Archibus SaaS / Maintenance / Workflow / Manage Service Level Agreements
Corrective Maintenance / Service Desk Manager / Manage Service Level Agreements
Preventive Maintenance / Service Desk Manager / Manage Service Level Agreements
Using the SLA Console (Manage Service Level Agreements)
The SLA Console (ab-bldgops-sla.axvw) simplifies choices for SLA creation. It enables you to:
- select workflow steps using a diagram of the workflow to simplify step selection
- create new SLAs by prefilling the form using the workflow or service level for an existing SLA that you have designated as a template
- create and maintain multiple SLAs at once if they have the same workflow and service levels
Access the SLA Console:
- Archibus SaaS / Maintenance / Define Workflow / Manage Service Level Agreements
- Maintenance / Corrective Maintenance / Service Desk Manager / Manage Service Level Agreements
-
Maintenance / Preventive Maintenance / Service Desk Manager / Manage Service Level Agreements
Note: As a Service Desk Manager, you might edit an SLA for which service requests have already been generated and are in process in the system. In this situation, the system will handle the in-process service requests according to the new rules that you define for the SLA governing these requests.
Note: Notice the SLA with a request type of SERVICE DESK – MAINTENANCE and an ordering sequence of 1. Since the system requires that all work requests it processes be matched to one SLA, the schema provides this SLA to serve as a “catch-all." If no other SLAs are defined or if a work request does not match with any other SLA, the system matches the work request to this SLA. Do not delete this SLA.
Note: All maintenance-related SLAs are created and managed with the SLA Console, accessed with the above tasks. SLAs for requests such as copying or new furniture are created and managed in Service Desk with the Workplace Services / Service Desk / Service Desk Manager / Manage Service Level Agreements (ab-helpdesk-sla-create-tabs.axvw) task. See Manage Service Level Agreements (Service Desk).
This topic has the following sections:
- Overview
- Two Methods for Working with the SLA Console
- Getting Started
- SLAs and the Archibus Cascading Update and Delete Feature
- See Also
Overview
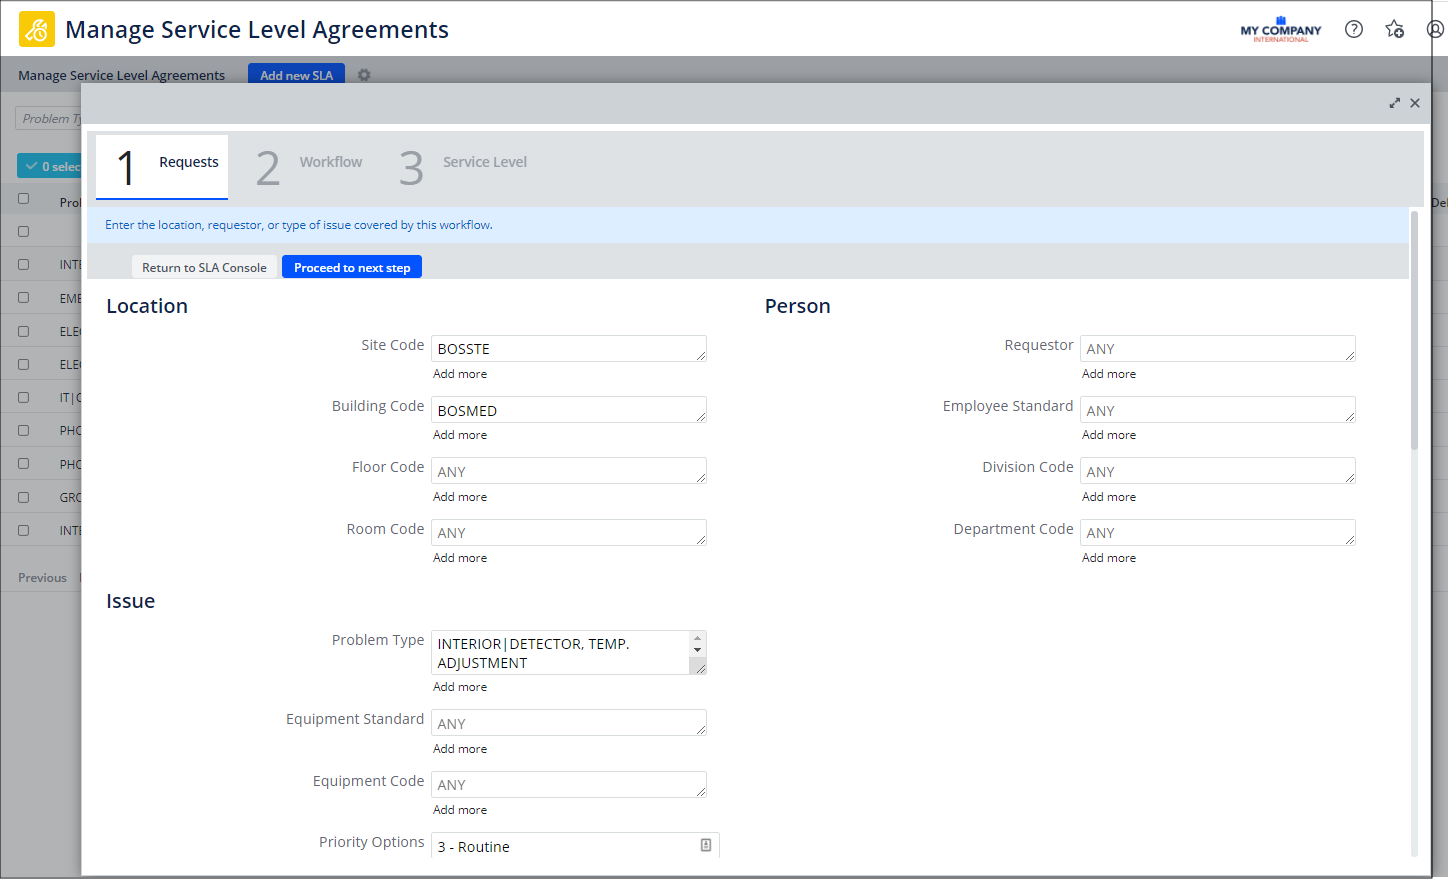
Using the SLA console, you define SLAs in three steps. As you work, a diagram that summarizes your selections appears at the bottom of the form.
- Requests. You define the location, the person requesting the work, and issue for the work governed by this SLA.
- Workflow. In this step, you define what actions should happen when the work has each status. For example, you define what should happen when the work is Requested, Approved, Assigned to a Work Order, Issued, Completed, and Closed. A dispatch step is always required, but optional steps define whether the work requires approval, verification, or the completion of a satisfaction survey, when and to whom notifications should be sent, and whether estimation or scheduling are required.
- Service Level. In this step, you define the requirements for the response by entering the service window start and end times, and the service desk manager. Optionally, you can enter the time to respond and time to complete the work and associate the work with a compliance contract.
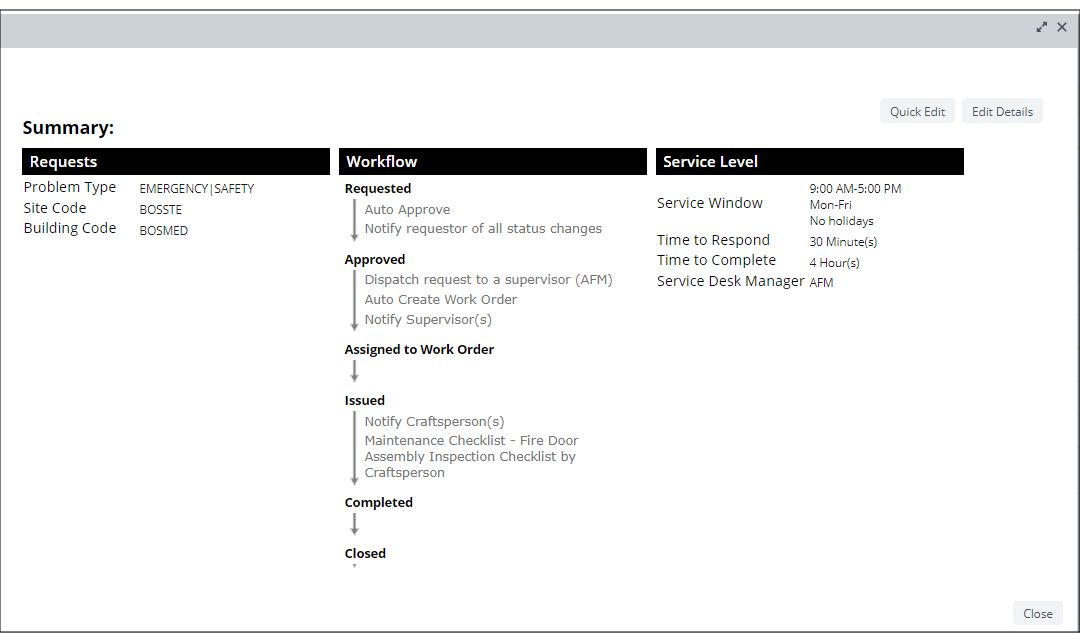
SLA Diagram
When creating a new SLA, the summary diagram appears at the bottom of the above form.
For an existing SLA, access the summary diagram by clicking on the Problem Type in the SLA Console. The diagram appears as a pop-up form; from here, you can access the Quick Edit or Edit Details features, described below.
Two Methods for Working with the SLA Console
The SLA Console offers two methods for working with SLA
Method 1: The SLA Wizard (Edit Details)
- select from all supported request parameters. This includes locations, requestor, division, department, or equipment assets.
- create SLAs that use different priority levels.
- create a workflow or service level that is not based on an existing template.
- prefill the workflow or service levels for the new SLA by selecting any workflow or service level that you have saved as a template.
To use this method:
- When editing an SLA, select it from the list and choose the Edit Details button to return to the complete SLA Console.
- When creating a new SLA, choose the Edit Details button on the resulting Add New SLA pop-up (shown in Method 2, below).
See:
- Using the SLA Console's SLA Wizard to Create Preventive Maintenance SLAs
- Using the SLA Console's SLA Wizard to Create Corrective Maintenance SLAs
Method 2: The Quick Edit Form
When you click Add New SLA from the Manage Service Level Agreements view, you first choose if it is Preventive Maintenance or Corrective Maintenance.
Next, you move to the Add New SLA form.
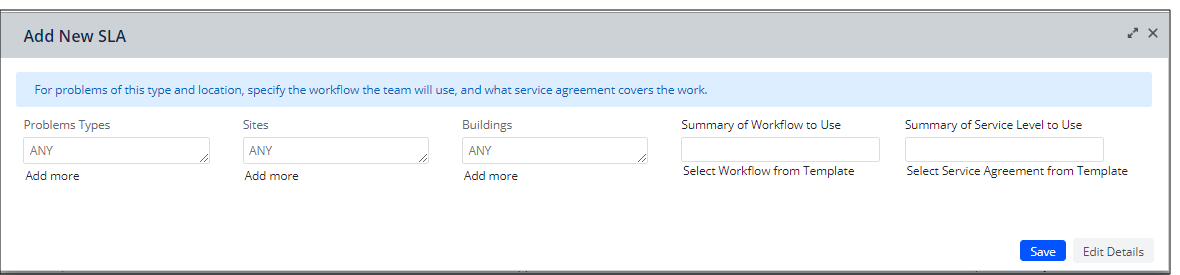
Using this simple quick action pop-up form, you can:
- create an SLA as long as the SLA you are defining uses only Problem Type and Locations for the Request parameters, and does not have multiple priorities.
- select the workflow and service level for the SLA from templates -- SLAs that you have created, and then saved their workflow or service levels as templates. This means you can use this pop-up form only if you have already saved at least one workflow and service level as a template. See Working with Templates.
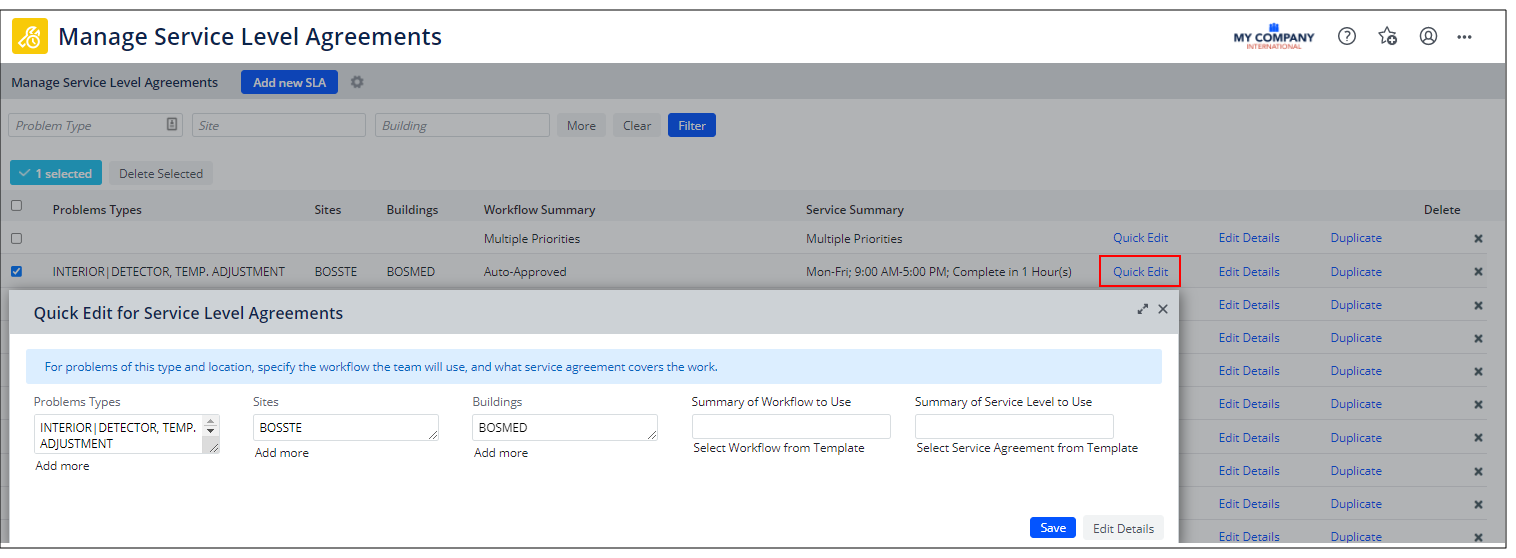
To use this method to edit an SLA:
- Select it from the list and choose the Quick Edit button to access the Quick Edit for Service Level Agreements form, shown below.
See:
- Use the SLA Console's Quick Edit Form to Add SLAs for Preventive Maintenance
- Use the SLA Console's Quick Edit Form to Add SLAs for Corrective Maintenance
Getting started
A good way to get started is to create a few basic SLAs using the SLA wizard, and save their workflows and service levels as templates.
Then, you can use either the quick action form or the SLA wizard to create SLAs that use a similar workflow and service level as these SLAs.
If the new SLA uses a different dispatch option than the workflow template you select, you can change the dispatch option right from the template selection form. This is handy as often the workflows for different SLAs vary only in their dispatch option.
Creating Multiple SLA at Once - Grouping
Do you have certain requests that you handle the same with the only variation being the problem type or location? For example, suppose in your workflow all requests for painting go to work team A, and require both approval and estimation, but these requests come in for different locations, and therefore require different SLAs. For these requests, you can create and manage the SLAs together. This is referred to as grouping. Grouping can be a good way to get started when you have a number of similar SLAs.
See Grouping SLAs.
SLAs and the Archibus cascading update and delete feature
The Archibus cascading update and delete feature protects date integrity when you delete a primary key that links to other records. In the case of SLAs, this means that if you delete a primary key value that exists as an SLA Request Parameter, then the whole SLA is deleted. This is because the request parameters are essential to the SLAs functioning. Here’s the list of fields that this applies to:
- bl_id
- dp_id
- dv_id
- em_std
- eq_id
- eq_std
- fl_id
- pmp_id
- prob_type
- requestor
- rm_id
- site_id
See Editing Primary Keys that Link to Other Tables.
See Also
Summary Topics
Preventive Maintenance
Corrective Maintenance
Detail Topics
Step 2: Add optional steps.
These steps are available for both Corrective Maintenance and Preventive Maintenance:
These steps are for Corrective Maintenance only:
Concept Topics