Archibus SaaS / Maintenance / Workflow / Manage Service Level Agreements
Corrective Maintenance / Service Desk Manager / Manage Service Level Agreements
Preventive Maintenance / Service Desk Manager / Manage Service Level Agreements
Setting Priority Levels for Corrective Maintenance and PM Work Requests
Optionally, a request can have a priority level, such as High, Medium, Low, Emergency, or Non-Emergency.
For each priority level, you can assign a unique set of response procedures. Thus, similar requests that vary in priority level can have entirely different responses, with different service providers, different approval routings, and so forth. For example, the SLA governing an installation request with a priority of Urgent can define a different workflow than does an SLA for a an installation request with a priority of Routine.
When a request is made from Workplace or mobile apps, the priority defaults to 1.
Preventive Maintenance Priority Levels
PM SLAs have a single priority; on the SLA Console, the Add Priority Option button does not appear for PM SLAs.
Ways to Use Priority Levels for Corrective Maintenance
There are a few ways to set up priority levels:
-
Choose not to work with priority levels. The user will not have a priority option on the Create Service Request form.
- For corrective work, allow the requestor to indicate the priority level on their request. In this case, you must use the Service Desk Manager / Define SLA Priorities task to define the various priority levels so that they appear on the requestor's form. When defining the SLA, from the Step 1 Request form, you select Client Choose Priority check box and you select Add Priority Option button to choose the priorities that should appear to the user.
- For corrective work, you can define multiple priorities and corresponding responses, setting one as the default priority. Priorities and default priorities are set with the Define SLA Priorities task.
- The requestor sees just the default priority and is not able to set a priority level when requesting work. However, a business manager reviewing the request can reset the priority level from the default to one of the other defined priorities, and thus set the corresponding response procedure. The business manager is able to make this change only when a request has a status of Requested and an Approval step has been defined. (All approval steps include the ability to edit.) See Adding an Approval Step for Work Requests.
To set this up, you enter the priorities and leave the Client Choose Priority box unselected.
For example, suppose two priorities ("urgent" and "routine") are defined, "routine" is the default priority, and the SLA is defined to route all service requests to a business manager for Approval (Edit and Approval). Suppose the business manager reviews a request and wants it immediately handled. In this case, the business manager can change the priority level to Urgent to activate the corresponding response procedure.
- The requestor sees just the default priority and is not able to set a priority level when requesting work. However, a business manager reviewing the request can reset the priority level from the default to one of the other defined priorities, and thus set the corresponding response procedure. The business manager is able to make this change only when a request has a status of Requested and an Approval step has been defined. (All approval steps include the ability to edit.) See Adding an Approval Step for Work Requests.
Procedure: Let the User Choose Priority
You define priorities as part of Step 1 - Request accessed by clicking Add New SLA, and then selecting Edit Details from the quick action pop-up form that appears.
To specify priorities:
- Prerequisite: Define priorities and indicated if they are the default priority with the Define SLA Priorities task. The values you set with this task are what you choose from in the Add Priority Option field, below.
- Access the Manage Service Level Agreements task, and on the Step 1 - Requests form, select Client Choose Priority and select the Add Priority Option button.
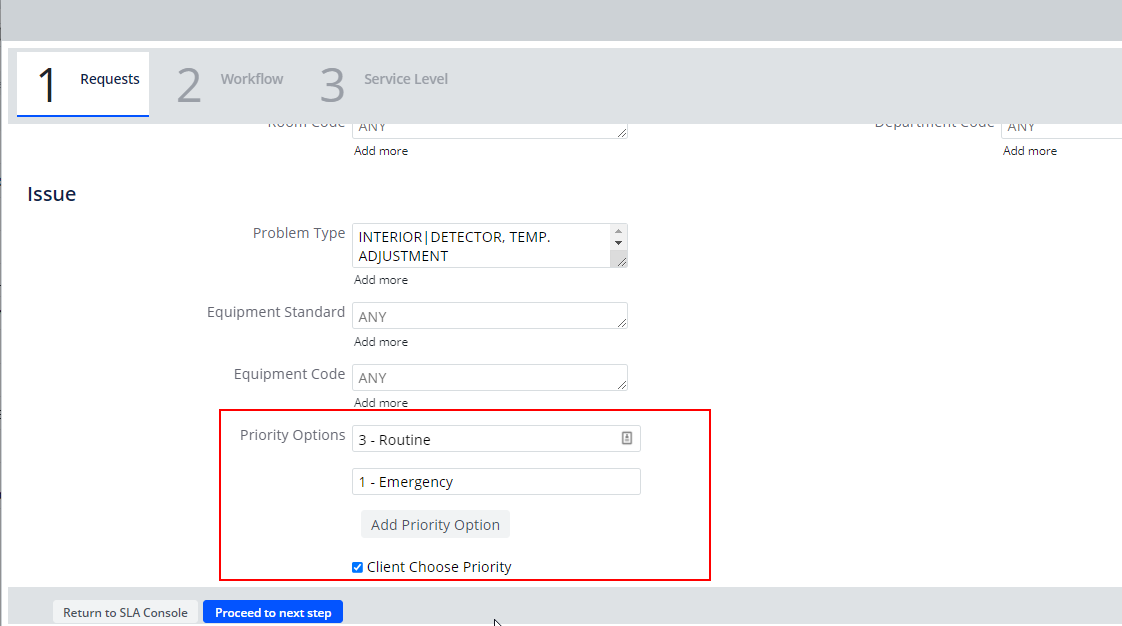
- Choose one of the existing priorities that you defined with the Define SLA Priorities task. Repeat for as many priorities you want to offer. For example, in the above image two priorities (Routine and Emergency) have been established. For each priority you add, you will establish a unique workflow.
- To enable the requestor to select a priority, select the Client Choose Priority check box. This means that the requestor will see all priorities and will be able to select one.
- Click Proceed to Next Step.
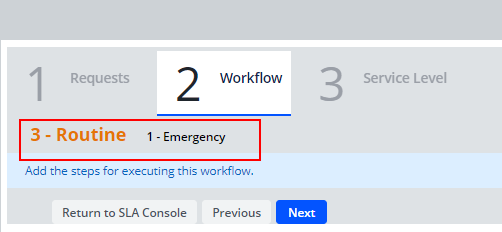
The Step 2 - Workflow step appears. When you define multiple priorities, the Step 2 - Workflow form will have a separate tab for each priority you added, so that you can define a different workflow for each for each priority.