Archibus SaaS / Maintenance / Define Workflow / Manage Service Level Agreements
Corrective Maintenance / SLA Console
Preventive Maintenance / SLA Console
Use the Quick Action Form to Add SLAs for Preventive Maintenance
Using the quick action pop-up form you create new SLAs by selecting the workflow and service levels select from existing SLAs that you have saved as templates. To add SLAs for preventive maintenance using the quick action pop-up form, you must have templates defined as using this quick action method, you select from templates to define the SLA's workflow and service levels. If you do not have templates defined, you must begin by defining an SLA using the SLA wizard.
For instruction to add an SLA using the SLA wizard, including instructions for saving the SLA as a template, see Defining PM SLAs using the SLA Console's SLA Wizard (Edit Details).
Note: The role of the Service Desk Manager in the Preventive Maintenance application is optional. If your site does not have specific craftspersons for a task, if you do not want to enforce escalations in the time that work should be completed, or if you do not have different supervisors and work teams for different PM procedures, then you do not need to set up service level agreements.
Note: Although both the Preventive Maintenance and Corrective Maintenance applications use SLAs, SLAs for preventive maintenance should be defined and edited using the tasks of the Preventive Maintenance application. Do not edit an SLA for preventive maintenance from the tasks of the Corrective Maintenance application.
Note: When you create SLAs from this task, the system will automatically assign the SLA a request type of Service Desk Maintenance and a Problem Type of Preventive-Maintenance.
Procedure
To add a new SLA (using the quick action pop-up form)
- Select the Manage Service Level Agreements task.
The Manage Service Level Agreement shows a list of the SLAs already defined.
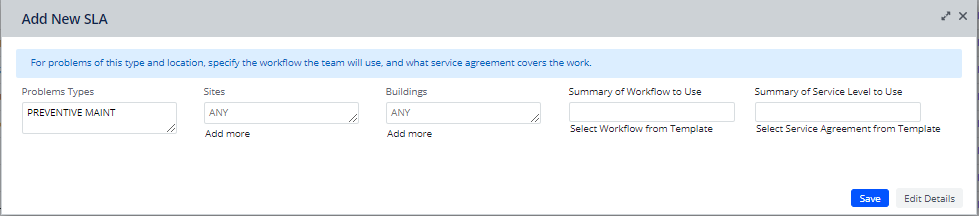
- Click Add New SLA, and select PM SLA from the submenu that appears.
The Add New SLA form appears. The Problem Type defaults to Preventive Maint, and this cannot be changed.
- To add location information for the SLA:
Note: You can select multiple locations. However, when selecting multiple request parameters, you should multi-select on only one part of a multi-part key, so that the restriction happens correctly. In other words, multi-select only sites, or only buildings, not buildings and sites. Otherwise, some erroneous combinations can occur.
- Click Add More under the Building field, select the buildings for the SLA from the Select Values - Building form, and click Save Selected. You can select multiple buildings if they all have the same workflow and service levels. See Creating Multiple SLAs at Once - Grouping.
The Add New SLA form now shows your selections. If the buildings are associated with sites, the sites are also shown in the form.
- Click Add More under the Building field, select the buildings for the SLA from the Select Values - Building form, and click Save Selected. You can select multiple buildings if they all have the same workflow and service levels. See Creating Multiple SLAs at Once - Grouping.
- To add a template for the workflow, follow these steps. For more information on templates, see Working with Templates.
- Select the Select Workflow from Template link under the Summary of Workflow to Use field.
The Select Template form appears.
- To select a template, click on it in the list.
- When you select a template, the option to 'Use this workflow with different Dispatch' appears.
- Optionally, to change the dispatch option, select the "Use this workflow with different Dispatch" check box. The dispatch options appear.
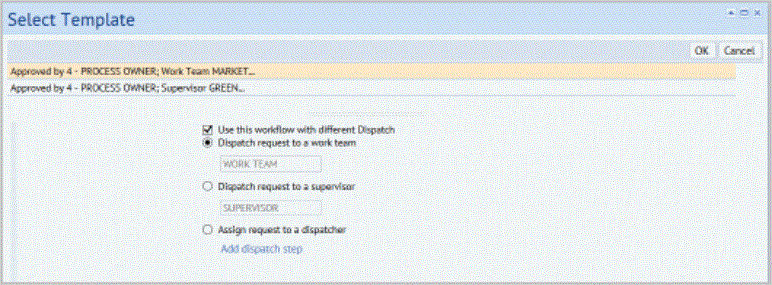
- Select one of the dispatch options shown: dispatch to a work team or supervisor.
Note: If the SLAs workflow has been set to Auto-issue the work or to Auto-assign it to a work order, then the dispatch to dispatcher option is not available.
- To dispatch to a work team or supervisor. After selecting the option you want to use, type in the field (Work Team or Supervisor) and make a selection from the list of values that match your typing. This list appears as you type. Alternately, you can mouse over the field for the selected option, click the Select Values button
 , and then select the work team or supervisor from the list. The Supervisor list shows the Craftsperson who have their Is Supervisor? field, set to Yes.
 - To use a dispatcher.
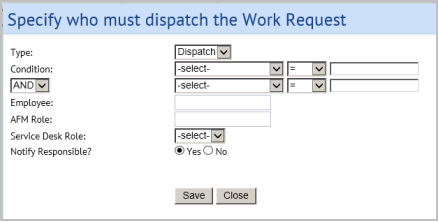
Click Add dispatch step. under the Assign Request to a dispatcher option on the Select Template form.
The Specify who must dispatch the Work Request form appears.
- Use the form to select either an employee or an AFM role as the person who will decide how to issue this work request.
Note: Do not set a condition for the Dispatch step. Because the dispatch is a required step, you should not make a condition that would potentially leave some work requests without a dispatch.
- Select Yes for Notify Responsible? if you want the dispatcher to receive an email when a request requires them to dispatch it.
- Click Save.
- Click OK in the Select Template form.
- To add a template for the service level:
- Select the Select Service Agreement from Template link under the Summary of Service Level to Use field.
The Select Template form appears.
- Select the service level from the list.
- A summary of the service level appears on the form.
- Click OK to use that service level.
- Select the Select Service Agreement from Template link under the Summary of Service Level to Use field.
- On the Add New SLA form, click Save.
A message appears if the application finds another SLA with the same information. In this case the SLA is not saved
Otherwise, the SLA is now added to the list of SLAs shown in the Manage Service Level Agreement task.
To change the dispatch option for the selected workflow. For information on dispatching, see The Dispatch Option for PM and Corrective Maintenance Requests.
Back to Manage Service Level Agreements (SLA Console)