Archibus SaaS / Maintenance / Maintenance Console
Corrective Maintenance / Maintenance Console
Preventive Maintenance / Maintenance Console
Maintenance Mobile App
Update Work Requests with Details from the Job
Taking the time to accurately record the hours, tools, parts, trades, and other costs for work requests helps you analyze the cost of work, your efficiency in managing work, and the resources required to accomplish it. The application uses the number of hours each craftsperson spent on the job and the craftsperson's hourly rate to calculate actual labor costs. These costs are summarized and shown for completed work in the Cost Analysis Dashboard.
Either craftspersons or supervisors can update work that is Issued and In Process with the hours and the number of parts and tools used. Once work requests are issued, you are entering actual numbers; you can review estimated or scheduled numbers, but at this point estimates cannot be entered or changed.
Procedures for updating work request details varies based on the tool you are using.
Note: As an alternative to the Maintenance mobile app, you can use the OnSite mobile app to manage work in the field.
| Task | Maintenance Console | Maintenance mobile app |
|---|---|---|
| Update "Issued and in Process" Work | Use the Update button. | Use the Craftspersons, Parts, Tools, Costs, and Documents buttons |
| Supervisor tasks | A supervisor can update the status for part estimates, directly change the status for a work request, and view the history of workflow steps for the request | Not available. |
| Enter new data | If data, such as a craftsperson or location has not been added to the system, you can add the craftsperson or location directly from the Console. It will be added to the work request, and also be available for future selection. | Not available. |
| Bulk update | Select the check boxes and use the appropriate buttons. | Tap the check marks for the work requests, and then tap Update from the check mark menu that appears once you select requests. |
Note: If a craftsperson or a supervisor enters Regular Hours on an Issued work request, and then a craftsperson returns that work request backwards in the workflow, no one is able to edit that Work Request Labor Assignment (WRCF) record, except to set the status to Complete. See Updating Work Requests and their Labor Assignments - Supervisors
Related topics
- Editing Request Parameters
- Approving and Rejecting Work Requests
- Work Logs
- For the benefits of entering specific information, see:
Select a work request from the Maintenance Console. The resulting Work Request form uses tabs and panels to organize the details for this request.
To work in a section of the Work Requests form, you expand the section by clicking its arrow . When the arrow points down, it displays the records. Click the arrow again to close the section and hide the records. When you expand a section, you can see all records and information that has already been added. Additionally, most sections offer Add or other buttons so you can enter additional information and perform actions. See Explore the Work Request form.
Tip: Alternately, you can review the number of part estimates that are "In Stock, Not Reserved" from the Alerts section of the default Home Page. Clicking on the alert brings you to the Reserve New Parts Inventory task. You can use the Reserve New Parts Inventory task to review all estimates for parts that are "In Stock, Not Reserved." Seeing all these estimates together can help you decide which estimates you want to reserve that part for.
Note: See step 11, below, for information on updating part estimates
Updating a single work request
- From the Maintenance Console, select the work request you want to update and click the Update button. Work requests that are Issued and in Process have the Update button. You can also update Completed work requests by clicking on them. (The Completed status does not offer an Update button, but you can still edit and add information.)
When you save the forms, Archibus summarizes the Actual Costs and Estimated Costs using the information you entered.
Use the tabs and expandable lists of the resulting Work Request form to add and edit information.
- Location, Problem, and Request Details. In the Overview tab, expand the Location, Problem, and Request Details section. If any of the basic information about the work request has changed, you can edit the appropriate fields. Note that many fields are not editable. You can edit these fields:
Field Description Status If needed, you can change the Status from this form, rather than using the Console's action buttons, such as the Issue button. Only statuses appropriate for the selected work request are available to choose Cause Type Select the cause of the problem the work is addressing. The list of available causes is defined using the Define Cause Types task.
Specifying a cause enables you to analyze causes using the Archived Work Requests by Cause Type report
Craftsperson Notes The craftsperson can enter any notes and special circumstances about the job in this field. 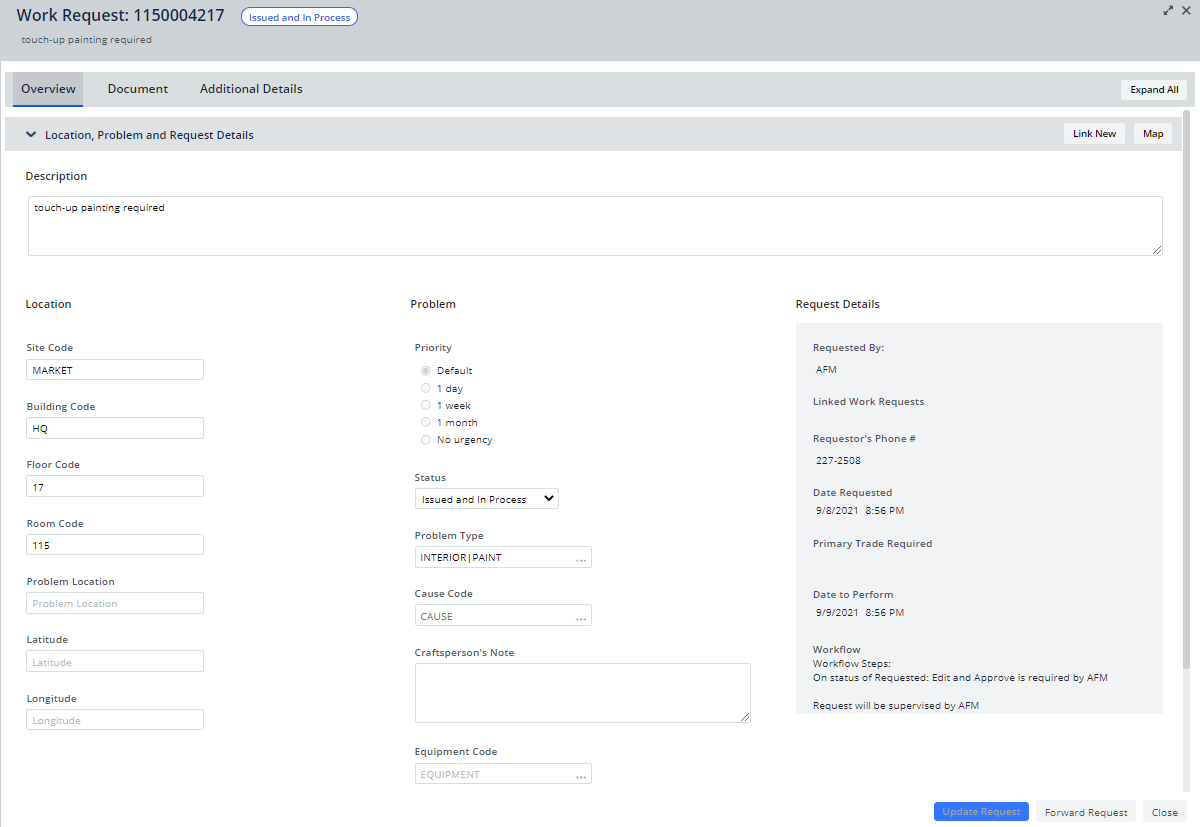
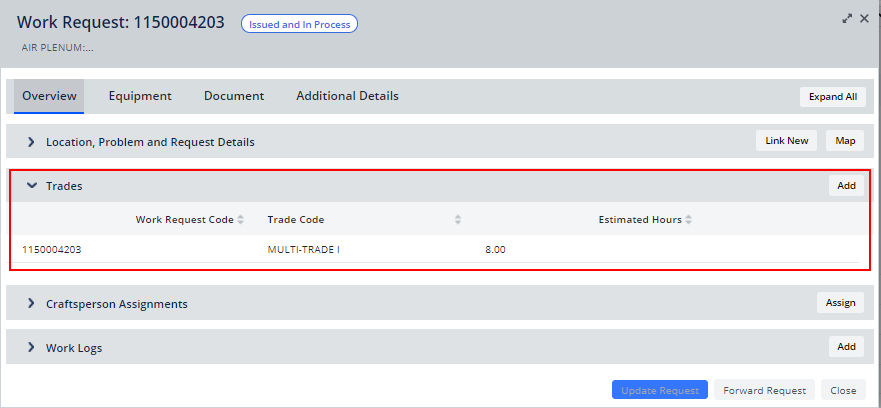
- Trades: In the Overview tab, expand the Trades section. You can edit the existing assigned trades, or click Add to add a trade. Trade information is typically added when estimating work before making a specific craftsperson assignment, but you can add it now if needed. Trades are used to calculate costs if you do not assign a craftsperson to the work. When craftspersons are assigned to the work, Archibus uses their hourly rate to calculate costs.
-
Craftsperson Assignments. In the Overview tab, expand the Craftsperson Assignments section. You can edit the existing craftsperson assignments, or assign a new craftsperson using the Assign button. If you are adding a craftsperson to an Issued work order, the assignment will automatically be set to Unscheduled.
- Work Logs: In the Overview tab, expand the Work Logs section to see the current list of work logs (recorded hours for a craftsperson). You can edit existing work logs, or add new work logs. For information on work logs, see Work Logs (Concept).
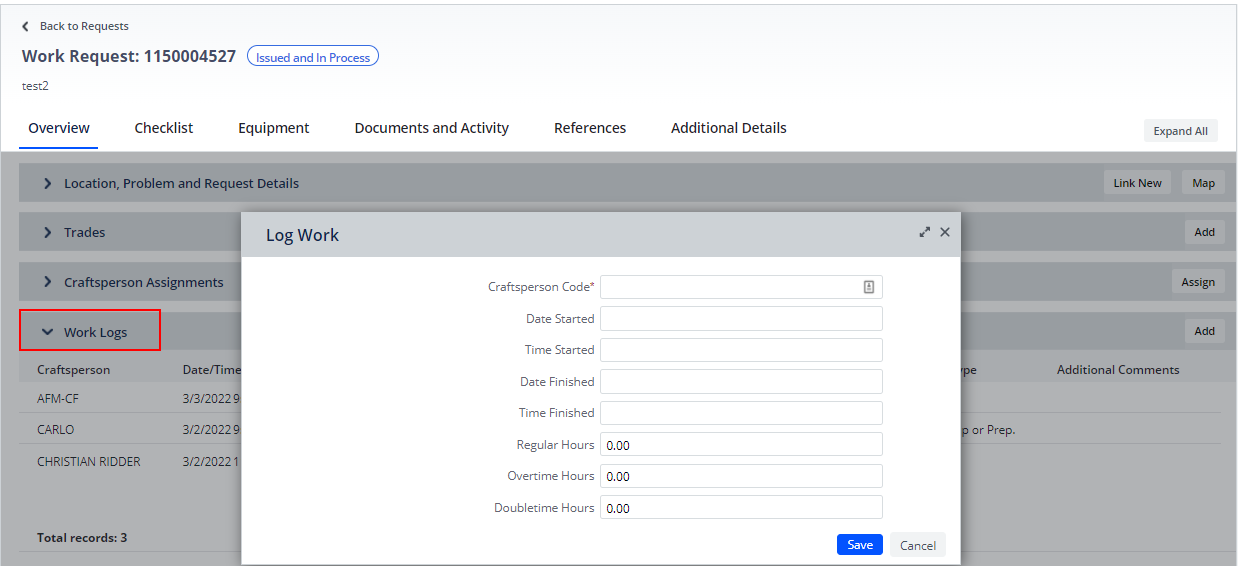
Complete the Log Work form as follows: - Tools In the Additional Details tab, expand the Tools section to review current tools or add a new tool.
| Field | Description |
|---|---|
| Trade Code | Select the trade that is needed for this work |
| Estimated Hours | Enter the number of hours you estimate this work will take |
| Field | Description |
|---|---|
| Craftsperson Code | Choose from the validating list. If the craftsperson is not entered into the system and is not available in the list, you can add them from the Select Value Craftsperson form |
| Estimated Hours | Enter the number of hours that you estimate the craftsperson will work on this job. Note that you can only add this information if the work request does not yet have a status of "Issued and in Process", or later |
| Work Type | Chose a value from the list, such as Unspecified, Work, Travel Time. This helps you quantify the work. |
| Assignment Status |
Choose from Active, Completed, Returned. Supposed a job required an additional craftsperson not originally scheduled for the job. If you are updating the work request after the job is completed and adding a craftsperson's work on the job at this point, enter Complete. |
| Comment | Enter an optional comment if desired. |
| Field | Description |
|---|---|
| Craftsperson Code |
Choose the Craftsperson for which you are logging hours. If you want to add a work log for a craftsperson not assigned to the work order, you should assign the craftsperson to the work request. For example, suppose additional work is required for job and the supervisor enters the additional work as a work log; the supervisor should also assign the craftsperson the work request. |
| Regular Hours | The number of hours spent at standard rate on this job. |
| Doubletime Hours | If any of the worked hours are double time hours, enter them here. |
| Overtime Hours | If any of the worked hours are overtime hours, enter them here |
|
Date Started/Finished Time Started/Finished |
If you want to record when the work was completed, enter these fields. These fields are for your reference Note that you still need to enter Regular Hours; the system does not complete Regular Hours based on the values of these fields. Sites that integrate the Maintnenace mobile app into their workflow might find that these fields are completed with the |
| Work Type | You can associate a work type (travel, work, waiting) for each log you make. For example, if you spent 1 hour traveling, you can enter a log with this value and then enter another work log documenting the hours worked |
| Assignment Status | For each log, choose from Active, Completed, Returned. |
| Field | Description |
|---|---|
| Tool Code | Select the tool |
| Date Scheduled Time Scheduled |
These fields are completed with the current system date and time, but you can enter your own values. |
|
Date/Time Started Date/Time Finished Straight-time Hours Used |
Record the actual time the tool was used |
Note: From the Tools Type section he Additional Details tab, you can review any tool types associated with the procedures defined in Service Level Agreements for Preventive Maintenance work requests. Any costs associated with these tool types are included in the Other Costs section of the screen. See Reviewing Tool Type Information.
-
Equipment. If the work request pertains to an equipment item, the Work Request form includes the Equipment tab listing basic information about the equipment item. If a warranty is defined for the equipment item, warranty information is also listed. Most of the fields are read-only and provide basic information about the equipment item. You can edit these fields:
Field Description Equipment Down (Hours) The amount of time the equipment item was unavailable because it was being serviced Equipment Status As part of working on this request, you might need to take the equipment item offline and set a status of In Repair, Out of Service, or o Be Disposed. Equipment Condition As part of working on this request, you might notice that the condition of the equipment has changed or deteriorated. Use this field to record the current condition of the equipment. Current Equipment meter reading If you are generating preventive maintenance based on the equipment's meter reading, enter the meter reading here. Archibus will calculate when the next preventive maintenance should be performed based on the schedule entered for the preventive maintenance and the reading you enter 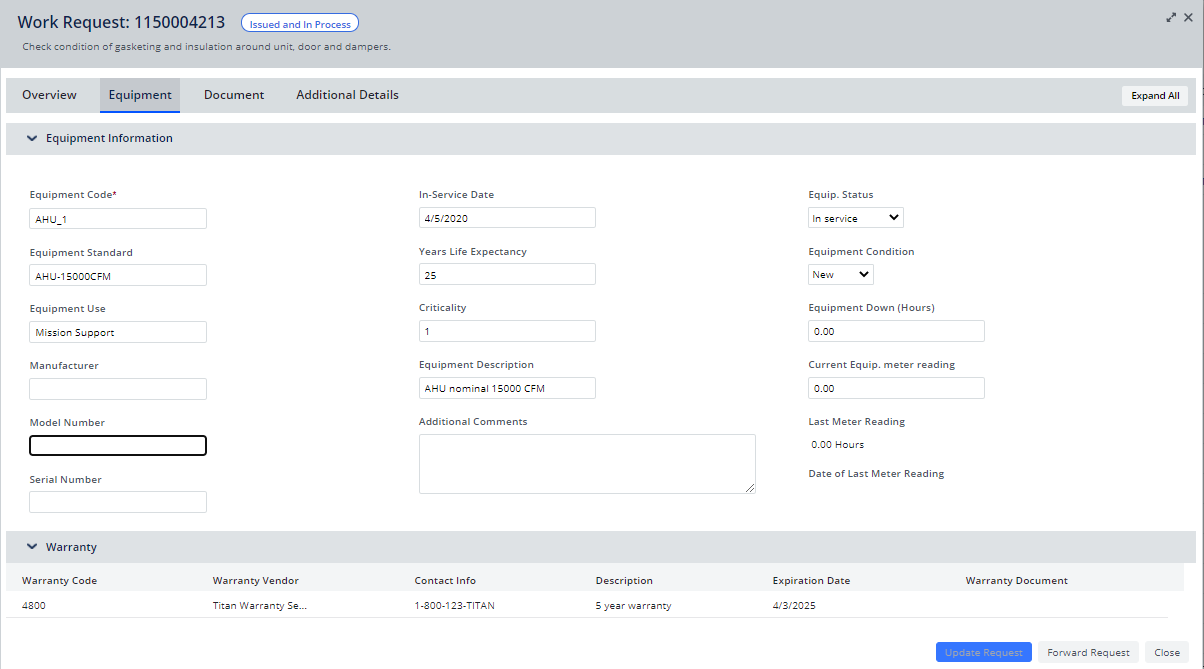
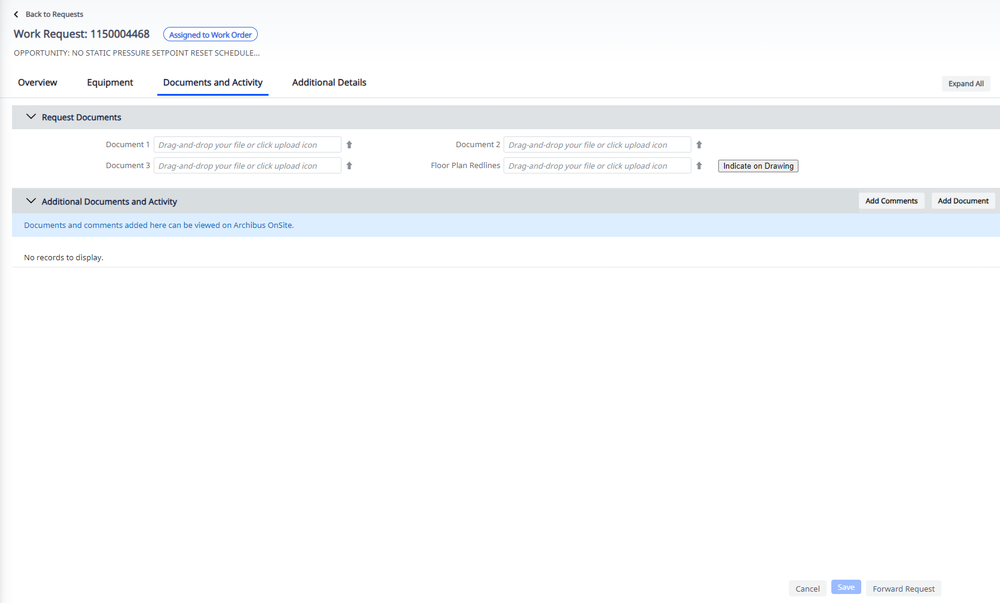
- Documents and Activity. In the Documents and Activity tab you can upload an unlimited number of documents pertaining to the work request as well as enter comments.
For example, you can draw redlines on a floor plan drawing to indicate the exact location of a problem. Or, you might take a photo to show completed work. The tab lists these items, as well as all status changes that the work request goes through.
When entering comments, you can tag colleagues, who will then receive an email notification with your comment.
The comments, documents, and status changes appear in the tab's maintenance activity log.
See Documents and Activity tab for details.
- In addition to documents that appear on this tab, your work request might also have linked reference documents that are associated with a work request's Equipment, Problem Type or PM Procedure. Review reference documents from the References tab. You can also review documents affiliated with an equipment item from the Equipment tab's Equipment Documents section.
- Other Costs In the Additional Details tab, expand the Other Cost section.
In addition to labor, part, and tool costs, you may need to record additional costs for executing the work request, such as the cost of a building permit, costs of items that you have not tracked above, one-time expenses, and so forth. Taking the time to track and enter these additional costs will enable you to more accurately determine the overall cost of the job.
The Inventory Manager should define the Other Resource Types used to categorize these other costs. See Defining Other Resource Types for Work Costs. -
Account Information. In the Additional Information tab, expand the Account Information section. This section holds fields that you might use to track the work request.
- Parts: In the Additional Information tab, expand the Parts section and add or edit parts.
Field Description Part Code Select the Part from your parts inventory. If you are using the feature to store parts in multiple locations, you select both a part and a location to indicate the parts used Quantity Estimated If work has not yet begun, enter the amount of the part you estimate will be needed.
Quantity Actual When work is completed, enter the actual number of parts used Reserve After saving the part, the Parts section includes the read-only Part Status, so you know whether the parts for that estimate are "Reserved", In Stock, Not Reserved, or "Not In Stock."Part estimates might be assigned the status "In Stock, Not Reserved" when there is not sufficient quantity available for all work needing this part.
When the part Status is "In Stock, Not Reserved" Archibus presents Reserve button. If a part estimate has this status, this means that there are enough parts available to satisfy this estimate, but not enough parts to satisfy all work needing this part. Click Reserve if you want to allocate the parts to this estimate.

| Field | Description |
|---|---|
| Other Resource Type | Select the type of resource that this cost represents, such as administration |
| Other Resource Description | Enter a description for this cost |
| Quantity Used: / Units | Enter this information if it applies to this cost type |
| Estimated Cost | Enter the estimated cost. Because the cost per unit is not stored for this item, you must enter the cost in order to save this value |
| Actual Cost | Enter the actual cost once the work is completed. Because the cost per unit is not stored for this cost, you must enter the actual cost in order to save this value |
| Field | Description |
|---|---|
| Account Code | In managing your facility, you may need to establish account information so that costs can be charged to accounts, rather than to divisions or departments. For example, suppose your company needs to track the maintenance costs related to an expansion project involving many divisions in the company. To charge the costs to the project's budget, you need to establish an account for the project. See Defining Accounts |
|
Division Code
|
You can complete these fields with the division and department assigned to the room or equipment item being serviced. |
| Repair Type | Select the type of repair, such as Repaired, Rebuilt, or Replaced. You can define the repair types using the Define Repair Types task. You can analyze repair types using the Archived Work Requests by Repair Type report |
Procedure: Updating multiple requests at once
From the Maintenance Console grid, you can select multiple work requests having the same status and then update them in one operation using the Update button beneath the filter. When working with multiple requests, you will apply changes to all selected requests. For example, you might want to add the same work log or tool to multiple work requests. Note that not all work request details can be added to multiple work requests at one time.
-
For work requests of the same status and for which you want to complete the same details, select their checkboxes.
-
Choose Update.
-
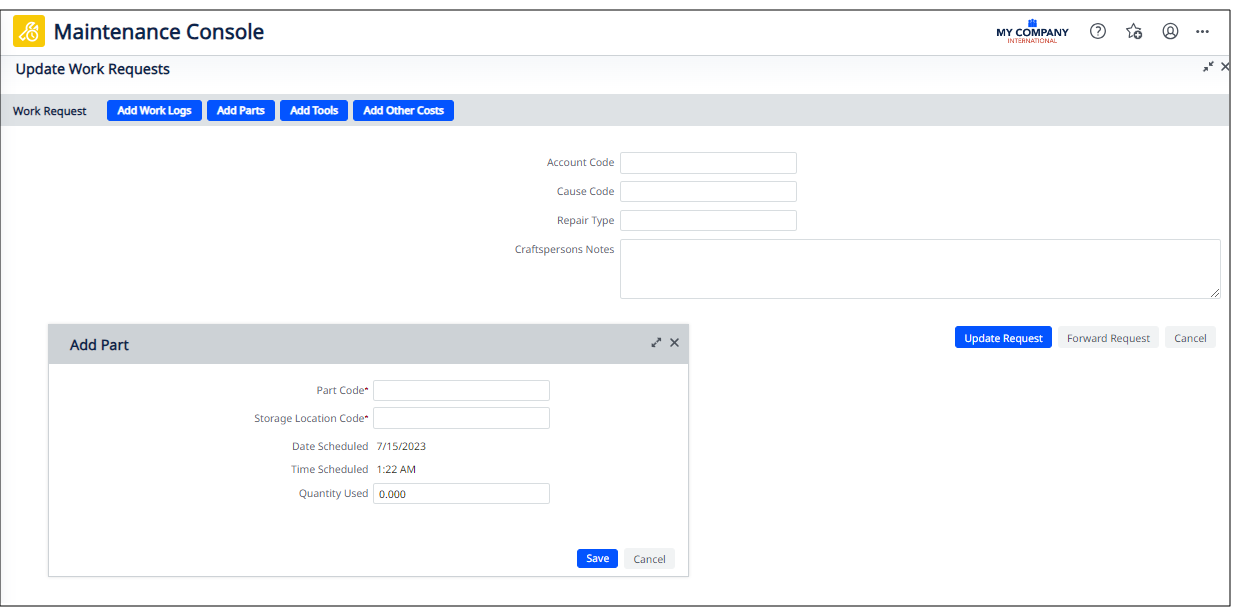
You receive the below Update Work Requests form for editing common information and adding new work logs, parts, tools, and costs. Note that the form presents any common values for the selected work requests in its fields. If the values for the fields in the selected work requests are not the same, the form presents <VARIES>.
-
If the values for any of the work requests are the same for all work requests, complete the form's fields. For example, if all selected work requests have the same Repair Type, complete this field.
-
Select the "Add" buttons at the top of the form to add elements (craftspersons, parts, tools, costs) common to the selected set of work requests. For example, the below form shows adding a part to a selected set of work requests. The buttons will present forms similar to those described above.
About adding work log information for multiple requests at once
When adding a work log to multiple requests, follow these guidelines to record the hours worked:
- Option 1: In the Regular Hours, Doubletime Hours, and Overtime Hours fields, enter the hours worked on each work request, and select "Add this time to each work request.".
- Option 2: Or, complete these fields with the total hours for all the selected work requests, and select "Divide this time evenly among all work requests."
- If needed, enter the Date/Time Started, and the Date/Time Finished. These values are informational; they do not automatically update the Regular Hours field.
When adding information for a craftsperson, the system checks to see if there is an existing labor assignment record for the craftsperson for the work request. If so, the existing record is updated with the values that you enter in the Add Craftsperson form. A new record is not created unless you update values that are already in the existing record. In that case, a new Work Request Labor Assignment (WRCF) record is created with the updated value. Basically, the system uses an existing Work Request Labor Assignments (WRCF) record, but only does so if it can apply all the populated values from the bulk update form.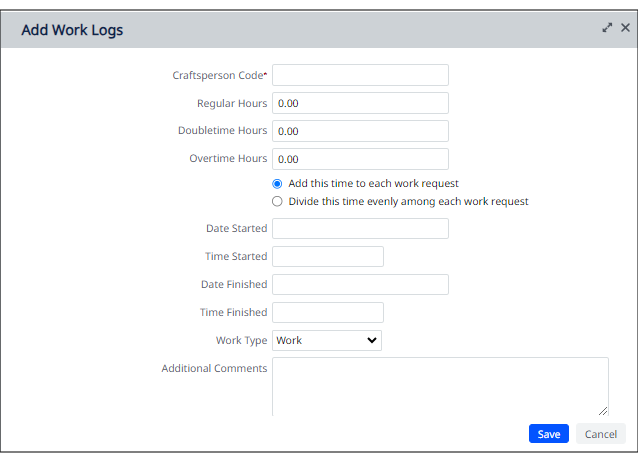
For example, for an existing record that has the Regular Hours field already populated:
- If you only update the Time Started field in the bulk update form, since that field is blank for the existing record, the system updates the existing Work Request Labor Assignment record by adding the Time Started.
- If, for this same record, you enter the Time Started and update the existing Regular Hours field, the system creates a new record, with the Time Started and the new value for the Regular Hours field. The Time Started field will stay empty for the first Work Request Labor Assignment (WRCF) record (that record is not populated.).
- If there are multiple existing Work Request Labor Assignment records for a work request, you would most likely edit the values manually to avoid creating more records and to ensure that the WRCF data is correct.
It can be very useful to give craftspersons the ability to update the Archibus system with details about the job. While at a job site, craftspersons will find it convenient to access and update the Archibus maintenance system directly from their smart phone or other mobile device using the Archibus Maintenance mobile app.
For example, craftspersons can access the Archibus system to put a job on hold, record the hours spent on the job, enter notes about how they resolved the problem, enter the parts used on the job, and so forth.
With the Maintenance mobile app, users at job sites do not need to use a laptop or tablet connected to the network in order to access and update maintenance information; instead, they can periodically sync their mobile devices with the server to upload the data that they record in the field, as well as download any changes from the Archibus server. See the Maintenance Mobile App: Craftsperson.
Either supervisors or craftspersons can update work using the Maintenance mobile app. You can update work from either the My Work screen or the Issued screen.
| Craftspersons |
Put a job on hold, record the hours spent on the job, specify the work type (for example, setup and prep, or material pickup), enter notes about how they resolved the problem, enter the parts or tools used on the job, and so forth. Craftspersons can make these updates either while the job is in process, or when it is finished and before they run the Complete action. Once a craftsperson runs the Complete action and syncs their device, the Completed work is removed from their queue. |
| Supervisors |
Work from the Issued screen or the My Work screen (for work assigned to them), supervisors can add new craftspersons, parts, tools or other costs. Once supervisors have marked the work as Completed and then synced their device, the Completed work is removed from the Issued group. It is now in the Completed group. From the Completed screen, supervisors can make further updates if needed before running the Close action. After closing the work request, no new information can be added. |
Update with details from the job
Updates can be done from the Issued screen, and from the My Work screen when you are updating work assigned to yourself. Tap on the work request to access the Update screen. The Update screen includes the buttons to edit the craftspersons, parts, costs, and tools associated with the work request, as well as add new ones. When craftspersons or supervisors sync the device, all cost information (labor, parts, documents, and other costs) is uploaded to the Archibus database.
Tip: When working from the Maintenance mobile app, you cannot remove resources (craftspersons, tools, parts, other costs) once they have been added. However, you can set the quantity of a resource to 0 (for example, set the craftsperson's estimated hours to 0, or set the quantity used for a part to 0) if you no longer need that resource.
Note: For supervisors: If craftspersons were not originally scheduled for the job, or if additional craftspersons are needed, only supervisors can add this additional labor by selecting from the list of craftspersons entered into the system.
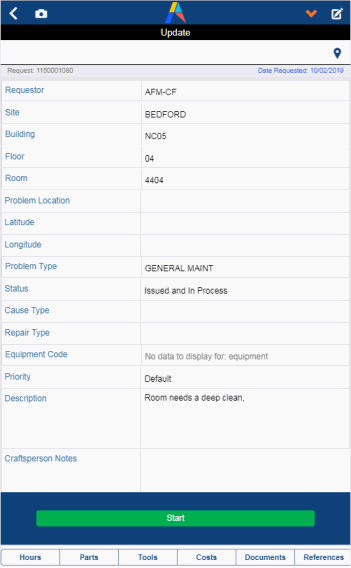
| Button | Description |
|---|---|
| Documents | Review any photos or floor plan drawings attached to the work request. You can add redlines and text to a photos or floor plan to further describe where the problem is. See Redlining Floor Plans and Images |
| Costs | If the job entails other costs that are not related to labor and parts--such as the cost of a permit--craftspersons or supervisors can record these by using the Costs screen. You can add multiple other costs using different resource types |
| Parts | As you use parts to address this issue, you can tap the Parts button to move to the Parts screen. Here, you can scan the parts inventory to locate the necessary part, and record the number of parts used. If you are using the feature to store parts in multiple locations, you select both the part and its location when entering parts used |
| Tools | Assign tools and record the date and time the tool is scheduled for. Craftspersons can use the timer feature to record how long they use the tool: click Start to begin recording the time; click End when you stop using the tool. The mobile app automatically records the Straight time hours used based on this start and end time |
| Hours |
When the job is completed, you can tap the Hours button at the bottom of the screen. Use the resulting Hours form to review
the craftsperson's worked hours. If craftspersons have used the mobile app's timer, they can verify the hours and distribute them between Regular
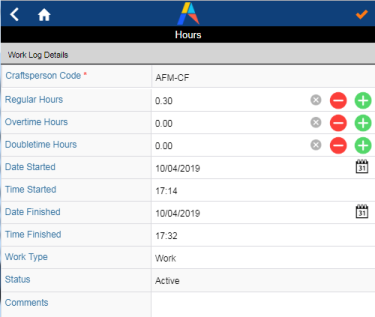
Hours, Overtime Hours, and Doubletime Hours. For example, the below image shows that AFM-CF used the timer to log work on this job, and the system entered the values in the Time Start/Time End fields. The system updated the Regular Hours field with this information.
Suppose the craftsperson knows that they worked on the job for 15 minutes before starting the timer. They could edit the Start Time value and the Regular Hours value to reflect these 15 minutes. Note that if the craftsperson manually edits Start Time, the Regular Hours field does not update with a new value; Regular Hours must be manually edited as well. In order to enter Regular Hours, the Craftsperson must have a Work Log to edit. Therefore, if they prefer to not use the timer but simply edit Regular Hours, they must minimally start the timer to generate a Work Log record to edit. They can then enter Regular Hours. |
Bulk updating from the Maintenance mobile app
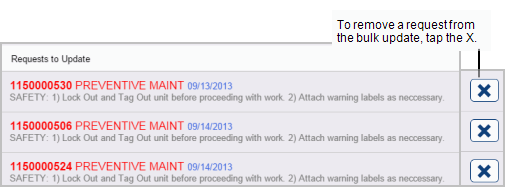
You can bulk update work by tapping the check marks for the work requests, and then tapping Update from the check mark menu that appears once you select requests. You can bulk update work as long as you are adding the same information for all the selected requests.
After tapping Update from the menu, the Assign Craftsperson form appears. From here, you can assign the same craftsperson to all the requests you selected. Use the buttons at the bottom of the screen to bulk update parts, tools, costs, and documents.
The Requests to Update section at the bottom of the screen reminds you of the requests you have selected. You can remove a work request from the update by tapping the X in its row.
Back to
Working from the Maintenance Console or from the Maintenance Mobile App: Overview
