Archibus SaaS / Leases / Lease Portfolio
Real Property / Leases / Lease Portfolio
Lease Portfolio Console
Working from the Lease Portfolio Console (ab-repm-addedit-lease-details-console.axvw), you can manage all aspects of a lease, whether you are managing leases as the landlord or as the tenant. You can also create new leases and all their details.
The Lease Portfolio Console combines features of several other tasks, such as the Portfolio Edit Wizard.
When you first load the view, you can:
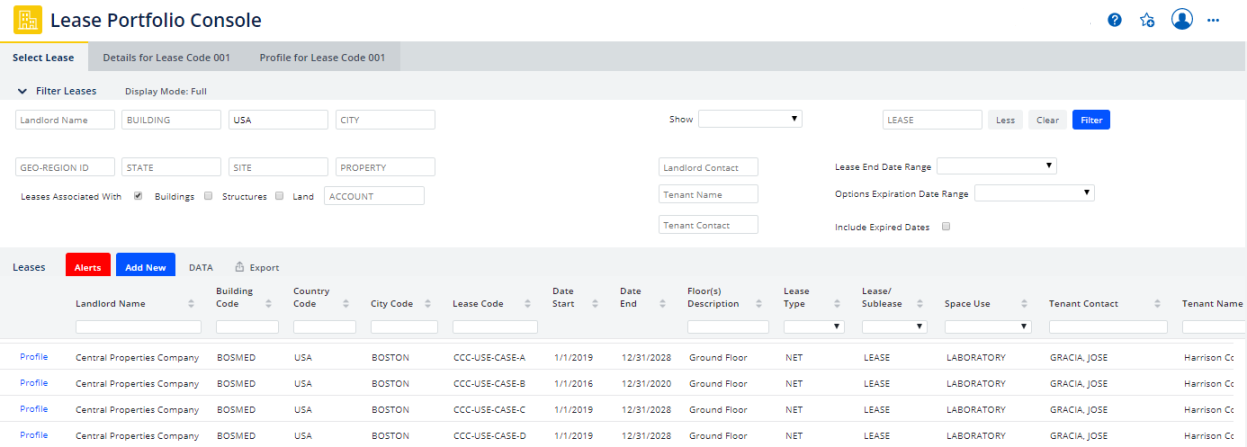
- use the expandable filter that enables you to quickly locate the leases that need your attention.
- check the alerts for all leases. The Alerts button provides a list of leases and options that are close to expiring.
- use the Add New button to create a new lease and all of its details
- import or export lease data using the Data Transfer and Export buttons.
- select a lease to review or edit.
- set the display mode (described below), which controls the interface of the Lease Portfolio Console.
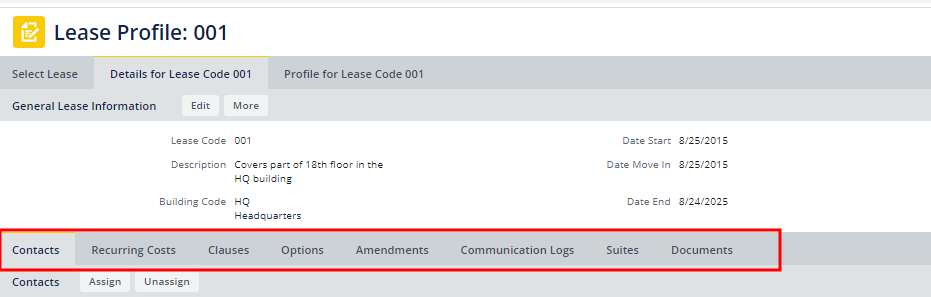
Once you select a lease on the first tab, the Lease Portfolio Console presents the following lease information so that you can review and edit it. If you are using the multi-tab mode, simply click on each tab to access the information and buttons for editing and creating new records.
- general lease information
- contacts
- recurring costs and cost profiles
- clauses
- options
- amendments
- communication log items
- suite assignments
- documents
- lease classification information and the Lease Classification Wizard (if you have a license for the Archibus Extension for Lease Accounting)
Note: With the exception of lease classifications, cost profiles, and communication logs, all of the above items can also be edited and created using the Portfolio Edit Wizard. Therefore, the Lease Portfolio Console and Portfolio Edit Wizard share many of the same help topics. For information on the Portfolio Edit Wizard and other tools for developing and editing lease data, see Overview of Tasks for Editing Leases. Note that th
The format in which the Lease Portfolio Console displays the selected lease depends upon the Display Mode that you select on the Select Lease tab.
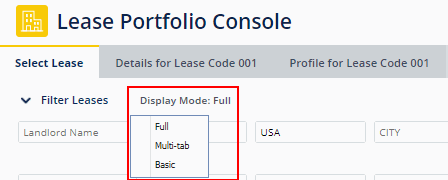
The display modes are:
| Display Mode | Description |
|---|---|
| Multi-tab |
To work with each type of lease information in its own tab. For example, clauses and options are each in their own tab.
|
| Full | To work with all lease information in a single form with multiple sections. Scroll down through the form to access all information. |
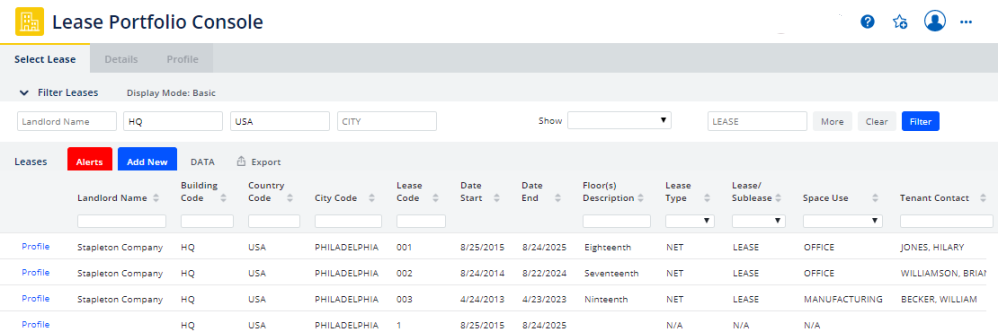
| Basic | To work with only contacts and recurring costs (base rents). |
You may have lease data from the landlord that you want to import. For example, new users migrating from other systems might want to quickly import lease abstracts to get started with Archibus. Likewise, a landlord may want to export lease records to share with a tenant.
Use the DATA and Export buttons, located next to the Add New button, to transfer your lease data.
When exporting, you can choose between Exporting to XLS (the Export button) or using Data Transfer's Export features. The two methods export different sets of data, so choose the method appropriate to your needs. See:
Note: The other tools for editing leases, such as the Portfolio Edit Wizard, do not provide the ability to export and import data. See Overview of Tasks for Editing Leases.
The Filter console enables you to search by such criteria as landlord, location, or by a specific Lease Code. The More button expands the filter to include additional fields, as shown below.
Complete the fields in the filter console to make your selections and then click Filter. The Lease Portfolio Console will list leases meeting your criteria. 
Note the predefined filters, available from the Show button.
| Filter | Shows |
|---|---|
| Leases Overdue | Leases where the Date End has passed. |
| Leases Expiring | Leases expiring within 60 days of the current date. |
| Options Expiring | Leases that have an option that has a Date End within 60 days of the current date. |
| Rent escalations | Leases which are scheduled within the next sixty days to have their base rent recalculated using a price index. |
| Active Alerts | Leases or options that have a Date End within 60 days of the current date. |
| 10 newest leases | The ten leases with the most recent Date Start. |
Note the date range options:
- Lease and option expiration date range. These predefined filters (such as leases coming due next month) enable you to locate leases that most need your attention.
- Include Expired Dates
- After you optionally set a filter, from the Select Lease tab locate the lease you want to work with.
- In the list of Leases, click the desired lease. For example, in the below image, the user has searched on leases for building HQ and can now select one by clicking on it in the list.
- You next move to the Lease Details tab, which displays the lease information in a series of tabs, or in one vertical scrollable form depending on your selected display mode.
If you want to access a report of your lease, choose the Profile button instead of selecting the lease. The console displays the Lease Profile report in the Lease Profile tab.
From the Select Lease tab, click the Add New button. This is located at the top of the console just below the Filter.
The Add Lease Information form appears. See Enter Basic Lease Information for a description of the information you can enter.
Once you create the basic information in the Add Lease Information form, the console returns you to the Lease Details tab so that you can enter the remaining details, such as costs, options, clauses, and amendments, as discussed below.
When adding a new lease, you can create a new building directly from the Add New Lease form. This speeds entering initial portfolios because you do not need to jump between the Define Locations form and the Add New Lease form to create new buildings and then create the leases.
You can Save and Add another lease without leaving the Add New form. This speeds up entering many Lease records.
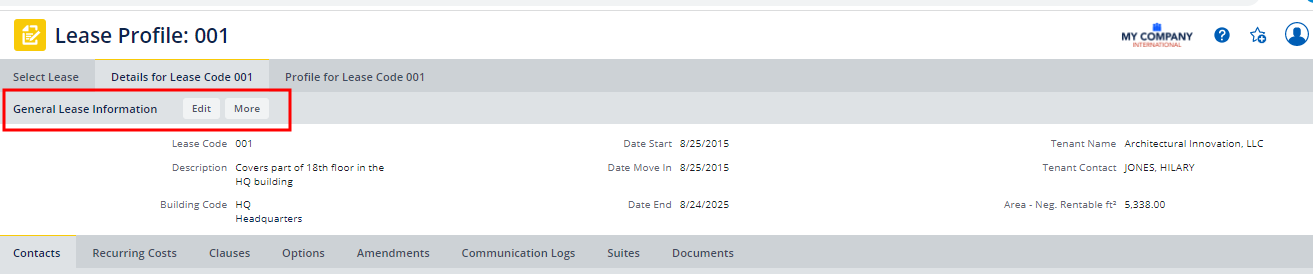
After you select a lease, the General Lease Information appears at the top of the Lease Details tab. This is handy for checking basic lease information no matter which tab or panel you are viewing.
- Click More to see the complete set of basic information.
- Click Edit to access a pop-up form for editing basic lease information.
- To review and edit other details about the lease, move to the various tabs or panels of the Lease Details tab. These are described below.
Use the Contacts tab or panel to assign existing contacts to a lease, and to add new contacts if needed. For a description of the information you can enter for a lease, see Adding Contacts.
- These contacts are stored in the Contacts table.
- When you assign these contacts to a lease, the assignment is stored in the Lease Contacts table.
- Adding contacts in this way enables you to add the most complete contact information, and to add this same contact record to multiple leases.
- The Contact Type designates the role the contact has for this lease. You can add a Landlord and a Tenant Contact for leases from the Contacts tab, as well as other types of secondary contacts, such as Building Superintendent or Property Manager.
Note: You can also add Landlord and Tenant Contacts when adding lease information. These contacts are stored in the Leases table, and are shown in key reports, such as Lease Details, Lease Abstract, and Leases by Landlord or Tenant Name. It is a best practice to add Landlord and Tenant Contacts as part of the lease record (Add New lease action), and also as Contacts in the Contacts table (Add New Contact action). For more information, see Enter Contacts.
Note: If you are upgrading from a pre-21.3 release and you have entered landlord and tenant contacts in the Leases table, see Updating legacy data.
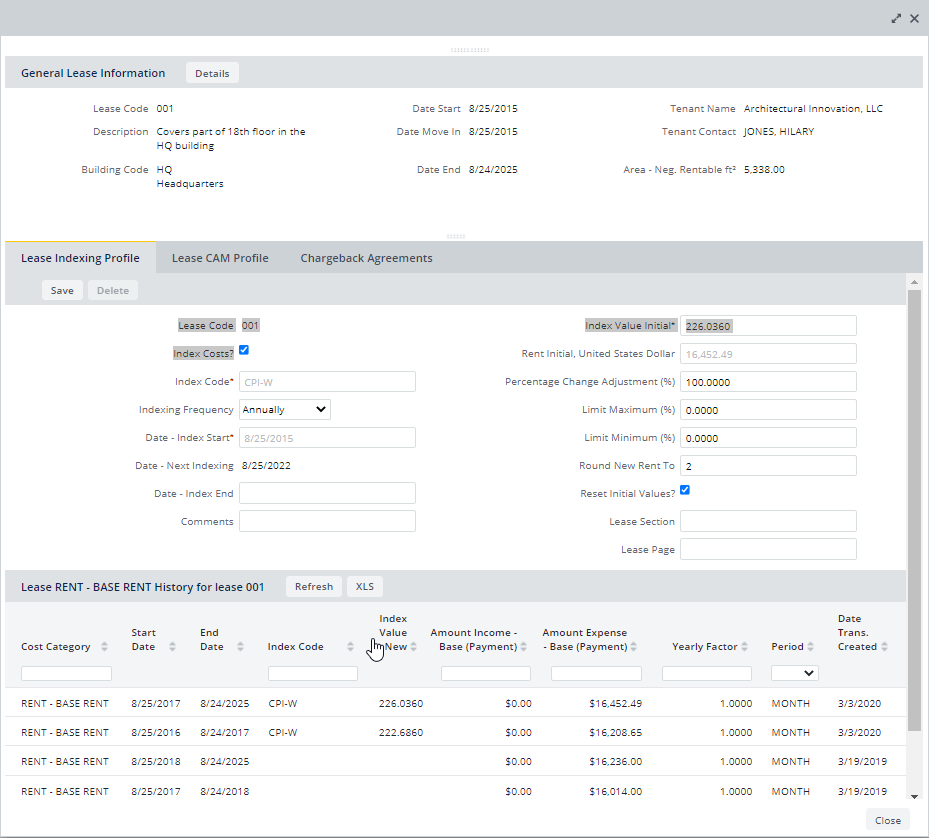
From the Recurring Costs tab or panel, you can
- Review all recurring costs added for the lease.
- Add a new recurring cost. See Create Recurring Costs.
- Export the recurring cost data to a PDF, DOCX, or XLS file.
- Review or update the lease's cost profile. Select the Cost Profile button to access the Lease Cost Profile Details form, which has options for setting the following. Develop these profiles only if you intend to use these features.
- The lease indexing profile, which generates rents based on a price index. See Create a Lease Indexing Profile and Indexing Overview.
- The Cost Profile's CAM profile is use to calculate CAM costs. See CAM Profile Overview.
- The Chargeback Agreement is used by the Cost Wizard to charge back actual costs. For details, see Define Chargeback Agreements.
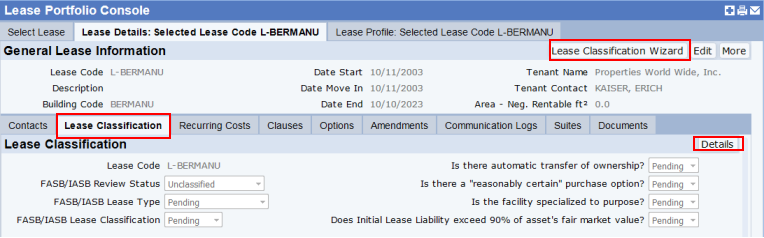
From the Full and Multi-tab display modes, you can access information about the FASB/IASB classification of your lease. This information is available if you have a license for the Archibus Extension for Lease Accounting (which includes the Lease Classification Wizard). For information about the data leading to the lease's classification, select the Details button, which presents a pop-up form with additional fields.
You cannot edit the data pertaining to lease classification from this panel or tab; the purpose is to simply show you the status and basic information about the lease's classification. To classify a lease, use the Lease Classification Wizard, which is available from a button on the Lease Details tab of the Lease Portfolio Console. It is also available as its own task in the Leases application.
From the Clauses tab or panel, you add clauses to lease agreements that detail responsibilities for either tenants or landlords. If a particular responsibility is split between tenant and landlord, create two records. For instance, for one lease, you might have two Lease Responsibility records—a CLEANING-LD record, stating that exterior window cleaning is the landlord's responsibility, and a CLEANING-TN record, stating that all interior cleaning is the responsibility of the tenant.
You can enter property amenities as a type of lease clause. You can then track these amenities for properties, buildings, or leases. You can also enter a lease chargeback agreement when entering a clause.
Working from the Lease Portfolio Console, to add a new clause, you click Add New at the top of the Clauses tab after selecting a lease.
See Enter Clauses.
From the Options tab or panel, you can add information for lease options, legal time-sensitive options that you can exercise on a lease, such as the right of first refusal to buy the property or the right to rent space that becomes vacant. You can then receive alerts from the console when these options are about to expire.
See Enter Options.
To track changes to your lease agreement, you can record amendments. You can also add a lease document for the amendment.
See Enter Amendments
Communication log document written correspondence and verbal communication concerning your leases. Use them to enter notes about conversations, phone calls, e-mail, and so forth. For written correspondence, you can create a communication log summarizing a letter or fax, scan the document, and store it in the Document field for the log. From the Communication Logs tab, you can review logs or add new ones.
From the Suites tab or panel, you can add new suites, edit suite information, assign suites to the selected lease, split a suite, and unassign a suite.
You can select the documents to associate with the selected lease using the Documents tab. From this tab, you can also add, edit, delete, or view documents. When you add documents, they are available to all authorized users. The information you enter for documents is included in the Documents by Lease report generated from the Portfolio application, and the Lease Details reports available from the Leases application.
See Associate Documents.