Space / Space Planning / Space Planner / Space & Portfolio Planning Console / Stack Plan tab
Real Property / Advanced Forecasting / Advanced Portfolio Forecasting / Space & Portfolio Planning Console / Stack Plan tab
View and Work with Stack Plans (Stack Plans pane of Stack Plan Tab)
The Space & Portfolio Planning Console's Stack Plan tab provides the major tools that you will use in allocating space. This topic overviews the interface of the Stack Plan tab's Stack Allocations pane, which is located in the bottom of the Console.

Once you open a stack plan (either by using the Display button or choosing or allocation from the Events pane), you are ready to examine your space use and experiment with different distributions of space.
This topic has the following sections:
- Review the Stack Plan
- Review Floor and Building Summary Statistics
- Set the As Of Date for the Stack Plan
- Control the Appearance of the Stack Plan
- Allocate Space
- Other Actions
Review the Stack Plan
By examining the visual representation of space on a stack plan you can immediately see in one place an overview of your space capacity and how space is dispersed among your organizational groups. Each floor is presented by a bar in the stack plan, and each organizational unit (business unit, division, department, functional group -- depending on how you defined the scenario) on a floor is represented by a colored block that is proportionately sized to represent the space allotted to the organization on this floor. The colored block is known as an allocation. The block's color is determined by the Highlight Pattern field of the Business Unit, Division, or Department. Functional groups, which are not stored in their own table and do not have an associated AutoCAD Highlight Pattern field, use the highlight pattern of the department. If a highlight pattern is not defined, the system assigns a random color to the allocation stack elements. You can change the generated color if you wish. See Edit an Allocation on a Stack Plan.
The unavailable area (vertical penetration, service area, and remaining area) are displayed in blocks of different shades of gray. Note that you can hide these blocks using the Show Unavailable Areas toolbar button, as described below.
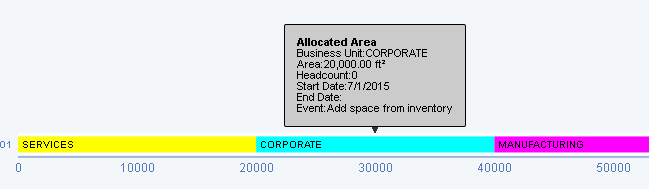
If space permits, the allocation blocks lists the organizational unit as a label for the allocation; if the complete name does not display on the allocation block, you can hover over the block to receive a form listing the name of the organizational group, as well as other basic information. The below image for a portfolio at the business unit level, shows the business unit name in each stack element.
Examining the stack plan, you can spot problems such as:
- too much available space on a floor or within a building
- building and floors that are used to maximum capacity and will not accommodate even modest company growth
- organizational groups that are dispersed among multiple floors and buildings and might benefit from being located on the same floor
- floors that are over-allocated
- floors with too much remaining area
Note that if a floor's allocations exceed the size of the floor, the system draws the allocation past the floor's size and indicates the portion that does not fit with a line through the allocation. For example, floor 01 below is 7000 feet, but the Publications organization assigned to this floor is 8000 feet. The vertical line through the allocation indicates the extra area that does not fit on the floor. In this case, you can run the Split command to split the Publications allocation and move part of it to another floor.

Review Floor and Building Summary Statistics
In addition to examining the size and colors of the blocks on the stack plan, you can access other key allocation information by examining the building and floor summaries. The building statistics are located on the left, and each floor's statistics are located on the right end of the floor's barHide both the floor and building summaries by clicking on the splitter to the left of the stack plan. Note that you can change the position of these summaries using the Switch Stack Orientation button, as described below.

You can choose the area-based and seat-based statistics that you want the stack plan to display by selecting the Stats button and completing the Select Statistics form. Note that you can select up to two building statistics and up to three floor statistics.
Theses area-based and seat-based statistics are also available in the Gap Analysis report. For details on the statistic calculations, see Gap Analysis report.
Set the As Of Date for the Stack Plan
When you choose an allocation event or allocation from the Events pane, the system displays the allocation date in the "Stack Allocations as of" date field, located in the top left corner above the stack plan. If you open a stack plan with the Display button, the system completes the date with the date of the latest allocation event.
You can also manually complete the As of Date field by selecting a date using the calendar. The displayed stack plans will show the stack plan as of the most recent allocation event before the date that you enter.
When reviewing the stack, you need to review only the stack on the days that allocation events occur. The allocations remain the same between allocation events. The stack plan provides a tree view of Events, ordered by date, that rolls up all the allocations that share the Event Name and Date.
Control the Appearance of the Stack Plan
The Console provides several buttons for controlling the stack plan's appearance. The number of stack plans that you wish to display at once and the number of floors and allocations within each stack plan will determine how you use these options to customize the appearance of the stack plan. For example, if you are working with only two stack plans and each stack plan has only a few floors, you may wish to increase the height of each floor's bar and the label size for easier viewing without causing a lot of scrolling. You can experiment with the buttons to create a stack plan that best suits your needs.
Once you use these options to customize the appearance of the stack plans, the options stay in effect during the current session and apply to all stack plans that you open in all scenarios. The next time that you sign in to Web Central, the stack plans will display using the default options.
Hover over the buttons and the system presents a tool tip explaining the action that the button performs.

The following buttons are available:
| Button | Name | Action |
|---|---|---|

|
Increase Floor Height | Increase the height of the floor bars within the stack plan. Increasing the height is handy for situations in which you do not have a lot of stack plans to display, or each stack plan does not have a lot of floors, so that increasing the floor bar height makes the stack plan easier to view without causing the user to scroll. |

|
Decrease Floor Height | Decrease the height of the floor bars within the stack plan. |

|
Increase Floor Length | Increase the length of the floor bars within the stack plan. Each allocation will adjust proportionately. |

|
Decrease Floor Length | Decrease the length of the floor bars within the stack plan. Each allocation will adjust proportionately. |

|
Switch Stack Orientation | Toggles the building summary information from displaying on the left of the stack plan to displaying beneath the stack plan; the floor summary remains on the right. With multiple stack plans open, this option displays the stack plans side by side so that you don't need to vertically scroll to see all stack plans. |

|
Increase Label Height | Increases the size of the identifying text within each allocation block. |

|
Decrease Label Height | Decreases the size of the identifying text within each allocation block. |

|
Show Unavailable Areas |
Set the stack plan to show only usable area by hiding the vertical penetration, service area, and remaining area allocations. This is useful for focusing the stack plan to show usable area and not using space on the stack plan to show areas in which you cannot place allocations. For example, if you hide the unavailable areas, the stack plan might have enough room to display the labels of the allocation blocks. |

|
Show X Axis |
Shows and hides the stack plan's X axis, which labels the number of square feet represented by the bar so that you can estimate the approximate size of a floor or an allocation by comparing its size to the labels. The Y axis, indicating the floor number, remains active. |
Allocate Space
To experiment with different space arrangements, you drag and drop the allocation blocks to different floors in the same building or floors within another building. For details on these operations, see:
- Split an allocation
- Edit an allocation
- Move an allocation to another floor
- Add new allocations
- Change the placement of allocations within a stack
- Reduce allocated space
Other Actions
From the Stack Plans pane, you can also perform these actions:
- Display a floor plan
- Add space requirements to a portfolio scenario
- Mark up floor plans
- If the scenario is at the functional group level, you can edit space requirements and sync space requirements. You do so using the following buttons, which only display when a scenario is at the functional group level.

See also: