Space / Space Planning / Space Planner / Space & Portfolio Planning Console / Stack Plan Tab
Real Property / Advanced Forecasting / Advanced Portfolio Forecasting / Space & Portfolio Planning Console / Stack Plan Tab
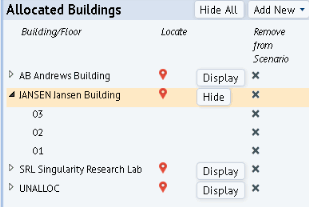
Display Stack Plans and Access Building and Floor Information (the Allocated Buildings pane)
The Space & Portfolio Planning Console's Stack Plan tab provides the major tools that you will use in allocating space. This topic overviews the interface of the Stack Plan tab's Allocated Buildings pane, which is located in the top left corner of the Console.
Display a building's stack plan
Use the Hide/Display buttons to control the stack plans presented in the bottom pane. Once you display a stack plan by choosing the Display button, the button name changes to "Hide" so that you can close it, as shown for the JANSEN building in the above image.
Display stack plans for as many buildings as you want to work with; if you display more than two, you may need to scroll the bottom pane to see all the stack plans or maximize the stack plans pane. If you find that you have too many stack plans loaded, you can always change their visibility using the Hide/Display button for each building. Use the Hide All button to hide all open stack plans and start over to open a new set.
In displaying a stack plan with this method, you do not specify the date as of which the stack should display allocations. Therefore, the system displays the stack plans as of the latest allocation event date. Review the "Stack Allocations as of " option (located in the top left of the bottom pane) to confirm the date as of which the stack plans are presenting data. You can always set your own date by editing this option.
Note: It is not essential that you first use the Display button to display a stack plan for a building. As described below, selecting an allocation in the Events pane will open the stack plan showing that allocation. You can then use the Hide All or Hide/Display options in the Allocated Buildings pane to close stacks as needed.
Access information about a building or floor
Click on the building name in the Allocated Buildings pane, and the system displays a form with key information about the building. When deciding on the organizational groups that you want to place in this building, you can use this features to access key information about the building. For example, you might want to check its street address or check its current leases.

Similarly, click on the triangle-shaped icon next to a building name, and the system displays the floors in this building, as shown with the Jansen building in the second image in this topic. Click on a floor, and you access the Floor Details form, which is similar to the Building Details form, above. Use this feature to check the details of a floor to which you are allocating space.
Display a floor plan
In addition to accessing floor information with the Floor Details form, you can view a floor plan for a selected floor. When allocating space, you may want to review the layout of the floor, the current department allocations, the types of rooms on the floor, and so on.
- Display a stack plan using the Display button or by selecting an allocation from the Events pane.
- In the displayed stack plan, click on a floor bar. The system outlines the bar in orange to show that it is selected. (See below image.)
- Choose the Show Floor Plan button and the system presents the floor plan in a pop-up window. You can use the options to highlight the floor plan by various criteria.

The Console displays enterprise graphics floor plans that are in SVG format.
Note: The system display the drawing with the layers that you have published. Therefore, if you are working with areas derived from a suite inventory (rather than a space inventory) and have published the Suites layer, then the system will display the suites. Since the default highlights are for a room inventory, you will not use the highlight features, but you can still check the location of your suites. See the Space & Portfolio Planning Console and Areas.
Display the building location on a map
For geocoded buildings, use the Locate icon (the !-shaped icon) to locate the building on the right pane's map. The system will zoom into the area of the map holding the marker for this building and present a form listing the building associated with this marker. You can return the map to showing all geocoded buildings in the scenario by using the Show All in Scenario button.
If the building is not geocoded, the system will not be able to locate it on the map and will present a message stating so.
Add or remove space in a scenario
From the Allocated Buildings pane, you can also add and remove space from the scenario. Use the Add New button, located at the top of the pane, to add buildings and floors from inventory to the scenario, or to add completely new space to the scenario. Remove floors or buildings from a scenario by clicking the "X" next to the floor or building. For information, see:
See Also
Space & Portfolio Planning Console: A Tour of the Stack Plan Tab