Space / Space Planning / Space Planner / Space & Portfolio Planning Console / Stack Plan Tab
Real Property / Advanced Forecasting / Advanced Portfolio Forecasting / Space & Portfolio Planning Console / Stack Plan Tab
Moving Allocations on a Stack Plan
Once you create the allocations for your scenario (either by generating them from space requirements or creating them yourself), you can use the stack plan tools to experiment with different arrangements to find the most optimal way to arrange organizational units on your floors.
To work with different arrangements of space, simply drag and drop an allocation to a floor's stack bar within a stack plan. You can:
- move an allocation to another floor within the stack plan of the current building.
- display the stack plans for multiple buildings and move an allocation to the stack plan for another building.
- display the stack plan for the Unallocated building and temporarily move allocations here before allocating them to a floor
As you move the allocations between stack plans, you can focus on various objectives such as positioning related groups near one another, maximizing utilization so that you have little available space and can possibly give up leased space, focusing space to the buildings within the same city, and so on.
If you find that you cannot fit the organizational groups within the defined space, you may need to split organizations between floors. See Splitting an Allocation.
Note: You cannot drag and drop unavailable area (service area, vertical penetration, remaining area, or other unavailable area) from one stack to another.
Procedure
- Open the Space & Portfolio Planning Console, select a scenario, move to the Stack Plan tab, and display the stack plan for the selected building. If you plan on moving allocations between multiple buildings or ot the Unallocated building, be sure to display the stack plans for these buildings.
- Click the allocation (the stack element within the stack plan) that you wish to move. The system temporarily outlines it in black to indicate that it is selected.
- Drag the allocation to an Available Area within the stack bar for another floor within this building, or within another building.
- If you are not sure if an allocation can fit within an available area, you can hover over the Available Area to see its size and compare this to the size of the allocation.
- Or, you can try to drag the allocation, and if it does not fit, the system will not permit you to place it.
- If the allocation can fit in the available area, the system presents the following form confirming that you want to move this allocation:
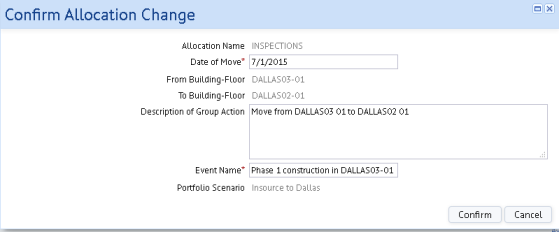
- The system pre-fills the form's fields. You can change the Date of Move and add more details to the Description, if desired. Enter an Event Name that documents this move. For example, in the above form, the allocation is being moved due to a construction project on the source floor.
-
Click Confirm to process the Confirm Allocation Change form. Once you process the form, the system:
- redraws the stack bar of the original floor and the new floor to reflect that the allocation has moved
- updates the Events pane to reflect the new allocation event
- updates the Locations panel in order to recalculate the Utilization statistics.
- in the database, this action updates the location of the existing Group record, or creates a new Group record, depending on the As Of date. If this action creates a new group, then the system sets the End Date of the original group to be one day prior to the Start Date of the new group.
- Once you complete the scenario and it is approved by all parties, the next step is to execute the moves required to implement this scenario. Use the Proposed Moves report to review required moves and generate move orders, which you can then manager with the Moves application.