Archibus SaaS / Space / Move Requestor
Space / Moves / Move Requestor
Request a Group Move
You can request group moves when you want to move multiple employees, teams, assets, or rooms at the same time. Group moves are convenient when items are being moved to or from a nearby location. For example, you can consolidate in one move project all items to be moved from the eighteenth to the nineteenth floor of the same building. Group moves are always associated with a move project.
Note: Your site might provide managers with Archibus Workplace on a tablet, kiosk, or smart phone so that self-service managers can request group moves. See Using Archibus Workplace and Methods of Requesting Moves.
Move Types
From the Move Requestor / Request a Group Move task, you can add the following types of move orders to your group move by working with the corresponding tab on the Request a Group Move form.
| Move Type | Description |
|---|---|
|
Employee |
An employee move tracks employee location switches. It tracks where employees are and when they move, and contributes to reports on churn An employee move moves an employee’s personal effects-- items that are not tracked in the Archibus database. A move operation largely pertains to moving an employee’s packed-up boxes which must move to new locations, even if desks or any assets stay where they are. If the employee has assigned furniture and equipment, you can optionally include it in the move order. |
|
Room |
If the room has assigned furniture and equipment, you can choose to include it in the move order. Practices at your site may specify that you move all of the room's content to the destination location and that you don't list out the individual furniture and equipment items on the move order. Or, your site may implement a policy that you move only the room's assigned equipment and furniture that is explicitly listed on the move order. This type of move order is also handy for moving the contents of a room when the room does not have an occupant and you cannot create an employee move order. |
|
New Hire |
Use this type of move order to place a newly hired employee in their room. This type of move order updates the system with the new employee's location, and informs data and voice coordinators that the destination room must be prepared for a new employee |
|
Employee Leaving |
Tracks employees leaving the company and no longer occupying rooms in the facility. If the employee has assigned furniture and equipment, you can optionally include it in the move order. The move order will not supply a destination location for movers to move these items, but data and voice coordinators can examine the move order's list of furniture and equipment and service it, reset it, prepare it for the next user, and so on. |
|
Equipment |
Use this type of move order to move a specific equipment item to a new location. |
| Team | If your site uses teams, you can move employees in teams or move teams from one location to another. See Working with Teams in Group Moves. |
|
Asset |
For this option, you do not select an item from a validated table, but instead enter it directly into the move order. This option is handy for moving items that are not tracked in the database, such as paintings. |
Once you create a move of a specified type, the tabs lists a count of moves of this type. You can view the details of each type of move by selecting the tab.

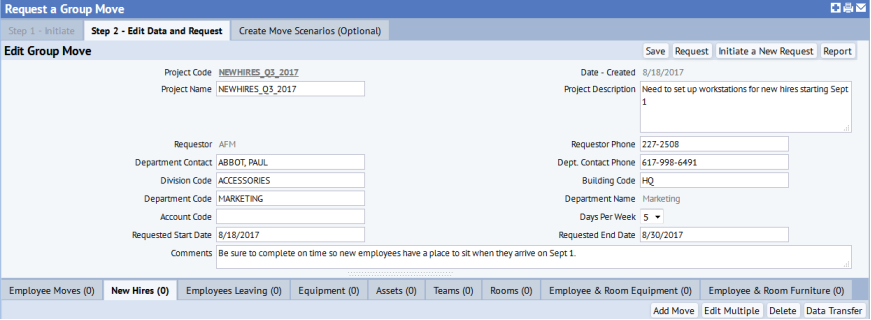
Note: In the above image, note the Employee & Room Equipment tab and the Employee & Room Furniture tab. These tabs present furniture and equipment that were added to the move order because they are assigned to an employee or room. See the below discussion, "Moving Furniture and Equipment Associated with an Employee or Room."
Moving Furniture and Equipment Associated with an Employee or Room
If an employee or room being moved has assigned furniture or equipment, when you add that employee or room to the move project you can include these assets in the move. If you select the checkboxes to move the assets assigned to the room or employee, the associated tagged furniture and equipment records are inserted into the Move Order Equip. Assignment (mo_eq) and Move Order Tagged Furn. Assig. (mo_ta) tables. The group move order forms list these equipment and furniture items two ways:
- Examine furniture and equipment in terms of their move order. Move to the Rooms, Employee Moves, or Employees Leaving tabs, locate a specific move order, and select its Edit button. On the resulting Equipment and Tagged Furniture tabs you will see the items for this move order.
- Examine all furniture and equipment at one time. Move to the Employee & Room Furniture and Employee & Room Equipment tabs (see above image). These forms list all furniture and equipment items that were added to the group move through their assignments to rooms and employees. The listing includes the move order for your reference.
Suppose you opted to include the furniture and equipment of an employee or room, but you do not want to move all of the assigned equipment and furniture associated with an employee or room. You have two methods to remove these items from the group move.
- Go to the Employee Moves, Employees Leaving, or Rooms tabs and select the Edit button for the desired move order. The system presents a form that includes Tagged Furniture and Equipment tabs listing he furniture and equipment assigned to the employee or room of this move order. Select an item and use the Delete button to edit the lists of equipment and furniture items.

- Go to the Employee & Room Equipment or Employee & Room Furniture tabs. The tabs list all the furniture and equipment items to move for all room and employee move orders. For the desired move order, locate the item you want to remove, check its box, and select the Delete button.

Procedure: Request a Group Move
You request a group move if you want to move multiple employees, teams, assets, or rooms at one time.
- Select the Move Requestor / Request a Group Move task.
- Enter values for
the following:
- Click the Go to Next Step button, and you move to the "Step 2: Edit Data and Request" tab, which displays the information that you have completed in Step 2. You can edit these values if necessary. You can also specify additional information:
- Space Planning: Linking Projects to Portfolio Scenarios and Space Requirements
- Enterprise Assets: Project Proposal Console
| Field | Description |
|---|---|
| Project Code | Enter a code to uniquely identify this move project. Note that you are completing the Project Code field because group move orders are move projects and stored in the Activity Projects table. |
| Project Description | Enter a description. |
| Building Code | Enter the building from which items in this project will be moved. Once you set a building, subsequent forms will automatically complete the Building Code with this value or restrict to items in this building. For example, if you add an employee move order, the form will default to employees in this building. However, you can remove the form's filter and select any employee. |
| Department Contact | Select the party responsible for this move. This person will receive email notifications as the move project is processed through its various stages and its status changes. |
| Requested Start Date | Defaults to the current system date. |
| Requested End Date | Enter the date by which you want all move orders in the group move processed. Note that for individual move orders of this group move, you can set move dates. |
| Field | Description |
|---|---|
| Project Name | If you want to link this move project to a portfolio scenario, space requirement, or an asset proposed project, complete this field with the same value as Portfolio Scenario Name, Space Requirement Name, or Project Name (for asset proposed projects). For information, see Otherwise, enter a descriptive name for the project you created by completing Project Code. Note: The Space SaaS module does not support linking a move project to a portfolio scenario, space requirement, or an asset proposed project as these features are not available in Archibus SaaS. |
| Division/Dept | The system automatically completed these fields with the division and department of the employee specified in Department Contact. If you wish to associate the group move with a different department, you can edit these fields. |
| Account Code | Enter the account to which this move order should be charged. |
| Number of days in a working week | Moves are often executed on the weekend. Enter the number of days in a week during which you can execute moves. |
| Requestor Phone | Automatically completed but you can change. |
| Dept Contact Phone | If the Department Contact has a phone, the system completes this field with the value. Otherwise, you can enter a phone number. |
- You now need to add move orders to the group move using the tabs at the bottom of the view. As shown in the below image, the tabs keep a count of the move orders of each category that are assigned to this group move. In the below image, the move requestor has defined only the group move project and not yet added any move orders, the move order count on each tab is zero.
Note: It is important to save your changes before adding moves to your group move. Click the Save button in the upper right corner of the top pane.
- Select the appropriate tab for the type of move order you want to add.
- See the above description of the Move Types for information on the various types of moves you can add.
- For information on using the Teams tab to add teams, see Working with Teams in Group Moves.
- On the appropriate tab, choose the Add Move button.
- The exact form that you complete depends on the type of move order you are creating. In general, you will complete these options:
- Description -- Enter any instructions for this particular move order.
- Requested Move Date -- The group move project provides a date range during which the entire group move should be completed. Complete this option with the date that this particular move order should be executed.
- From Building, Floor, Room -- The system completes these with the location of the employee, equipment item, or room you are moving. If necessary, you can edit these values. For example, if you know that room listed for the employee is not correct, you can enter the employee's correct location.
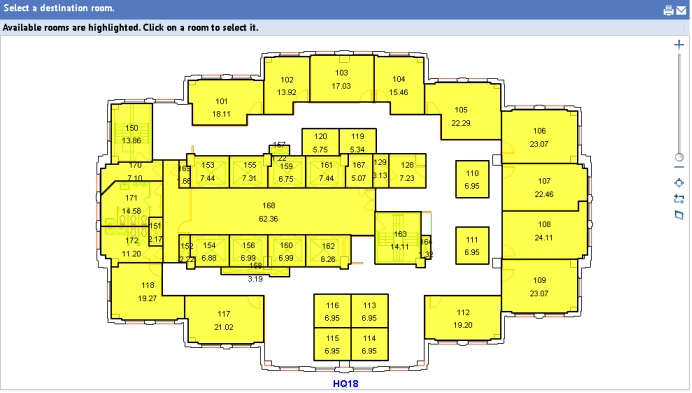
- To Building, Floor, Room -- First, select the To Building and To Floor values. Then, select the room with one of these methods.
- For the To Room field, click the select value button and choose a room from the list. Select the Available Only? check box to have the list show only available rooms.
- Click Show Drawing and a popup window shows the floor plan and highlights available rooms. Click on a room in the drawing to select it. When you click on a room, the system completes To Room with the room number of the selected room.
- Note: While the system does offer the option of presenting only available rooms, you can choose any room regardless of whether or not it is available.
Note: If you working with an Employees Leaving move order, the form does not present the destination fields.
- Choose Save.
- The system generates a move order code for this move and displays the move order in the bottom pane.
- The corresponding tab updates its display of the count of move orders of this type. If you chose to move equipment and furniture assigned to a room or employee, the Employee & Room Equipment or Employee & Room Furniture tabs will include these items.
- Continue working with the group move project and add additional move orders, edit move orders, remove furniture and equipment items from a move order, and so on. For each type of move order, the tabs offer various options.

Once you select the tab for the type of move order you want to work with, you can do the following: - Move to the Employee Moves tab, choose the Add Multiple button.
- In the Add Multiple form, complete the Division, Department, Building, and Floor from which you want to move people. For example, you could move all employees from the Electronics division who are located on floor HQ-19.
- Specify the To location and choose Add Employees.
- The system adds all these employees to the Employee Moves tab. You can refine the list and remove some employees from the move using the Delete button.
| To ... | Follow these steps |
|---|---|
| Create a single move order and add it to the group move project | Move to the appropriate tab and choose Add Move button. Follow the above procedure. |
| Add multiple move orders for employees of the same division or department |
|
| Edit the move order for a single employee, asset, team. or room. For example, if a move project encompasses a date range, you might want to add the move date for a particular item. | Move to the appropriate tab, locate the move order, and choose its Edit button. Edit the move order fields as needed. |
| Edit multiple move orders. |
Move to the appropriate tab, select the move orders in the bottom pane, and select the Edit Multiple button. Complete the pop-up form with the values that you want to apply to all of these records. |
|
Delete a move order. |
Move to the appropriate tab, select the move orders you want to remove, and choose the Delete button |
| Remove from a move order equipment and furniture associated with an employee or room. | Select the Employee & Room Equipment tab or Employee & Room Furniture tab, select the items, and choose Delete button. See Moving Furniture and Equipment Associated with an Employee or Room, above, for the exact steps and an alternate method. |
| Output the move orders to an excel or other file | Move to the appropriate tab, select the move orders, and choose the Data Transfer button. For example, you might want to send a list of the employees that are moving to the HR department. |
Next Steps
When satisfied with the move orders assigned to the group move, you can do the following:
| To ... | Follow these steps |
|---|---|
| Save the group move and return to it later to request it. | Click the Save button in the upper panel. The status will remain as Created. You can return to the move order to request it using the Edit My Group Moves task. |
|
As a requestor, you can develop move scenarios for employee group moves. You can create scenarios now, or after you request you can use the Edit my Group Moves task to work with scenarios. Another possibility is that your site may have other personnel dedicated to this task and working with scenarios is not an option for the move requestor. |
Move to the Create Move Scenarios tab. |
| Request the move. |
Click the Request button in the upper panel. The system:
|
|
After you request the current group move, request another group move. |
Click the "Initiate a New Request" button in the upper panel. The system returns you to the far-left tab, Step 1: Initiate. Note that if you do not first request the current move, the system retains it in Created status. You can return to the move order to request it using the Edit My Group Moves task. |
| Print your move order | Choose the Report button. The system generates a paginated report of the group move and all its move orders. |
Note: Once the move has the status of Requested, it can no longer be withdrawn. Notify the move coordinator if you want to withdraw a move that you have requested.