Archibus SaaS / Space / Move Coordinator / Move Console / Plan Move Scenario tab
Space / Moves / Move Console / Plan Move Scenario tab
Space / Moves / Move Scenario Planner / Develop Move Scenario / Plan Move Scenario tab
Select the Layout for the Occupancy Scenario
To work with an occupancy scenario, you must select the layout drawing to work with. A layout can be either:
- an inventory drawing -- the official inventory drawing with space and room assignments as they currently exist in the inventory
- a layout scenario drawing -- a different configuration of the space, made by a CAD operator. For example, the CAD operator can make a copy of the inventory information on a trial layer and reconfigure the space, such as converting a conference room to office space or converting cubicles to open space.
Also see the "Prepare Drawings" section of Create Occupancy Scenario topic for information on publishing drawings you intend to use as scenario drawings.
Choose a Layout
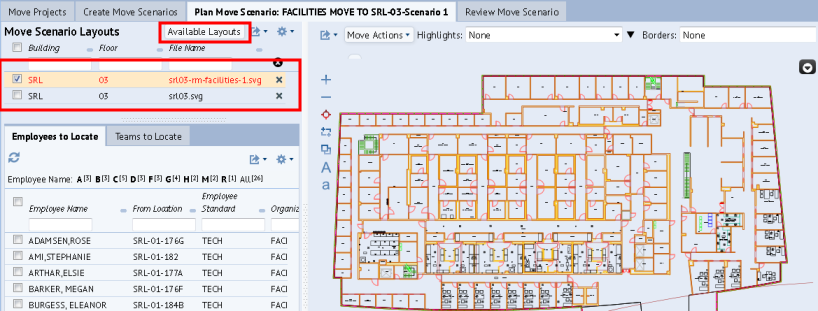
When you first load the Plan Move Scenario tab, it presents any associated layouts (inventory drawings and layout scenario plans) in the top left pane.
The list uses these fonts to indicate the type of floor plan:
| Font | The floor plan is ... |
|---|---|
| Black | the official inventory floor plan |
| Red | a layout scenario floor plan that has a space configuration on a trial layer. |
| Bold |
already associated with other move scenarios in the same project. You can still select this layout, but you should be aware that other projects use it. |
The list can include inventory drawings as well as layout scenarios. Inventory drawings use the standard naming convention, such as srl03.svg. For information on the naming of layout scenario drawings, see CAD User: Publish.
Click a layout in the list, and the enterprise graphics file displays in the right pane.
You can load only one layout at a time.
Add a Layout to a Move Scenario
Note: Although it is possible to assign a floor's inventory drawing and multiple layout scenario drawings to one move scenario, the best practice is to assign only one version of a floor's layout to a move scenario; that is, a move scenario should have only one layout (either an inventory or layout scenario drawing) per floor.
To have a layout appear in the above list, you must associate the layout with a move scenario using the Available Layouts form.

The Available Layouts form lists all the available inventory drawings and layout scenario drawings in the project that have been saved as enterprise graphics files (svg files). The Available Layouts form lists all layouts in the project, regardless of whether or not they are already associated with the move scenario and listed in the left pane.
When choosing the layout to load, consult the following for information about the SVG file:
- The Usage Type field informs you if an SVG is from the official inventory drawing or a layout scenario
- For layout scenarios, the file name lets you know whether the layout is from a trial layer on the original inventory drawing or a trial layer on a new drawing, as well as if the layout represents a partial drawing. See CAD User: Publish for information on the naming convention of the SVG files for layout scenarios.
To add a layout to the move scenario:
- Click the Available Layouts button located above the list of layouts. .
- In the resulting Available Layouts form, enter search criteria, or leave the search boxes blank and click Filter.
- Review the list of layouts, consulting the Usage Type and File Name to locate the desired layout.
- Click the check box to select a layout.
- Click Add to Scenario, and the system adds it to the list of layouts in the top left pane.
Set the Display of the Layout
The Plan Move Scenario tab offers several features for highlighting and displaying labels on the inventory or scenario floor plan. These features follow the same operation as they do in the Space domain's Space Console.

See the following Space Console topics for information on setting the display of the floor plan.
- Highlight Rooms by One Property
- Highlight Rooms by Two Properties
- Include Labels
- Work with Drawings (for general information on zooming and setting layers)
Since the highlight names for layout scenario drawings come from the Room Trials data source, they use a naming convention that includes "Scenario" to distinguish them from highlights for the inventory drawings. For example, in the above image of the menu for a layout scenario drawing, you can highlight by "Departments-Scenario."
Employee Labels
A floor plan labeled with Employees shows two things:
- Employees who are assigned rooms on the floor, but are not part of the move project. This is informational only; these employees cannot be moved to other rooms. These employees appear in black text.
- Employees who are part of the move project and were placed into rooms, either in the move order or in the move scenario. This is both informational and action-able; these employees can be moved and assigned to different rooms if needed. They appear in blue text.
See Employee Labels discussion in Create an Occupancy Scenario topic.
Next
Once you have your layout loaded and set to the appropriate layers, you can develop the occupancy scenario by assigning teams and employees to rooms. See Create Occupancy Scenario.
See also: