Defining Locations (Sites, Buildings, Floors, Rooms)
The levels of the Archibus space hierarchy are Sites, Buildings, Floors, Rooms. Space is typically organized by sites, which house buildings, which in turn house floors, which in turn can house groups or rooms.
Archibus offers the Define Location task (ab-sp-def-loc-rm.axvw) for defining all levels of the space hierarchy: sites, buildings, floors, rooms.
This view is available in several Navigator locations. The following are the Navigator locations within Space:
- Archibus SaaS / Space / Background Data - Space / Define Locations
-
Space / Space Inventory / Background Data / Define Locations
Use this view to:
- view locations in terms of the hierarchy (sites, buildings, floors, rooms)
- search for items in the space hierarchy
Working with the View
Use the view's tabs to access each portion of the space hierarchy. On each tab, you can change the displayed fields and export the data using the gear and export icons.
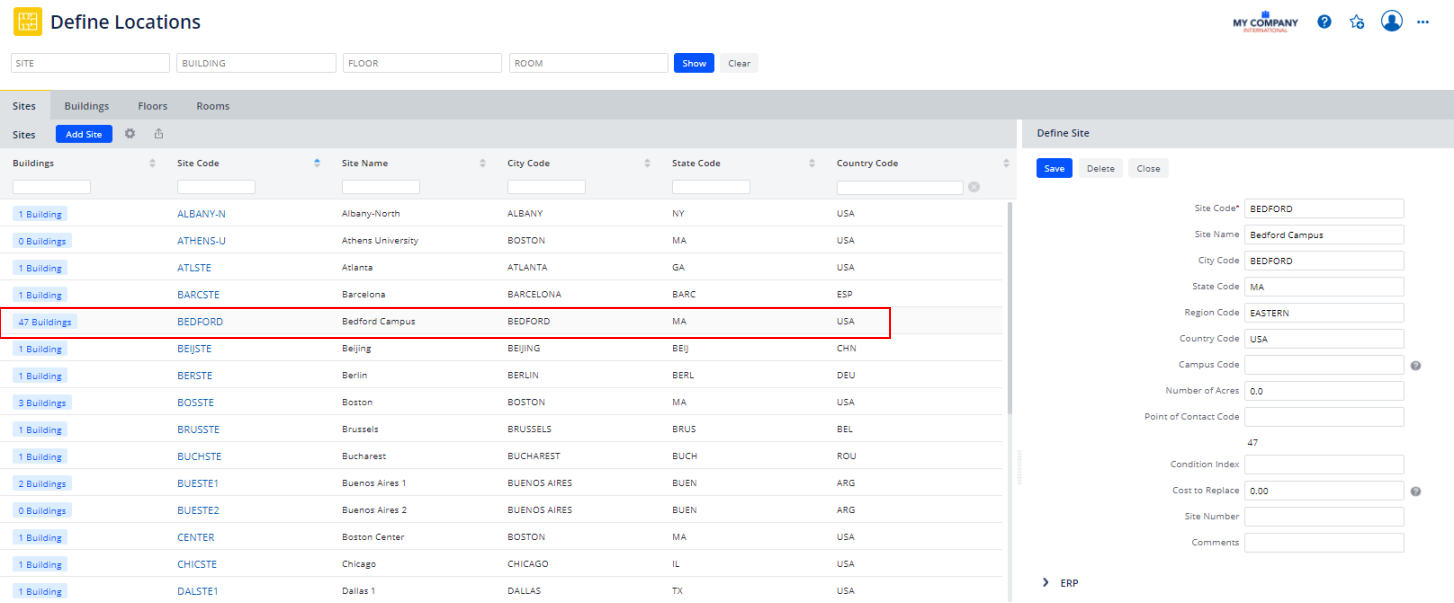
To edit a record listed on a tab, click on any field, except the far-left blue button. The right panel will then display the record's values, such as the Define Site panel displaying the values of the BEDFORD site, below.
View Locations in Terms of the Space Hierarchy
Each level of the hierarchy (except rooms) has a blue button on the left column that lists the number of items assigned to it. Click on the blue button to receive a list of the assigned items. For example, in the above image you can click on the "47 Buildings" button of the BEDFORD site to move to the Buildings grid, which presents just the buildings assigned to the BEDFORD site (partial list shown in below image). To drill down to the floors of a particular building, choose the Floors button; for example, to see the floors of the AB (Andrews) building, click the 11 Floors button.

You can use these buttons to drill down through all levels of the hierarchy.
Search for Records in the Space Hierarchy
Use the Filter at the top of the view to search for items in the space hierarchy.
You can enter as many as the components as you know to locate the item. For example, suppose you know a room is numbered 101, but you don't know the building or floor. You can enter 101 in the filter and then receive a list of all rooms (complete with their building and floor) that have this number. You can then choose a room from this list to complete the filter.

Within an individual grid, you can also use the Smart Search Console to search on additional fields. For example, you can search on all sites located in Canada.

Develop Sites
Sites group together multiple buildings located in a contiguous area, such as a Market Street site that contains three office buildings. If your company wants to report on and organize space inventory according to a buildings located in the same area, you will want to develop sites. If you do not have multiple buildings located in the same area, you likely will not need the site level of the space hierarchy.
Suppose a site is divided between two cities; for example, the city line crosses through the site so that the site contains two buildings in one city (Bedford), and a third building in another city (Billerica). There are two ways to address this situation; you can choose the one that works best for your reporting needs.
- You can create two Site records with the same prefix, such as Bedford 1 (whose buildings are located in Bedford) and Bedford 2 (whose buildings are located in Billerica). Each Site record will complete its City Code with the city in which its particular buildings are located. The "Bedford" prefix lets you associate these two sites.
- Have one site (Bedford) which lists Bedford as its city. Each Building record lists the city that it is located in, which may be different than the city that the site is located in.
Note: Some views might require you to develop sites in order for data to be rolled up or displayed correctly. For example, when using some map views, such as the Waste Map by Site Locations, you select from a drill-down list of locations that require sites in order to view the rollup of waste amounts by status for each site. If you are not tracking sites, it is good practice to develop a "not used" record in the Sites table. The HQ sample project has a "not used" record in the Sites table for this purpose.
Note: For information on the fields in the ERP section of the Sites tab, see Enterprise Resource Planning.
To define your sites
- In the Navigator,
choose the Define Locations task (
ab-sp-def-loc-rm.axvw). This task is available from several locations on the Navigator. - If necessary, review the existing sites. You can use the smart search filter to search for existing site records.
- Click the Add Site button. The Define Sites panel appears on the right. To edit, click on a field in the Site record.
- In the Define Sites panel, complete the following site information and Save at the top of the panel when complete.
Field Description Site Code Enter a unique value, such as Market, that describes this site. Site Name Enter a descriptive name for the site. City/State/Region/Country Click on the ellipses buttons to choose an existing value from the geographic hierarchy tables. For information on these tables, see Developing Geographic Data.
In the Real Property domain, to have portfolio items appear in all key performance indicator charts grouped by geographic location, you should enter all the fields of the geopgraphic hierarchy: the Country, Region, State, City, and Site Codes.
Site Number Site Number and Site Name are often the description of a site, especially for government buildings and secured facilities. This field is used with BUILDERTM SMS. Campus Code This field is validated by the Campuses ( campus) table. This is the site location in BUILDERTM SMS. Note that the Extensions for BUILDERTM SMS connectors import the values for the validating Campuses table. If you are not working with BUILDERTM SMS, you typically want to retain this field as empty and track the area on which your buildings reside with sites.Number of Acres Enter the number of acres on which this site is located. Point of Contact Code Choose a value from the validating Contacts table to specify the contact for this site. Number of Buildings Enter the number of buildings located on this site. Note that you must update this value as you add buildings to the site; the system does not automatically update it for you. Condition Index This field is used in conjunction with BUILDERTM SMS. The Condition Index fields are calculated in Builder SMS and sent to Archibus. The data is transferred only from BUILDERTM SMS to Archibus; it is not transferred from Archibus to SMS. For information, see Condition Index (BUILDERTM SMS). Comments Enter comments about this site. Cost to Replace The Site PRV (Present Replacement Value) from BUILDERTM SMS is written to this field. If you are not using BUILDERTM SMS, you can enter the replacement value of the site in this field. Site Photo If your company uses the Archibus Space Book and other mobile apps, you can complete this field with the name of a bitmap image representing your site. The mobile apps will include this image in site lists that they present. Detail Drawing If you are creating a site plan, enter the name of the drawing that houses your site plan, such as acampus-bl.dwgorus-pa-campus.dwg. For information, see Draw Buildings on a Site Plan. - (Optional): You may want to develop a site plan (also known as a campus plan) that depicts your land and the location of the buildings on it. This is particularly useful for working with applications in which you can drill down by a site plan, such as the Space Book mobile app. For information, see Draw Buildings on a Site Plan. When satisfied with your site plans, publish them as enterprise graphics so that you can view them in Web Central views.
Develop Buildings
- In the Navigator,
choose the Define Locations task (
ab-sp-def-loc-rm.axvw). This task is available from several locations on the Navigator. - Move to the Buildings tab. If necessary, review the existing buildings using the smart search console.
- Click the Add Buildings button. Or, to edit a building, click on its record.
- In the right pane, complete the following
fields and Save when completed. The fields are organized into sections that you can hide and display.
Field Description Location Building Code Enter a unique value, such as TOWER. The field identifies the building and must be completed. Building Name Enter a descriptive name for the building, such as Tower. Site Code If you are tracking sites, choose a site from the Select Values form. Some views in other Archibus applications expect a Site Code value and roll up data by site. If you are not tracking sites, it is good practice to develop a "not used" record in the Sites table and then choose this record for this field. Building Number Building Number and Building Name are often the description of a building, especially for government buildings and secured facilities.
Address 1
Address 2
Postal CodeComplete these fields with the street address and postal code of the building.
Note: When viewing buildings on map views, you should be aware that the City and State Codes are used together with the street address (Address 1 field) to calculate the latitude and longitude so that the building can be placed on the map. Enter full words rather than abbreviations for the address. For example, enter "Street", not "St." See Working with Map Views.
City/State/Region/Country Click on the ellipses buttons to choose an existing value, or type a new value into the box. Property Code If you are tracking properties, you can choose the property on which the building is located from the list of existing properties.
Geocode To calculate the coordinates for this building from the street address, ensure that the Address 1, City, and State fields are completed, save the record, and click Geocode. If there are already values for the building's Latitude (bl.lat) and longitude (bl.lon), the Geocode button is disabled. If needed, to change the location, you can use the Locate on Map action. Locate on Map Geocoding processes are often approximate. They compute coordinates by interpolating street addresses along lengths of road which might not be the location you want to specify. Additionally, some addresses return no valid results at all, not even acceptable approximations. For these reasons, as an alternative to geocoding, you might want to override and refine the geocoded results by clicking on the map to locate the object.
To define a location directly on the map
- Click Locate on Map.
- The Locate Asset pop-up window appears. The application plots the existing location (specified by latitude and longitude), if available, or else presents the map so that you can zoom and pan to the location of the site or building shown in the form.
- On the Locate Asset Map, click the point on the map where you want to define the location.
- The application plots a different color marker (for example, yellow versus the default red circle) where you click.
- If needed, zoom in to further inspect the location.
- If you are not satisfied with the new location, click again. The first yellow marker is erased, and the application plots a new marker where you most recently clicked.
- Once satisfied with the marker placement, click Save Location to confirm the placement, The application updates the Latitude and Longitude values in the edit form above with the new coordinates.
- Click Save. The new location data is saved to the appropriate table.
Latitude
LongitudeSee the above discussion on Geocode and Locate on Map for information about completing these fields. Or, if you know the coordinates, you can enter them yourself. Building Specs Building Photo If you are creating a new building, this field becomes available once you save the record.
Upload a photo of the building in this document field. For details on document fields, see Using the Document Management System. The Space Book app will include this image in building lists that it presents.
Building Use Select the building's primary use from the selection list. You can add reference documents for buildings having the same use. Also, you can generate reports to group data by building use, such as when generating the Utility Metrics report Construction Type Select the type of construction from the list. You can generate reports by construction type, for example, you can filter the Energy Consumption by Location report by construction type. Also, if you enter the Construction Type and Building Use for your buildings, the Energy Consumption Over Time report helps you evaluate if the building's activity or building materials are contributing to consumption values. Date Built Enter the date the building was constructed to use as a reference. Date of Rehab Enter the date that the building was renovated, if applicable.
Building Age Enter the age of the building. Note that the system does not calculate this based on the Date Built value.
Building Occupancy / Maximum Building Occupancy Complete these fields with the current and maximum building occupancy. These values are used in calculations; for example they are used to calculate the Occupancy Rate for the building shown in the Property Abstract report.
Note: If you are leasing out some areas of a building, the Building Occupancy number should include the headcount for both the areas you are leasing and the areas you are occupying. That is, the Building Occupancy number should include both the Emp. Headcount as well as the occupancy of any leased and subleased areas of the building. Entering the number in this way ensures that calculations, such as the Vacancy Rate in the Global Portfolio Dashboard, more accurately reflect the building's capacity.
Condition Index This field is used in conjunction with BUILDERTM SMS. The Condition Index fields are calculated in Builder SMS and sent to Archibus. The data is transferred only from BUILDERTM SMS to Archibus; it is not transferred from Archibus to SMS. For information, see Condition Index (BUILDERTM SMS). Number of Floors Enter the number of floors for this building. Internal Gross Area
External Gross AreaEnter the overall gross areas in these fields. External Wall Area The system calculates this as the difference between the External Gross Area and Internal Gross Area Cost per Area. Use this field to record the cost of 1 square meter or 1 square foot of the building (depending on the area measurement standard you are using). Typically, an accountant in your organization will determine the cost of one square foot of area and provide you with this figure. This cost figure can be derived from a combination of the cost of rent, construction, maintenance, building insurance, and other factors. The Cost Per Area is used to calculate the Cost Per Employee benchmark shown in the Building Abstract report. Cost to Replace The Site PRV (present replacement value) from BUILDERTM SMS is written to this field. If you are not using BUILDERTM SMS, you can enter the replacement value of the site in this field. Other Details: This section can also hold fields added by your administrator using the view's Configure Fields option. Building Contact
Contact Phone/
Contact EmailUse these fields to document the party to contact concerning the building. For example, you can enter the facility manager in charge of this building; if you lease the building, you might enter the landlord’s name. For Building Contact, enter new values, or choose a value from the Contacts table. Account Code For financial purposes, you may wish to associate the building with an account. Click on the ellipses buttons to choose an existing value, or type a new value into the box. Real Property Unique Identifier Sites, such as the Federal Government, use a Web Service for assigning and looking up Real Property Unique Identifiers enterprise-wide. Archibus provides the non-validating Real Property Unique Identifier (grp_uid) field in the Properties, Buildings and Equipment tables for deployments looking to link US Federal Registry assets to Archibus asset inventory tables. Building Value Enter the fair market value of the building only; do not include the value of the land on which it is located. Comments Enter any additional comments about the building. Fields for Extensions for BUILDERTM SMS
If you have a license for the Extensions for BUILDERTM SMS, the Building form includes the following fields, since BUILDERTM SMS tracks this data. Note that the Extensions for BUILDERTMSMS connectors import the values for the tables that validate on the Construction Type Validated and Building Use Validated fields.
- Effective Year of Status
- Building Use Validated
- Construction Type-Validated
- Perimeter
- Structure Type
- Additional Access?
- High Security Building?
- Historic Building?
- Child-occupied Facility?
- (Optional): You may want to represent your buildings with asset symbols on a site plan (also known as a campus plan). This is particularly useful for working with applications in which you can drill down by a site plan, such as the Space Book mobile app. For information, see Draw Buildings on a Site Plan. When satisfied with your site plans, publish them as enterprise graphics so that you can view them in Web Central views.
Develop Floors
Floors are identified by the values of the Building Code field plus the Floor Code field, such as JFK-01 for floor 01 in building JFK.

To enter your floor information in the database
- In the Navigator,
choose the Define Locations task (
ab-sp-def-loc-rm.axvw). This task is available from several locations on the Navigator. - Move to the Floors tab. If necessary, review the existing floors using the smart search console.
- Click the Add Floor button. Or, to edit a floor, click on the Floor record.
- In the right pane, complete the following
fields:
Field Description Building Code Choose a value from the list of existing buildings. Floor Code Enter a value for this field that when combined with the selected Building Code will form a unique value, such as 01. Floor Name Enter a descriptive name for the floor. Cost Per Area Enter the cost of one unit of this floor, such as the cost of one square foot or one square meter. The Space domain uses this value to internally charge departments for their use of space on this floor. Exterior Gross Area/Interior Gross Area If you are not depicting your floor in a CAD drawing, you can manually enter the size of the floor in these fields. The Space calculations will use the values that you enter. If you are developing these areas in CAD drawings, the system will complete them with the size of the gross area asset symbols. Ext Wall Area feet Standard Area per Employee Enter the typical amount of area used by an employee situated on this floor. Sort Order For use with stack plans, the sort order determines the order in which the stack plan presents floors. The stack plan sorts first by this field and then by the Floor Code value; thus, if this field does not have a value, fields are sorted by the Floor Code.
Other Details If your administrator uses the view's Configure Fields option to define new fields, the Floors panel will include an Other Details section to display these new fields.
To develop a floor plan
Often, organizations wish to have a floor plan so that they can graphically see the location of accidents, maintenance issues, risk issues, and so forth. In this case, users purchase the Space Inventory application and use CAD to depict develop floor plan drawings. The floor plan can then be used with other Archibus applications.
If you want to depict your floor in a CAD drawing, see Draw Gross Areas (Space Inventory). Once you develop the floor outline, you can add vertical penetration, service areas, and rooms. When satisfied with your floor plans, publish them as enterprise graphics so that you can view them in Web Central views.
Develop Rooms
Note: If your CAD specialist depicted rooms in a floor plan drawing and linked them to the Archibus database, the CAD specialist may have already completed many of the room fields. In this case, you can use the Define Locations task to further edit the records. If your site does not develop CAD plans, you can use the Define Locations task to develop a room list, and your self-service users can work with the Archibus Workplace using a room list only.
Note: When working with the room list in the HQ sample project, you will notice that the list includes many types of areas that you may not consider as rooms. In Archibus, every area on the floor plan is a room: offices, conference rooms, cafeterias, rest rooms, vertical penetrations, circulation area, and so on. Assigning an area on a floor plan a room category determines the type of area it is and whether or not it is occupiable. See Define Room Categories and Room Types.
Developing Room Classification Validating Data
When developing a room list, you may wish to classify your rooms. Once you define these classifications, you can choose these values when completing the corresponding fields of the Rooms table. Archibus offers two methods of classifying your rooms; you can classify your rooms by either or both of these methods:
Developing a Floor Plan with Rooms in CAD
Often, organizations wish to have a floor plan with rooms so that they can graphically see the location of accidents, maintenance issues, risk issues, and so forth. In this case, users purchase the Space Inventory application and use the Room Inventory process to develop a room plan and inventory by using CAD to depict their rooms in floor plan drawings. This room inventory and room plan can then be used with other Archibus applications.
For information on developing a room plan, see Draw Rooms.Be sure to save your room plan as an enterprise graphics file so that you can access the room plan in mobile and Web Central.
Once you develop room asset symbols in CAD (which links the boundary lines to Room records), you can use the below method to edit the Room records, if necessary.
Developing Rooms in the Database
Use the Define Locations view to enter rooms in the database or to edit existing Room records.
- In the Navigator, choose the Define Locations task. This task is available from several locations on the Navigator.
- Move to the Rooms tab. If necessary, review the existing rooms using the smart search console.
- Click Add Room.
- In the right pane, complete the following fields and Save when completed. Minimally, you must complete Building Code, Floor Code, and Room Code. If you are not a space manager and do not know exactly how this room is used or how your site charges for it, you can retain these fields with their default values. Many of these fields are used only by the Space Inventory application, so it is not essential that you complete them if you are not working with that application.
Note: If you are Foundations user, you will not work with the following fields of the Rooms table and can leave these fields blank: Room Standard, Prorate, Room Survey Redline, Date Last Surveyed, and Survey Photo.
| Field | Description |
|---|---|
| Building Code |
The building and floor in which the room is located. The system completes these fields with the values you selected from the drill down list. Note that if your rooms derived from CAD, you should not edit this information from Web Central. Since the room exists on a floor plan drawing that represents a specific floor within the building, the building and floor assignments should be changed in the CAD environment. |
| Floor Code | From the list of floors for the selected building, choose the floor in which this room is located. |
| Room Code | Enter a value, that when combined with Building Code and Floor Code, will uniquely identify this room. |
| Room Name | If desired, enter a descriptive name for the room, such as North Conference Room. |
| Categorization | |
| Room Standard |
Choose a room standard to classify this room. Room standards focus on the dimension of the room. See Define Room Standards. |
| Room Type Room Category |
To distinguish rooms as occupiable or non-occupiable, complete these fields by choosing from the existing lists. See Define Room Categories and Room Types for information on setting up the values from which you can choose |
| Organization | |
| Division Code Department Code |
Enter the division and department to which this room belongs by choosing values from the lists of defined divisions and departments. See Define Departments for information on setting up the values from which you can choose. |
| Room Specs | |
| Room Area | If this room is represented in CAD, the system completes this field with the value from the polyline in the CAD floor plan. You cannot edit this value. This value is used in several area calculations. |
| Room Area Manual Entry |
If you are creating a room list, enter the size of this room in square feet or meters. To have the system use this value in its area calculations, you (or someone at your site with access to this task) must run the Update Room Area from Manual Area action. If the room is represented in a CAD drawing, the area is already recorded in the Room Area field and you can leave this field empty. |
| Employee Capacity |
Set the number of employees that can be housed in this room. You may want to do this in bulk: For rooms that have an employee capacity of 1, you can automatically complete this field based on the room type. See Set a Room's Employee Capacity to One Occupant Based on Room Type. |
| Prorate |
This field describes how the system charges for the use of this room and is used with the Space Inventory application. Typically, this field should be completed by a space manager who is familiar with operations at your site. If you are not sure how your company charges for this room, leave this field blank. See the below discussion: Specifying Rooms as Common Area |
| Room Photo |
Once you save a new record, the system activates this field so that you can upload a photo or other document pertaining to the room and attach it to the record. Attaching a photo is particularly useful for rooms that are reservable because self-service users running the Archibus Workplace can see the photo of the room when choosing the room they want to reserve. See Uploading and Viewing Documents. You can upload only one photo or document for each room. |
| Survey Photo Room Survey Redline Date Last Surveyed |
These fields are used in conjunction with the Space Occupancy & Survey mobile app. In the mobile app, users can attach photos and redlines of the rooms that they encounter during the survey. |
| Other Fields | |
| This section holds additional fields that your site has added to the view using the view's Configure Fields option. | |
QR Code Room Labels
You can print QR Code labels for your rooms, using the Print QR Code Labels button, located next to the Export icon. For information, see:
Specifying Rooms as Common Area
In addition to departmental areas, a floor often contains rooms used by all departments (common areas). When a room is used by multiple departments, and you want to bill these departments for their use of this area, you can designate the room as common area by setting the room's Prorate field to a value other than NONE and not assigning a division and department to the room. This is the first step in the chargeback process.
You set a room's Prorate field to one of these values:
- NONE -- If the room represents a specific departmental area, and not a shared area, set the Prorate to NONE. The chargeback routine will change the group's department for this area. You will want to complete the Division Code and Department Code fields to associate this room with a departments. If the room represents a vertical penetration, its Prorate field should be set to NONE. See below note.
- FLOOR -- By setting a room's Prorate field to FLOOR, you are designating that this area is shared by the departments occupying rooms on the floor. Typical examples of floor common areas are lounges and reception areas that serve all departments on a floor.
- BUILDING -- By setting a group's Prorate field to BUILDING, you are designating that this room is shared by all the departments within the building. A typical example of building common area is an auditorium or business center serving all departments in the building.
- SITE -- By setting a room's Prorate field to SITE, you are designating that this area is shared by all departments across the facility site. A mail center serving all departments across the site is an example.
Note: As mentioned, vertical penetration and service areas, developed with the Building Performance process, are stored in the Rooms table and their Room Category indicates that they are not traditional rooms but vertical penetrations and service areas. Vertical penetrations are part of the structure of the building and should not be considered as common areas used by departments. Therefore, if the room category and type indicates that a room is a vertical penetration, be sure that its Prorate field is set to NONE. Service areas, on the other hand, are considered to be common areas and can be charged to departments. If the room category indicates that a room is a service area, be sure to set its Prorate field to FLOOR, BUILDING, or SITE so that it can be included in the common area calculations.
Next steps
If you have a license for the Reservations module or for the Reservations and Hoteling applications and will be using Workplace to reserve meeting spaces and working spaces, you must take additional steps to designate the rooms in your inventory that are reservable. See: