Workplace Services / Hoteling / Background Data
Archibus SaaS / Reservations / Background Data - Facilities
Define Amenities for Hotelable Rooms
When reserving a seat using Workplace, you have the option to search for rooms that have fixed resources (amenities), such as a stand-up desk or a window view.
Use the Define Amenities for Hotelable Rooms (ab-ht-rm-amenities.axvw) view to:
-
define the amenities available for a set of rooms you select. Records that you create with this view are stored in the Room Amenities (rm_amenity) table.
-
see the existing amenities defined for a room or set of rooms
Note: Using this task to associate amenities (fixed resources) with rooms is used only by the Workplace task; the corresponding Create Bookings task does not support searching for rooms based on amenities. Both Workplace and Create Bookings do support searching for rooms based on unlimited resources. This requires using the Define Resources task to associate unlimited resources with your sites or buildings.
This topic has the following sections:
Select the Floor to Work With
Load the Define Amenities for Hotelable Rooms view using the tasks listed at the top of this topic.
To get started, complete the filter at the top of the view and enter the building and floor holding the rooms to which you want to add amenities, or view existing amenities.

Complete the filter options as follows, and click Show. The view will display either a floor plan or room list meeting the criteria you specify in the filter.
| Filter Option | Description |
|---|---|
| Site Code |
This field is optional. If you enter a site, the Building Code field will be restricted to buildings in this site. |
|
Building Code Floor Code |
Select the floor for whose rooms you want to specify amenities. You must enter values for these two fields. |
| Rooms |
|
| Display |
|
Select Rooms and View their Current Amenities
Once you set the filter, select one or multiple rooms to view their current amenities or to add the same set of amenities.
For the selected rooms, the Resources in Selected panel will display the list of entities.
-
If the rooms do not have the same set of amenities, the panel displays a message informing you that the list includes only the amenities that are common to all the selected rooms. See below image.
-
Suppose you select two rooms with the same set of amenities and then another room with no amenities. Because the Resources in Selected panel shows only amenities common to all three rooms, it will show no amenities for this set of rooms.
From the Room List
After you set the restriction, the grid displays the rooms meeting the restriction (either hotelable rooms only, or all rooms).
-
Click on the checkboxes for one or more rooms.
-
The Resources Selected panel displays the currently assigned amenities for these rooms.

Note: If you have selected All Rooms, note that the room list displays all rooms on the floor, including rooms whose Employee Capacity = 0. You should review the Employee Capacity field to be sure that you do not assign amenities to areas such as mechanical closets or stairs. You may need to resize the panel in order to see the values for the Employee Capacity field.
Note If you are working with the Archibus features for meeting room reservations, you may be accustomed to associating fixed resources with meeting rooms. Note that this should be done with the Define Fixed Resources task, as fixed resources for meeting rooms must be assigned to the room arrangement.

From the Floor Plan
After you set the restriction, the floor plan highlights in blue rooms meeting the restriction (either hotelable rooms only, or all rooms with capacity >0).
-
Click on one or more rooms in the floor plan.
-
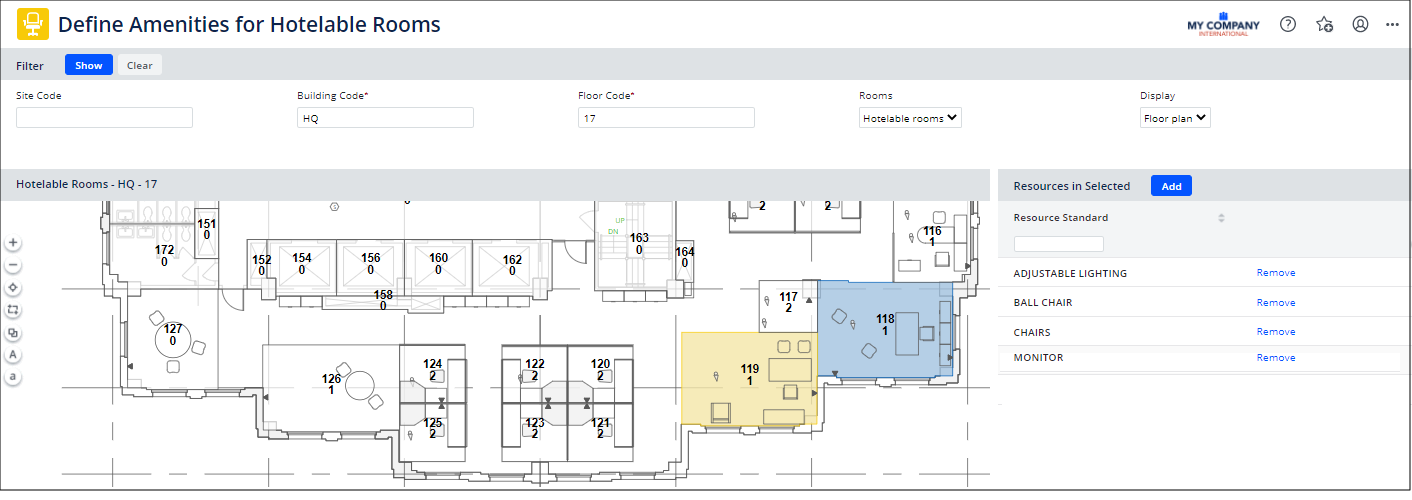
The floor plan highlights the selected rooms in yellow. For example, the below image shows that HQ-17 has two hotelable rooms (originally both were highlighted in blue) and the user has selected one room (highlighted in yellow) to see its amenities.
-
The Resources Selected panel displays the amenities for the selected rooms.
Assign Amenities to Selected Rooms
Select the floor and room set as described above. Once you have you selection of rooms (either from the floor plan or the grid), you will use the Add button on the Resources in Selected panel to access a list of amenity types (resource standards) to associate with the room.
-
In the Resources in Selected panel, click Add.
-
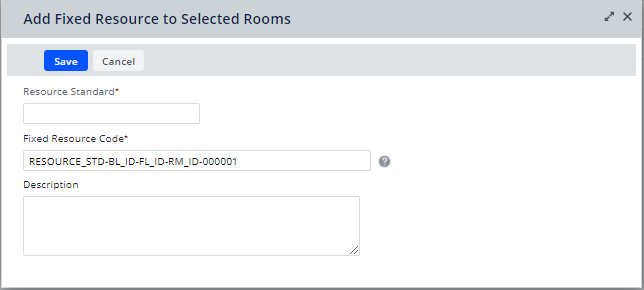
The Add Fixed Resource to Selected Rooms form appears:
-
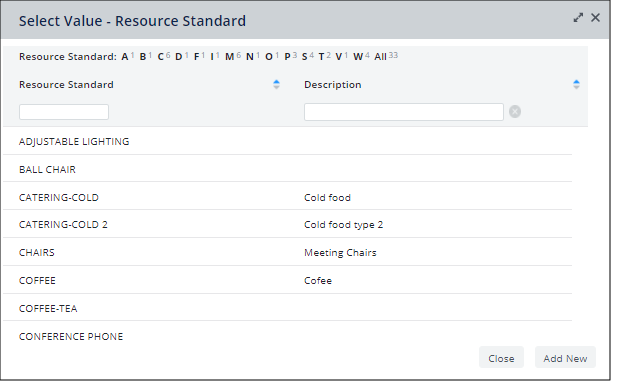
In the Resource Standard field, select a Resource Standard that represents the type of amenity (resource) that exists in the selected rooms.
-
If the desired Resource Standard does not exist in the list, you can enter it by using the Add New button. See below discussion.
-
Resource Standards are also used for meeting space reservations, such as reservations for conference rooms. The Select Value - Resource Standard form shows all Resource Standards, including standards for unlimited resources, such as catering or coffee services. Unlimited resources are affiliated with the entire site and defined with the task; therefore, there is no need to assign unlimited resources to an individual room.
-
-
Click Save.
-
Archibus generates records in the Room Amenities (rm_amenity) table to represent the entity in each selected room. To complete the Fixed Resource Code field, Archibus combines the Resource Standard Name and the room number. The Fixed Resource Code field displays this numbering format, is shown in the image in Step 2.
-
For example, if you were adding ADJUSTABLE LIGHTING and rooms HQ-17-127 and HQ-17-128 were selected, Archibus would generate two records in the Room Amenities table. The Fixed Resource Code values would be ADJUSTABLE LIGHTING-HQ-17-127 and ADJUSTABLE LIGHTING-HQ-17-127.
-
Before creating the records, Archibus validates the new set of records against the existing records in the Room Amenities table so that you do not create a duplicate record in the database for any of the selected rooms.
-
-
The Add Fixed Resource to Selected Room form stays active so that you can easily add more resources to the selected set of rooms. To do so, clear the value in the Resource Standard field , enter a new value for this field, and Save.
Remove Amenities from Selected Rooms
You might find that amenities no longer exist in a room. In this case, you will want to update the Room Amenities table to reflect the actual conditions at your site.
-
Select a set of rooms in the grid or floor plan, as outlined above.
-
In the Resources in Selected panel, find the Resource Standard for the amenity that you want to remove and click the Remove button.
-
Archibus deletes the records in the Room Amenities table for the combination of the resource standard and room IDs of the selected rooms.
Create a New Type of Amenity (Resource Standard)
If the Resource Standards table does not contain a record for an amenity you want to enter, you can create the Resource Standard right from the Define Amenities for Hotelable Rooms view.
-
Follow steps 1-3 in the Assign Amenities to Selected Rooms procedure, above.
-
Click Add New at the bottom of the Select Value - Resource Standard form. This form is shown in Step 3 of the Assign Amenities to Selected Rooms procedure, above.
-
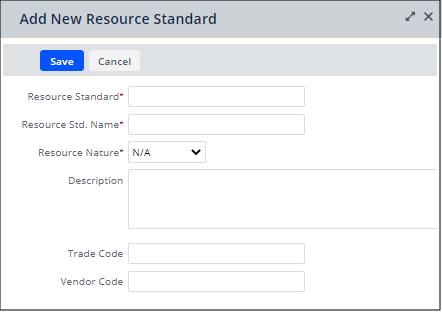
Archibus presents the Add New Resource Standard form.
-
For information on completing the fields, see Define Resource Standards.
-
Save the new Resource Standard and Archibus adds it to the Resource Standards table.
-
Return to the Select Value - Resource Standard form and you can select your new resource.