Archibus SaaS / Foundations / Facility Services / Service Console
Workplace Services / Service Desk / Service Provider / Service Console
Manage Moves
Note: Archibus Workplace users do not have the ability to request group moves.
The general procedure for moving employees and optionally their equipment is:
- Users request moves:
- from the Create Service Request task (group moves and individual moves)
from Archibus Workplace (individual moves only). See Requesting a Move in Archibus Workplace.
- For each request, the system:
- consults the service level agreements (SLA) for the SERVICE DESK-INDIVIDUAL MOVE or SERVICE DESK-GROUP MOVE request type for the buildings of the destination rooms
- sets the move to Requested status
- displays it in the Service Console of the user listed in Assigned To field of the SLA.
For information, see Manage Service Providers and Notifications.
- For example, the sample database includes two move SLAs that are specific to building NC05 and which have user AEM is the assigned service provider. The system consults the move request's destination building and if it is NC05, it adds the move request to the Service Console for AEM. It the destination building is not NC05, the move request does not appear in the Service Console for user AEM. In this case, the move would be routed to user AFM, who is the assigned service provider for the move SLAs that do not specify a building.
- For group moves, all assigned move requests must be for the same destination building in order for the group move request to follow a building-specific SLA. For example, if a group move contains four move requests to building NC05 and one request to building NC04, the group move will not appear in the Service Console for user AEM. Group moves cannot be requested from Workplace.
- The manager reviews the individual move requests and the reviews the group move requests, adding more information as necessary.
- While the move is Requested status, the manager can optionally:
- The manager approves or rejects the move request. The system generates an email to the requestor to let them know the status change.
- For approved moves, the manager can optionally:
- Right before the move date, the system generates an email to the requestor so that they can prepare and pack.
- The manager prints the move orders to supply the move details to the movers for execution.
- The movers report back to the manager after executing the move. The manager can update the move with any additional details encountered in the field.
- The manager completes the move order.
- Upon completion of a group move or an individual move, the system updates the location fields (Building Code, Floor Code, Room Code) of the move items:
- the equipment associated with the employee or room
- the employee being moved
Additionally, if you specified a new "to" department and phone, the corresponding fields in the Employee record will also be updated.
Completing a move order sets the Move Order Status of an individual move and the Move Project Status of a group move to Closed.
- Analyze churn rate with the move reports.
Reject or approve requested moves
When a Workplace user requests a move, the system routes the move to the appropriate user, where it appears in the Requested section of the user's Service Console.
Typically, you will review the move details, and then choose to approve or reject the move, using the buttons at the top of the Service Console. For moves you are approving, you may want to add more information, enter cost estimates, and make edits to the employee's request. For information, see review and edit individual move requests and the review and edit group move requests.
- In the Space Console's Requested grouping, select a group or individual move request by clicking on its selection box in the left column. For details on selecting, see Select Service Requests to View and Process.
- Click the Reject or Approve button in the upper left corner of the Service Console. Or, if working with just one move request, click the Actions drop-down menu in this row, and click Reject or Approve.
- If you reject the request, the system prompts you to enter a comment explaining why you are rejecting the request. The system sets the status to Requested-Rejected and the Service Console no longer displays this request.
- If you approve the request, the Service Console displays it in the Approved section and sets the status to Issued and In Process. In Archibus Foundations, moves are automatically issued when you approve them.
- For either status, the system notifies the requestor.
Assign the move to another service provider
You might need to assign a move request to another service provider for monitoring. For example, you might have approved a request but you will be out of the office when the move is scheduled to occur and you want someone else to monitor it; in this case, you can reassign the request to another manager . This user can then monitor the request using Service Console.
Once you reassign move requests, they will not appear in your Service Console.
When assigning moves to another service provider, the exact button that the Service Console presents depends upon the status of the request. For requests in Requested status, the Service Console presents the Assign button. For requests in the Approved status, the Service Console presents the Reassign button.
- Select one move request or multiple move requests of the same status by clicking on their selection boxes in the left column. See Select Service Requests to View and Process.
- Click the Reassign or Assign button beneath the filter. Alternatively, if you have selected just one request, click the Actions drop-down menu in this row, and click Reassign or Assign.
- In the resulting pop-up form, choose an employee for the Assigned To field by clicking on the ellipses button and selecting an employee from the list.
- Enter a comment to document this change.
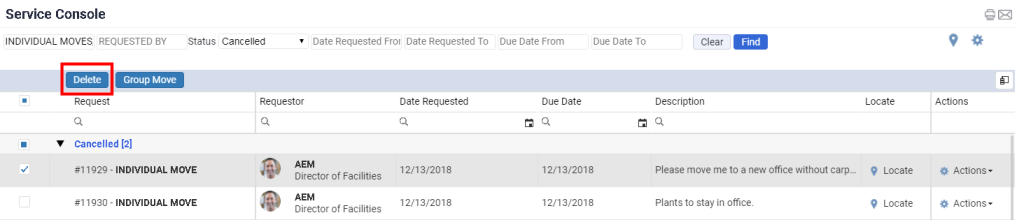
Cancel a move, and optionally delete it
After a move has been approved, if circumstances change and the move is no longer needed, you can cancel the move request.
Note: If the move has not yet been approved, and you find that the move is no longer needed, you can reject the move.
- Select one move request or multiple move requests from the Approved section of the Service Console by clicking on their selection boxes in the left column. For details, see Select Service Requests to View and Process.
- Click the Cancel button beneath the filter.
- Alternatively, if you have selected just one request, click the Actions drop-down menu in this row, and click Cancel. You may wish to enter a comment before canceling this move request by first accessing the Comment command from the Actions drop-down menu.
- Alternatively, if you have selected just one request, click the Actions drop-down menu in this row, and click Cancel. You may wish to enter a comment before canceling this move request by first accessing the Comment command from the Actions drop-down menu.
- The Service Console changes to the status to Cancelled and shows this move in the Cancelled section (if you have opted to display this section using the commands on the gear-shaped icon).
- If you wish, you can delete the cancelled move requests from the system by selecting them in the Cancelled section of the Service Console and clicking the Delete button. The Service Console prompts you to confirm the deletion.
Print move orders
To provide the movers with instructions for executing the move, you can print the move details.
- Select an individual move request or a group move by clicking the selection box in the left column. See Select Service Requests to View and Process.
- On the resulting form, click the Report button.
- The system generates a Word file of the move details and presents the DOCX file so you can view it.
- You can save the DOCX file to a desired location.
Complete a move
Once the movers execute the move and report back to you, you can mark the move as Completed. This is important for updating the location fields of the employee and the equipment moved with the new location. Before updating the status to Completed, enter any changes that might have occurred in the field. For example, if a mover found that a room was in repair and made a decision on the fly to move the employee's items to another vacant room, you can update this employee's destination room with the new information.
- Select one move request or multiple move requests from the Approved section of the Service Console by clicking on their selection boxes in the left column. For details, see Select Service Requests to View and Process.
- If you have selected just one move, if you wish, you enter a comment using the Action drop-down menu, or by completing the Comments field in the Move Order Details form.
- Click the Complete button beneath the filter.
- Alternatively, if you have selected just one request, click the Actions drop-down menu in this row, and click Complete.
- Alternatively, if you have selected just one request, click the Actions drop-down menu in this row, and click Complete.
- The Service Console changes to the status to Closed and shows this move in the Completed section (if you have opted to display this section using the commands on the gear-shaped icon). Note that in Archibus Foundations, completing a move automatically closes it; in the Space SaaS module, completing and closing a move are separate actions.
- The system updates the Building Code, Floor Code, and Room Code fields of the employee and optionally their assigned equipment with the values of the destination room.
- The system notifies the requestor of the status change.