Workplace Services / Service Desk / Service Provider / Service Console
Review and Edit Group Moves
Note: Archibus Workplace users do not have the ability to request group moves.
From the Create Service Request task, you can create a group move and works through the forms to add one or more employees to the group move. Each move can be on a different date, although best practice calls for some commonality between the moves added to the group move. Additionally, you can create new group moves from Service Console by selecting an individual move and opting to add additional moves to it.
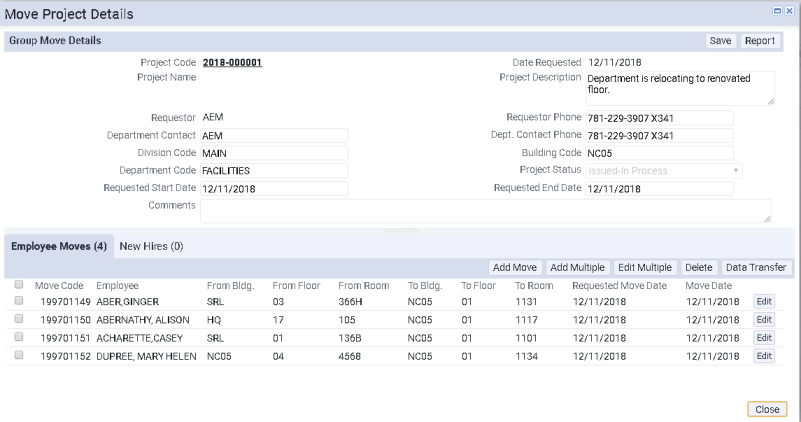
Once you define group moves using the above methods, you can manage them using the Service Console's Move Project Details form. As shown below, the top of the form, the Group Move Details panel, lists information about the group move (also known as a move project); the bottom portion lists the individual moves (either employee moves or new hire moves), with options for processing them.
Use the Move Project Details form to:
- Review and edit details about the group move
- Print the group move and provide it as instructions for movers
- Create individual moves and add them to a group move
- Edit an individual move
- Edit multiple individual moves at once
- Delete an individual move from the group move
- Share moves with others by exporting the move details
Review and edit the group move information
The Group Move Details panel lists the details of the group move. These fields are completed with values that the Archibus Workplace user entered when requesting the move, or may have been automatically completed by the system. Some fields are editable.
- From Service Console, click on a group move.
- The Move Project Details form appears, with the Group Move Details panel listing the following fields for the group move project. You can edit these values as follows.
- Click Save to save any changes you made.
| Field | Description |
|---|---|
| Project Code | The system automatically generated a value for this field, which you cannot change. This field is used by those managing moves using the Move Console (Space SaaS module). Move Console users can search for the move using this value. |
| Project Name | This field is currently not used in Service Console. |
| Project Description | You can enter a short description of the move, such as its purpose. |
| Date Requested | The system completes this field based on the date when the user requested the move using Archibus Workplace, or by generating a group move for an individual move using Service Console. This is not editable. |
| Requestor | The party who requested the move in Archibus Workplace. This is not editable. |
| Requestor Phone | For the party entered in Requestor, this is the phone number associated with this employee in the Employees table. You can change this value if necessary. |
| Department Contact | This person will receive email notifications as the move project is processed through its various stages and its status changes. |
| Department Contact Phone | For the party entered in Department Contact, this is the phone number associated with this employee in the Employees table. You can change this value if necessary. |
|
Division Department |
These fields are completed with the values of the requestor. |
| Building | The destination building for individual move orders assigned to this group move. The exact location within the building is specified in the individual move orders. |
| Project Status | The system automatically completes this field based on action that you take on the move. For information, see Move Status and Project Status fields. |
| Requested Start Date | This is the value the user entered when requesting the group move using Archibus Workplace, or by generating a group move for an individual move using Service Console. You can edit this value as needed. |
| Requested End Date |
The date by which you want all move orders in the group move processed. Note that for individual move orders of this group move, you can set move dates. This is the value the user entered when requesting the group move using Archibus Workplace, or by generating a group move for an individual move using Service Console. You can edit this value as needed. |
| Comments | If necessary, enter any comments about this move. |
Create individual moves and add them to a group move
Create one individual move
You may want to create an individual move and add it to the group move.
- From Service Console, select a group move.
- For the selected group move, move to the Employee Moves tab.
- Choose the Add Move button.
- Complete the Add Employee to Move Project form as follows:
- Set the Available Only? option and when you click on the ellipses button next to Room Code, the list will show only those rooms that have space available for the employee. If you have completed Building Code and Floor Code, the list will show only those rooms that are available on the specified floor. If these fields are blank, the list will show all available rooms.
- Once you enter the floor, you can use the Show Drawing option to access a floor plan showing occupiable rooms. Click on a room to select if for Room Code. This is handy for seeing the exact location of the room to which you are moving this employee. If you have selected the Available Only? option, the floor plan highlights occupiable rooms that have availability.
- Save the Add Employee to Move Project form. The group move displays the new move.
| Field |
Description |
|---|---|
| Employee to Move | Choose an employee from the list of employees entered in the system. |
| Move Description | The group move already contains a description of the overall move. You can enter a description specific to this individual move if necessary. |
| Requested Move Date | The system completes this with the Requested Start Date of the group move. You can change this if necessary. |
| From Building, Floor, Room | The system completes these fields with the current location of the employee you selected. You can change these values if needed. For example, if you know that the system is not reflecting the employee's current location, you can edit these fields with the correct location. |
| To Building, Floor, Room |
The system completes the form with the building specified for the group move. Complete the destination floor and room. If necessary, you can choose a new building and a room within this building. However, in most cases you will want a group move to contain individual moves to destinations within the same building. |
Create individual move orders at one time
You may want to create multiple individual moves at one time and add them to the group move. The form is pre-filled to move all employees of the same department and located on the same floor at one time, but you can change the From fields to meet your needs. For example, you could move all employees in the same division and located in the same building by completing the From Division and From Building fields, and leaving the From Department and From Floor fields empty. Or move all employees in the same division, regardless of location, by completing only From Division.
- From Service Console, select a group move.
- For the selected group move, move to the Employee Moves tab.
- Choose the Add Multiple button.
- In the resulting Add Multiple form, the system has completed the fields based on the group move properties, but you can change these values as needed. For example, you can choose a different From Department or a different From Building. Complete the from fields according to the employees you want to move
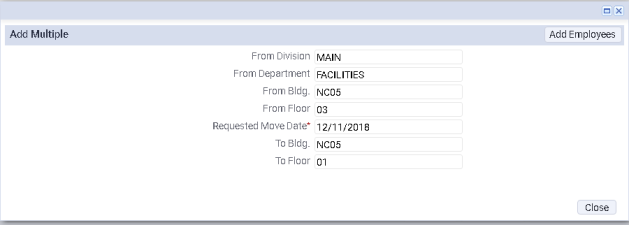
- Click the Add Employees button. For each employee in the combination of the From fields that you specified (such as employees located in the From Department and located on the From Floor), the system generates an employee move order and lists it in the Employees tab. Note that if there are no employees for the specified field combination, the system alerts you.
- Review the list of generated individual moves. If there are employees who should not be included in this group move, you can remove them by selecting the individual move and clicking the Delete button.
Create an individual move order for a new hire
- From Service Console, select a group move.
- For the selected group move, move to the New Hire tab.
- Choose the Add Move button.
- Complete the resulting Add New Hire Move to Project form as follows:
- Set the Available Only? option and when you click on the ellipses button next to Room Code, the list will show only those rooms that have space available for the employee. If you have completed Building Code and Floor Code, the list will show only those rooms that are available on the specified floor. If these fields are blank, the list will show all available rooms.
- Once you enter the floor, you can use the Show Drawing option to access a floor plan showing occupiable rooms. Click on a room to select if for Room Code. This is handy for seeing the exact location of the room to which you are moving this employee. If you have selected the Available Only? option, the floor plan highlights occupiable rooms that have availability.
- Save the Add New Hire Move to Project form. The group move displays the new move under the New Hire tab.
| Field |
Description |
|---|---|
| New Hire | Choose the new hire from the list of employees entered in the system. Note that the new hire must already be entered in the Employees table. |
| Move Description | The group move already contains a description of the overall move. You can enter a description specific to this individual move if necessary. |
| Requested Move Date | The system completes this with the Requested Start Date of the group move. You can change this if necessary. |
| To Building, Floor, Room |
The system completes the form with the building specified for the group move. Complete the destination floor and room. If necessary, you can choose a new building and a room within this building. However, in most cases you will want a group move to contain individual moves to destinations within the same building. |
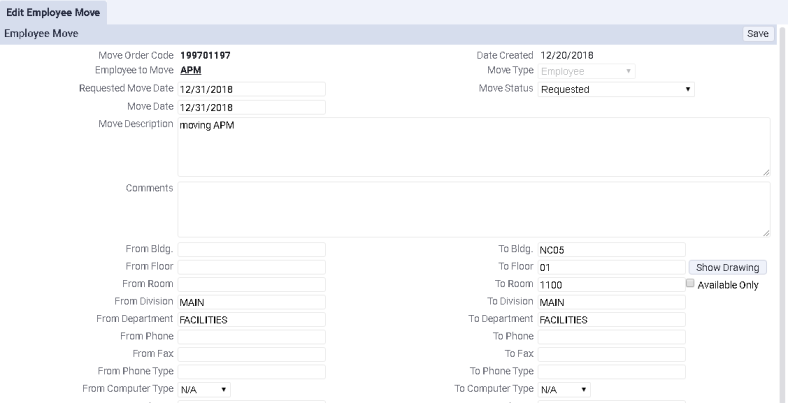
Edit an individual move
You may need to edit the details of an employee move or a new hire move.
- From Service Console, select a group move.
- For the selected group move, move to the Employee Moves tab or the New Hires tab.
- Select a move order.
- In the resulting form, edit values as needed. For information on the Move Status field, see Move Status and Project Status fields.
Edit multiple individual moves at once
You might want to edit several individual moves at one time, such as change the move date or description for multiple moves at one time.
- From Service Console, select a group move.
- For the selected group move, move to the Employee Moves tab or the New Hire tab.
- Select one or more individual moves.
- Click the Edit Multiple button.
- The resulting form presents a set of fields for which you can set the same values for the selected individual moves. For fields in which the values are the same for the selected individual moves, the form lists the common values. If the values are not the same, the form lists <VARIES>.
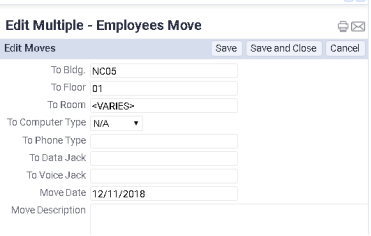
- For any fields for which you want to set the same value for all selected moves, enter the value in the form.
- Click Save, and the system applies the entered value to all individual moves you have selected.
Delete an individual move from the group move
You may have added an individual move to a group move and realize that you no longer require this individual move.
- From Service Console, select a group move.
- For the selected group move, move to the Employee Moves tab or the New Hire tab.
- Select one or more individual moves.
- Click the Deleted button.
- The move no longer displays in the list.
Share moves with others by exporting
Others in your organization, such as a department manager, may wish to know about upcoming moves. Use the Data Transfer feature to export a list of employees and their move details to an Excel file and share the file with a department manager. If the department manager has access to the Space Console, the department manager can review the floor plan and room numbers.
- From Service Console, select a group move.
- For the selected group move, move to the Employee Moves tab or the New Hire tab.
- Click Data Transfer.
- Select to transfer out.
- The system writes the contents of the Move Orders table to an Excel file. On the Transfer Progress form, open the generated file (mo.xls) and save it to a location of your choice. You can edit the Excel file to focus on only a specific set of moves that you want other users to see. For information, see Data Transfer Overview.