Archibus SaaS / Space / Move Coordinator / Move Console / Plan Move Scenario tab
Space / Moves / Move Console / Plan Move Scenario tab
Space / Moves / Move Scenario Planner / Develop Move Scenario / Plan Move Scenario tab
Work with Mark-ups in Move Scenarios
When working with move scenarios, you often work with mark-ups of floor plan drawings that contain notes, outline floor areas to reconfigure, or use arrows and text to point out areas of the floor plan to change. Mark-ups are an important tools for communicating changes between a space planner, move planner, and CAD operator.
For example, as a move coordinator, you might:
- inherit mark-ups from a space planner who has generated a move order. These mark-ups store the space planner's ideas on how to reconfigure the space to make it available for occupancy.
- refine proposed mark-ups. For example, the space planner provided a rough proposed layout during the strategic planning process. The proposed layout needs more detail, which the move planner can provide by further marking up the layout with more detailed changes.
- create your own markups on a layout scenario to make comments for a CAD operator
When working with the Plan Move Scenario tab, you can:
- create new markups and save them to the project
- view and edit markups for the drawings of the current move project
- view and edit markups for drawings from other projects
Create New Markups
When you load the Plan Move Scenario tab, the console includes the Mark-ups form with all the tools for adding markups to the current inventory and layout scenario drawing. For general information on creating mark-ups, see Marking Up Images and Floor Plans.
- Load the layout drawing or inventory drawing to which you want to add mark-ups.
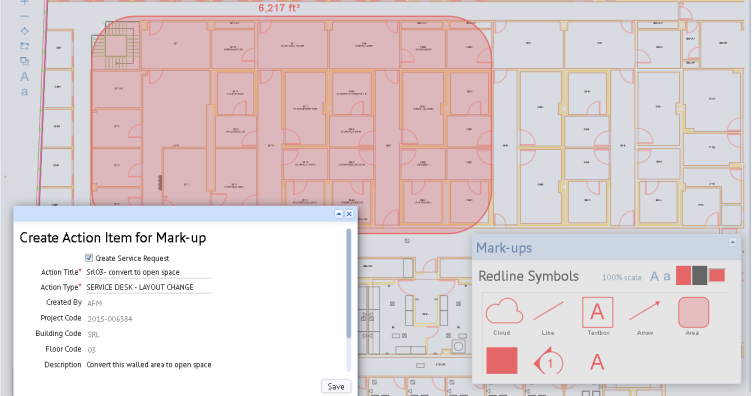
- Use the mark-up tools to add mark-ups to the floor plan. For example, in the below image, the user had used the Area Box, Arrow, and Text tools to indicate an area on the drawing and comment on it.
- Choose the Save Mark-up command on the Move Actions menu, and in the Create Action Item for Mark-up form enter an action title, action type, and description.
- For action type, you can choose SERVICE DESK - LAYOUT CHANGE.
- If you manage tasks with the Archibus Service Desk application, you can optionally generate a service request for executing this action item.
- The underlying SLA can then route this request to the This the CAD Operator, who receives it and can look at the attached mark-up for reference in making layout changes in CAD.
- Click Save and the command creates a screen-scrape and saves it to the Document 4 document field of the Action Items (
activity_log) table and completes the Action Items table's Project Code field with the move's Project Code value. The mark-up is now associated with the move project. The system saves to the Archibus Redlines table (afm_redlines) the data that is necessary to re-create the markup and highlighting so you can edit it later on.
CAD Operator: Receiving Mark-ups
If the move planner created a service request for the mark-up as described above, the CAD operator will receive e-mail notification of the mark-up.
The CAD operator can then use the mark-up for reference in making layout changes to the drawing in CAD. The CAD operator receives notification of a new service request, and does the following:
- Opens the Workplace Services / Service Desk / Service Provider / Issue - Complete Service Requests task.
- Selects the Service Request, which has a Request Type of SERVICE DESK - LAYOUT CHANGE.
- On the Update tab, clicks the "Show Document" icon next to Document 4. This is the saved mark-up.
For information on creating new layouts based on the mark-ups, see Move Scenarios: CAD User.
Note: If your site does not use Service Desk, the move planner can retrieve the mark-up from the Document 4 field of the Action Items table and send the mark-up to the CAD operator as an email attachment.
Open Existing Mark-ups
You can view and edit mark-ups associated with the current move project, as well as those associated with other projects. For example, you might send a red-mark to a CAD operator indicating space that needs to be reconfigured for the current move project. The CAD operator can send back an updated layout scenario drawing with the new configuration. You can further comment on this configuration and send mark-ups back to the CAD operator. In this case, you are working within one project.
Recall, Space Planning, Enterprise Assets, Advanced Forecasting, and Moves projects can all be linked if they have the same value for the Project Name field. Thus, mark-ups created in any of these applications that affect the floor plan currently loaded can be accessed from move scenarios.
The Move Actions menu offers these commands for accessing mark-ups of the currently-loaded layout scenario drawing or inventory drawing.
| Command | Description |
|---|---|
| Show Mark-ups |
Presents a form listing other mark-ups from the current project that also affect the floors currently loaded in the drawing control.
|
| Show Other Project Mark-ups |
Presents a form listing mark-ups from other projects that also affect the floors currently loaded in the drawing control.
Note that layer_name doesn't have to be the same, thereby enabling the form to show mark-ups that may involve the same drawing but on different layers (which also may relate to a different project). |
| Hide Mark-ups | Use this command to hide the mark-up and re-instate the inventory drawing or scenario drawing. |
The Show Mark-ups and Show Other Project Mark-up commands present a form listing all mark-ups meeting the restriction. As shown below, the form for the Show Other Project Mark-ups command includes the Project Code and Project Name.
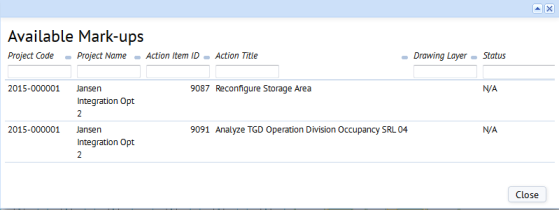
Select a mark-up from the form, and the command loads the mark-up, replacing the currently loaded layout (inventory drawing or layout scenario drawing).
Note that you can load only one mark-up at a time.
Work with Existing Mark-ups
Once you load an existing mark-up, you can add to it using the mark-up commands.
If it is the first time that you worked with the mark-up (that is, you have not yet saved changes to the mark-up), it is a new mark-up. The system presents Create Action Item for Mark-up form and you can save the mark-up with a new name. In this way, you keep a separate file from the mark-up that you might have inherited from the CAD operator.
How you save the markup depends upon if the mark-up belongs to the current project or another project.
If you load a mark-up for the current project for first time, make changes, save it to a new name, and then make more changes, you do not save the file again to a new name; you add to the changes that you already made. If the file belongs to a different project, then you do complete the form for saving to a new name:
- If the markup is not new and it belongs to the current move project (
activity_log.project_id = <this project>), then the Save Markups command updates the existing markup (afm_redlines record) with the updated image. A new activity_log item is not created. - If the markup is not new, but it belongs to a different project (
activity_log.project_id <> <this project>), then you must complete the create a new redline record and associate it with a new activity_log record that belongs to the current move project. To do this, pop-up the existing form that's used for the Save Mark-ups action for the user to fill in details for the new mark-up.
See also