Archibus Smart Client
Access Any Database Table by Creating a New Grid View
You can use the Views tab on the Explorer pane to create new grid views by selecting a table to add to the view, the fields to include in the view, sort order, and so on. After customizing the view, you can save the view and optionally add it to the Favorites list.
You can create ad hoc views for reviewing the data in any table or the schema underlying the table. Use this feature to access any table in the database; this is especially hand for accessing tables for which no corresponding task exists on the Smart Client Navigator.
Note: In addition to creating new grid views from Smart Client, you can create your own views using Web Central's System / Add-In Manager / Reports Central task. Reports Central offers a wizard interface for specifying the tables, fields, and restrictions for a new view. It is available as part Foundations, Archibus SaaS, and the full software offering.
Archibus SaaS Users
If you are running Smart Client as part of an Archibus SaaS deployment, the Explorer's Views tab is hidden based on the following. This enables administrators at your site to explicitly provide control as to who has access to the Views tab.
-
The Views Tab will be enabled if the user is a member of the group name specified in Parameter Value in the afm_activity_params table where Application = ‘AbSystemAdministration’ and the Parameter Code = ‘EnableSCViewsTab
-
If that value does not exist in the db, the default group name that a user must belong to is “SYS-VIEW-ALTER”.
SaaS Partner Administrators (such as user AFM-BP) and SaaS Administrators (such as user AFM-CLI) can access the View tab because they are assigned to roles that are assigned the "%" security group.
To activate the View tab for specific security groups:
- Run the System / Archibus Administrator - Application Configuration / Configure Application Parameters task.
- Choose the
AbSystemAdministrationapplication. - Set
EnableSCViewsTabto the desired security groups. - Users who are members of roles assigned to these security groups will now have access to the Views tab.
To create a new grid view
- From the Explorer panel, select the Views tab. In the lower pane, the Smart Client displays a list of all tables in the database. You can filter this list by completing the filter tab in the top row, as shown below where the user as searched on tables begninning with "afm_".. For information on filtering, see Searching for Records Using the Filter Row.
Note that the top of the Explorer lists views that you have recently created. In the below image, the user has recently worked with four views. See Loading Views that you Recently Created.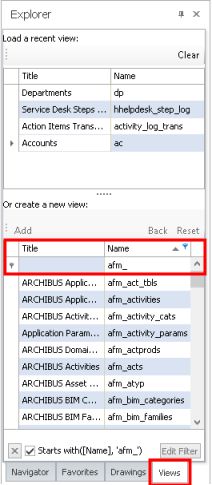
- From the bottom pane, select the table that you want to examine by clicking the row header for the table in the list.
-
Click Add, or, double-click the table.
-
The grid displays the selected table with a default set of fields. See Overwriting Default Grid Views for information on how the default fields are determined.
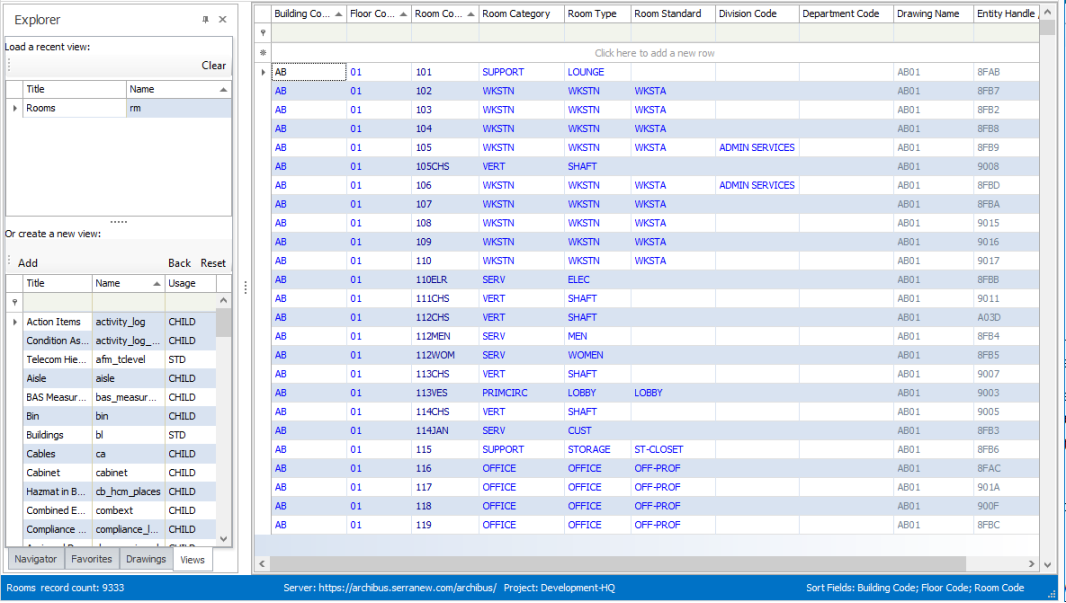
- Your new grid view (named according to the selected table) is added to the top panel of the Views tab for future access (suc as "Rooms" in the below image. See Loading Views that you Recently Created.
-
- If needed, use the following commands to customize how the view presents records from this table.
To... ... Run this command Add or remove fields View / Fields (on the Ribbon)
See Selecting the Fields to Display.Set filters to restrict the records that display Filter / Filter (on the Ribbon)
See Creating Complex Filters.
Filter / by Row (on the Ribbon)
See Searching for Records Using the Filter Row
Using the Filter Icon Options to Restrict the ViewSort the rows Sort (Column header action)
See Sorting Columns
- Optionally, add a second table to the view by double-clicking a table in the Explorer pane's list. The table list is restricted to show only those tables that can be related to the first table selected.
- For example, if you are examining the Divisions table, you can add the Departments table so that your view presents all departments assigned to each division. Use the Back button to return to the list of all tables. The above image shows setting the Rooms table as the first table, and the Add panel listing the tables that are related to the Rooms table and can be added to the view.
- The list indicates whether the additional tables can be used in the standard role or as a child table in the view you are creating.
If a table in the standard role is added, the command makes its key field and description field visible.
If a child or drill-down table is added, the command adds the table as a child to the first table. Click the plus sign to see the child records. See Parent-Child Grid Views.
- If needed, customize the fields for the second table using the commands in the above table.
- Optionally, select a third table by double-clicking the table in the list. If a child table was selected as the second table, the list of tables includes only tables that can be related to that child table.
- If needed, customize the fields for the third table using the commands in the above table.
- If you want to save the view, see Saving Views.
- If you want to start a new view and clear the grid pane, choose Reset to clear the current view. You can always return to this view by selecting it from the top of the Views panel (if you saved it). See Loading Views that you Recently Created. You can now create a new view by following the above procedure.
Note: If you are creating a view to import or export its data, be aware that data transfer exports only the fields in the main table. See Data Transfer Overview.