Archibus Smart Client
Working with Parent-Child Grid Views
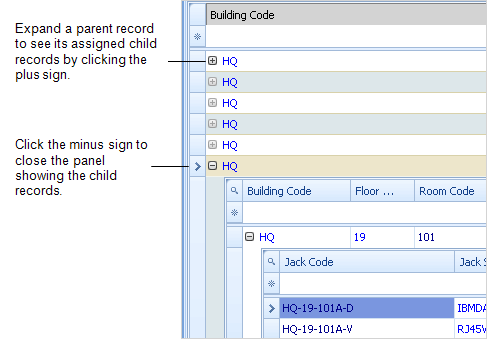
Some Smart Client grid views show parent tables that have child tables assigned to them, such as Building records that have assigned Floor records. The child records are shown as you expand the parent record. The grid presents the parent records with a plus sign; when you click the plus sign the grid expands to show the assigned child records.
After you have selected a plus sign, it becomes a minus sign; click the minus sign to close the panel so that you no longer see its records.
If you have already expanded and contracted a panel to show its assigned records, the plus sign for that panel darkens to indicate that it has already been selected, helping you track which records you have reviewed.
For example, the following screen shot shows the record for HQ's floor 19 expanded to show the room records for floor 19. The record for room 101 is expanded to show its associated jack records. The first floor record for building HQ in the grid has already been expanded to show its room records indicated by its darkened plus sign.
Showing Only Child Panels
If a child panel has many records, you might want to view only the child panel to reduce the amount of scrolling needed and to increase your workspace for that panel.
To show only the child panel:
- Click the magnifying glass icon in the column header row for the child panel.
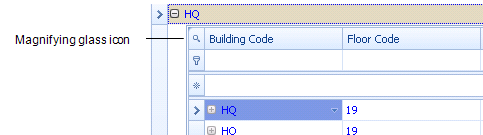
This hides the other panels in the view.
The grid shows just the child panel.
- To dismiss the child panel and return to the original view that shows all the panels, click the X.

Filtering Child Panels
You can create filters for child panels in the following ways:
| Method | Description | Help Topic |
|---|---|---|
| Filter/by Row | When you run the Filter/by Row command for a parent-child view, the Filter row is added to the parent panel and to each of the child panels. If you run the command when a parent panel is expanded, the view refreshes and the child panels are hidden. When you expand the panels you will see the Filter row available on each of the child panels | Searching for Records in a Grid View Using the Filter Row. |
| Filter icon | Each field title in a child panel includes a Filter icon that appears when you mouse over the cell. Click this Filer icon to see additional filter options. | Restricting Views Using the Filter Icon Options. |
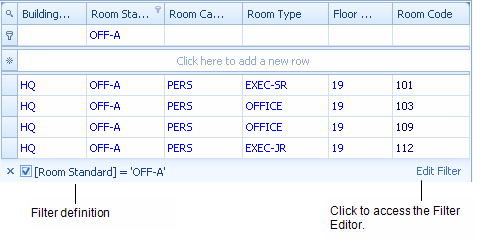
| Filter Editor | Once you set a filter for a child panel using the Filter/by Row command or the Filter icon menu, the bottom of the grid shows the filter definition and the Edit Filter command. Edit Filter invokes the Filter Editor used to create complex filters. | Creating Complex Filters |
The following image shows a child panel that has a filter set, and therefore has the Edit Filter link.
Adding Child Records
When you add a new child record, enter the primary key for the new record; after you enter the primary key, the Smart Client fills in the data for the selected parent record, reducing your data entry.
When adding child records, some fields are filled in using the selections you make when drilling down to the child records. For this reason, these fields are disabled when you enter a new record. For example, when entering an equipment item using the Define Equipment by Room task, you drill down to the equipment records by selecting a building, floor, and room record. When you enter the Equipment Code for the new equipment record, the Building, Floor, and Room Codes are filled in using your drill-down selections. You are not able to make entries in these fields.
To add child records:
- Open a grid view that has parent-child records. These tasks often include the word "by" to indicate that the view shows parent-child records. For example, load:
Space / Space Inventory / Room Inventory / Define Rooms by Building
The grid presents the parent records.
- Click the plus sign to expand a parent record to show its child records.
If the child records have a plus sign, these records also have child records.
- Drill-down to the level you want to work with.
To view only the child panel, click the magnifying glass icon in the column header row for the child panel.
- To add a new record, click in the first row of the grid panel showing the data you want to add.
- Click in the primary key field for the record, and enter the primary key. For example, click in the Room Code field to add a new room record.
After you type the primary key, the Smart Client fills in information for the selected parent record, such as the building and floor information in the case of a room record.
- To save the record, click outside the row.
- To close the panel showing the assigned records, click the minus sign next to the parent record.
Deleting Records in Parent-Child Grid Views
When you expand a panel that has child records, you can select the child record and press Delete on your keyboard. This action deletes only the selected child record.
If you select a parent record in the grid and press the Delete key on your keyboard, the parent record and all its assigned child records are deleted. For example, if you delete a Floor record, all its assigned Room records are also deleted. This behavior is known as cascading updates and deletes.
To control the behavior of this feature, see Setting Up Archibus Cascading Update and Delete (System Management Help).