Archibus SaaS / Maintenance / Maintenance Console
Corrective Maintenance / Maintenance Console
Preventive Maintenance / Maintenance Console
Explore the Maintenance Console
The Maintenance Console (ab-bldgops-console.axvw
The Maintenance Console shows only work that needs your attention, as the console filters requests by your sign-on. For example, if you sign on as a work team supervisor, you will see only work requests assigned to your work team, while logging on as a business manager, you would see only requests requiring your approval.

This topic introduces you to the Maintenance Console, and has the following sections:
- Expand and Contract Work Request Lists
- Control the Console's Grid
- Review a Work Request
- Use Actions to Advance Work through the Maintenance Process
- Export Work Requests
- Locate Work with the Map and Floor Plan
- Customize the Maintenance Console
Also see:
- Search for Work Requests
- Explore the Work Request Form
- Add Data as You Work
- Maintenance Console: Overview (list of "how to" topics)
- Working from the Maintenance Console or from the Maintenance Mobile App: Overview
- List of Videos that Overview the Maintenance Console
Expand and Contract Work Lists
The Maintenance Console groups work requests according to the category you specify in Group By (located in the right of the ribbon at the top of the Console). The default is to group by Status, but you can group by other criteria, such as Building, Craftsperson, or Work Order.
The Maintenance Console displays a count of the items in each category in the category header. Clicking on a header expands this list to show all requests of this category, as shown in the above image for the Approved header. As you work with requests and their values change, the Maintenance Console updates the header bands with new counts and lists the request in the appropriate category. For more information, see Console Views: Grouping by a Category.
The bands containing items that need immediate attention, such as requested work and items on hold due to a lack of available labor, are in red.
Note: If your site has a large number of work requests and you are finding that the Maintenance Console takes a long time to load, you can set parameters to control the number of requests loaded at once. See Set Application Parameters for the Maintenance Console.
Control the Console's Grid
In addition to using the Group By field to organize the grid, you can use the Options menu to control the data displayed in the grid.

Use the Options menu to:
-
highlight escalated work requests
-
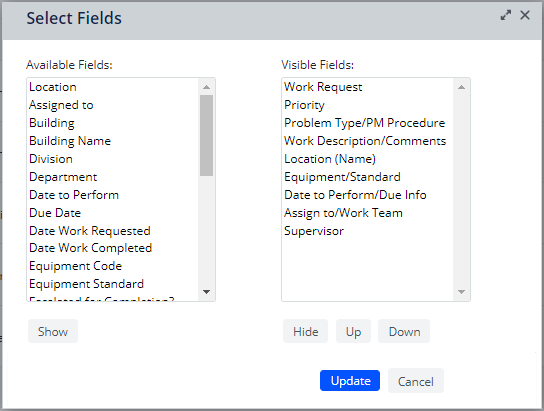
change the visible work request fields and their position in the grid. Note that some fields in the Select Fields form, such as Problem Type/PM Procedure are grouped as one entry. This is because these fields display together on the Maintenance Console grid.
-
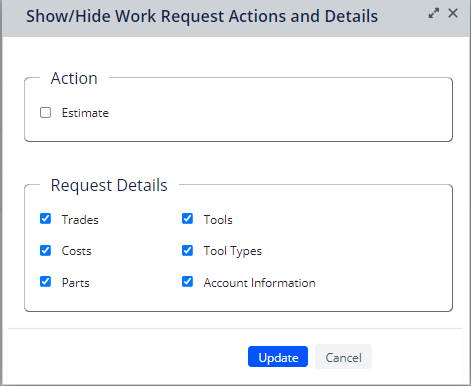
display and hide work request details and actions. For information on hiding the Estimate action, see Estimating Trades, Parts, and Other Costs. To hide panels on the Maintenance Console's Work Request form clear their check boxes. For information on the Work Request form, see Explore the Work Request form.
.
Review a Work Request
The Maintenance Console lists all the work requests and groups them by status. To access details on a work request:
- Expand the grouping (such as "Issued and In Process" or "Assigned to Work Order" so that you can see the individual work requests.
- Click on the Work Request number in the left column.
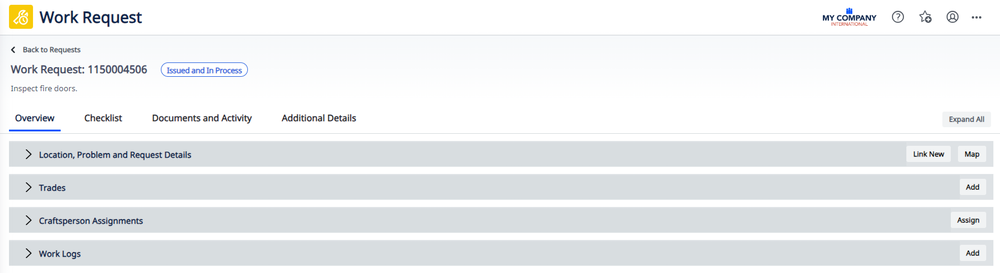
- The Console replaces the current content with the Work Request form, holding the details of the work request. The Work Request form has a series of tabs with expandable panels to organize the details about the request. You can expand the various parts of the form to review or update details. See Explore the Work Request Form.
-
To return to the main page of the Maintenance Console, listing all requests, click the Back to Requests arrow, located in the top left corner.
Use Actions to Advance Work through the Maintenance Process
Working from the console, you can use the action buttons to change the status of work requests as they progresses through its lifecycle. The Console only displays buttons appropriate for the appropriate status and for the underlying work request.
Depending on the work request's current status and underlying SLA, you might have buttons for Approve, Issue, Cancel, Estimate, Schedule, Update, Verify, Survey, Complete, Close. See below images for examples.
Step 1: Select the Requests
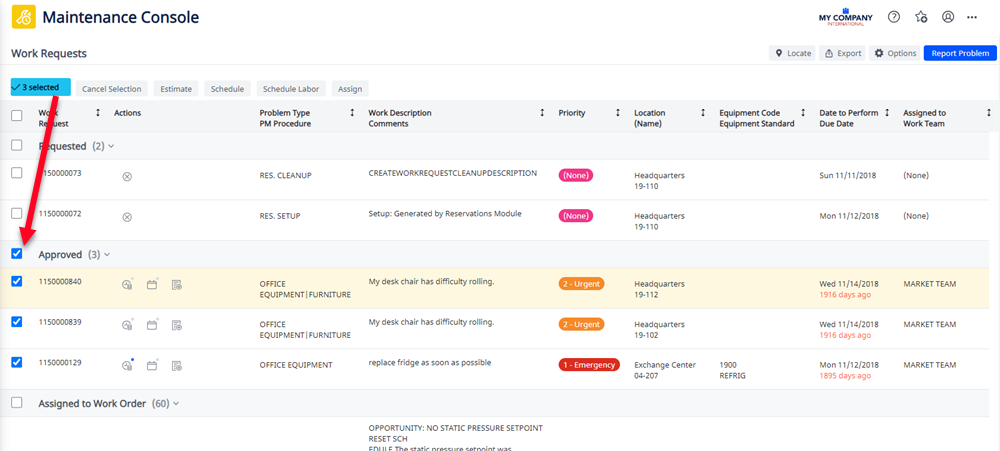
Select a single work request, or set of work requests, by clicking their check boxes. You can also select the box next to a band's heading (such as the box next to "Approved 3" in the below image) to select all work requests in a grouping.
Once you have a selection of work requests, you can remove work requests from the selection set by clearing their boxes.
At the top of the Maintenance Console, the left-most button keeps a count of the selected work requests. Use Cancel Selection to deselect all work requests.
By selecting multiple requests, you can use the action buttons at the top of the Maintenance Console to act on all the selected requests at once. For example, click multiple Approved requests and click Assign to assign them to the same work order. As shown below, several action buttons are appropriate for the selected work requests. For example, you could choose Schedule to schedule the same trade or tool to the selected requests. If the action requires you to enter data, the resulting form shows only the information that is likely to be the same for multiple requests.
Step 2: Select an Action Button
Select one or multiple work requests, and the buttons at the top of the Maintenance Console refresh to reflect only those actions appropriate for the selected set of work requests. If a request is not selected, no buttons appear.
Clicking the buttons presents a form that has the most commonly entered information for that action. Or, in some cases, there is no data entry needed; clicking the button advances the status and presents a message that describes the action that occurred.

Action Icons
Some action buttons include icons to indicate more information about the action.
| Icon | Example | Description |
|---|---|---|
| Star |
|
This action is required. |
| Check Mark |
|
This action has been completed. |
| Stop Icon |
|
|
Alternative Method: Use Per-Row Actions for Individual Work Requests
Note: As you review the help topics for the Maintenance Console, be aware that the instructions call for using the action buttons at the top of the Maintenance Console; the instructions do not include the per-row actions. Although the help topics do not include the per-row actions, you can always use the per-row actions when you are working with only one work request at a time.
In addition to using the action buttons as described above to work with one or multiple work requests, you can use the per-row actions to process an individual work request. Each row contains a set of action buttons for the actions appropriate for the work request's status. Hover over an action button for a description of the action. The below image shows the icons for the Estimate, Schedule, Issue, and Cancel actions, appropriate for the Assigned to Work Order status.

Click an action icon to perform this action on the work request in this row. For example, clicking the Estimate icon presents the Estimate Work Request form.
The per-row actions are handy when you are working with one work request at a time; the per-row actions save you from first selecting the work request's check box and then travelling to the top of the Console to access the action buttons.
To indicate additional information, the per-row actions add the following symbols to the icons:
| Symbol | Example | Description |
|---|---|---|
|
Blue dot |

|
Action is completed. |
| Green dot |

|
Applies only to checklists. Checklists have been verified. |
| Red dot |

|
Action is blocked. |
| Red asterisk |

|
Action is mandatory. |
Export Work Requests
You can select work requests in the Maintenance Console and then export them to a Word Doc or PDF using the below "selected work request" commands. The Export to XLS and Export to Doc export all items on the current screen. You may first wish to filter and set fields before exporting.
Exporting work requests and printing them can be a handy way to distribute work to craftspersons. See Getting Work Request Information to the Person Doing the Work.
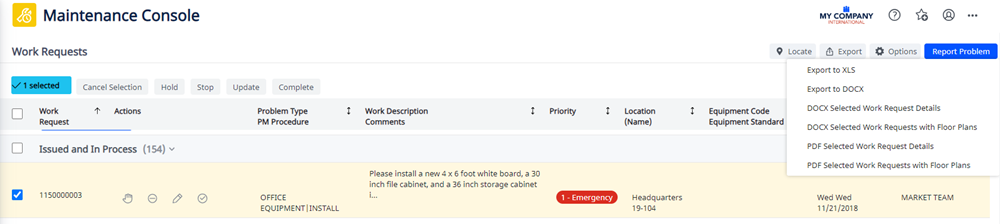
Locate Work with the Map and Floor Plan
Use the Locate icon (to the left of the Gear icon in the upper right corner of the Console) to locate work by map or floor plan. This feature is handy for visualizing all the locations on a floor with open work, or all locations on a map with open work. The feature presents the locations with work requests that meet the current filter restriction. For example, the below image shows the locations in SRL-03 that have open work requests.
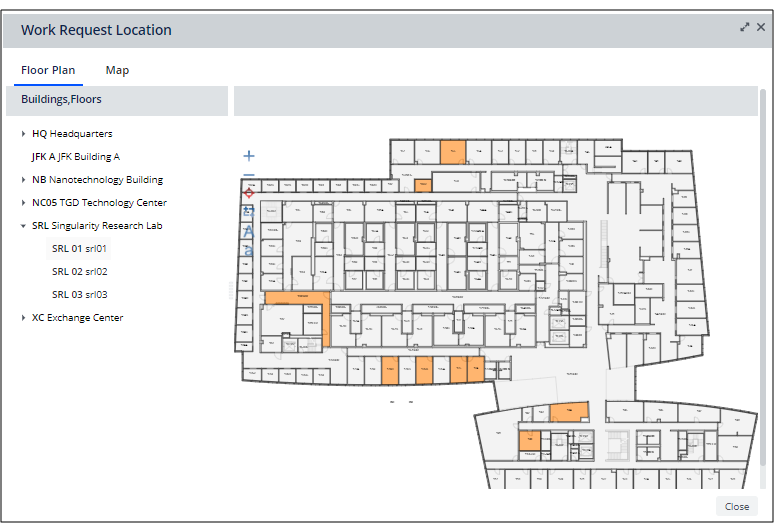
To see work by floor plan
- Click the Locate icon, and the Console presents the Work Request Location form.
- Choose a floor from the list and the Console presents the floor plan drawing and highlights the rooms with work that meets the current filter restriction. For example, if you have restricted to show only completed work, the floor plan highlights only those rooms with completed work requests.
- Click on a room and the Console closes the Work Request Location form and loads the work requests for that room, setting the filter to the selected room.
- When you are through reviewing the work requests, clear the filter to return to the complete list of work.
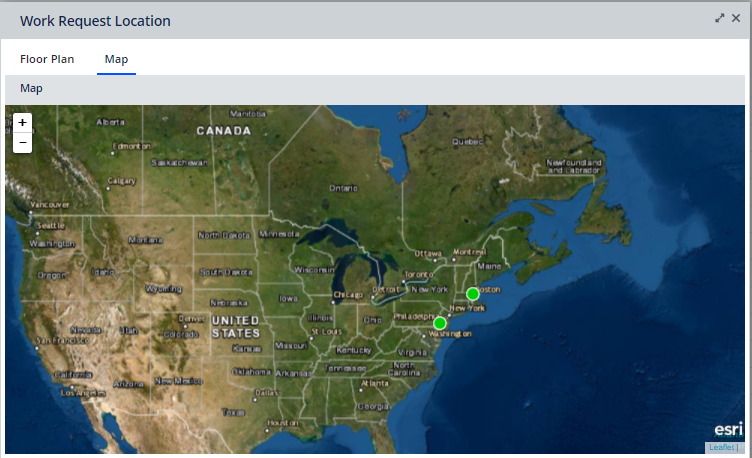
To see work by geographic location
- Click the Locate icon, and the Console presents the Work Request Location form.
- Click on Map.
- The Console displays a map with markers for locations that have open work. This includes work requests that might be tracked by longitude and latitude, such as when work is outside the building, or when the user reports a maintenance problem, completes the Site Code field, and then chooses the particular area on the site using the map feature.
- As necessary, zoom into the map to see the specific markers.
- Click on a marker and the Console displays a pop-up with information about the location.
- You can close the pop-up by clicking its X button, or you can choose Filter in Console to set the Console's filter to display work requests for this location.
Advanced: Customizing the Maintenance Console
The main AXVW file for the Maintenance Console, ab-bldgops-console.axvw, contains 11 app-level js files that have been compressed into one file to improve performance. However, if customizations are to be made to the js files, then the developer should modify the uncompressed js files. To do this, comment out ab-bldgops-console-all-min.js and use the separate, uncompressed js files in ab-bldgops-console.axvw instead.
See Also
Maintenance Console: Adding Data as you Work