Archibus OnSite
Manager Configures OnSite for All Users
When integrating OnSite into the maintenance workflow, the maintenance manager can control aspects of OnSite behavior using System / Mobile Apps Manager / Manage Configurations for OnSite task.
This topic has the following sections:
Overview
The Manage Configurations for OnSite view presents a series of tabs that group together related options. Each option includes a "?" button that presents a pop-up tooltip describing the setting and resulting OnSite behavior.
Note: If you are using a localized version of Archibus, you will notice that the pop-up tooltips are not localized. Since the tooltip text is the application parameter’s description field text and Archibus does not have schema structure to localize these descriptions, the tooltips present the English/Un-localized text for all languages. If your site wants localized tooltips, they can translate the application parameter descriptions stored in the database.
Each tab offers a Save button. Save any changes you make on a tab before moving to the next tab. When you save your settings, the options are stored as application parameters in the afm_activity_params table under the AbOnSiteMobile application. You can view them with the System / Archibus Administrator - Application Configuration / Configure Application Parameters task.
Note: Changes that you make with this view will reflect in OnSite the next time that the technician opens the OnSite app.
Per-Site vs. Per-User Options
The Manage Configurations for OnSite tabs include options that apply to all OnSite users as well as options that OnSite users can overwrite by setting options from their device.
| Tab | Options Apply To |
|---|---|
| General | All OnSite users across your organization. |
| Workflow | All OnSite users across your organization. |
| Notifications |
All OnSite users across the organization. -- or -- Allow each OnSite user to control notification behavior; users will set these options directly from OnSite. If you allow users to set their own options, use this tab to set the default behavior, which users can then change using the OnSite app. |
| Offline Support | All OnSite users across your organization. However, when offline support is active, each technician can choose to turn it off if they know that they always work in a location with WiFi. |
| Display Options |
OnSite users can set some of their own display options directly from the device. Use the Display Options tab to set the default values that OnSite users can change. |
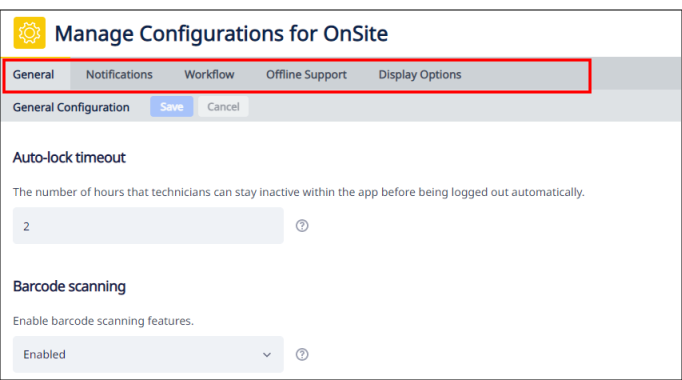
General Tab
The General tab contains these options:
| Option | Parameter Name | Description |
|---|---|---|
| Auto-lock timeout | AutoLockTimeout |
For security purposes, you can have OnSite automatically log out the current user if the user has been active for a set time period. Complete this option with the number of hours the user must be inactive on OnSite before OnSite automatically logs out the user. |
| Barcode scanning | ShowBarcodeScanActions |
Enable or disable the ability for OnSite users to complete fields by scanning a barcode, such as completing the Search field by scanning the barcode of an equipment item. If your site does not have barcodes in place, use this option to hide the barcode elements from the OnSite interface. When this option is set to Disabled, the following screens do not display the barcode options:
|
| Labor Hour Options | ||
| Allow technicians to log labor hours by manual input, start-stop a timer, or both | LaborHoursMethodsToLog |
OnSite includes a timer so that technicians can record their labor hours by starting and stopping a timer as they work on a job. The intervals recorded by the timer are stored in the work request's work logs (records in the wrcf table). Use this option to specify if technicians record their labor using manual entry only, timer entry only, or both timer and manual entry. Setting to both timer and manual entry enables the technician to manually adjust the work logs if they forget to set the timer. When the timer is active, the Work Request Details page shows the total logged hours or the running timer in the footer and includes the Start Timer and Stop Timer buttons. Click here to see an image of the timer features. If you set this option to Manual Only, instead of the timer button, OnSite displays the Add Work Log button, which accesses the Add Work Log page for manually entering work information. |
| The maximum number of labor hours that technicians can log each day | LaborHoursLimitPerDay |
Your site may wish to prevent a technician from working too many hours during the day. For example, if your site does not want to pay an overtime rate, you can set this option to the maximum number of hours a technician can work in a day before requiring the overtime rate. When the technician's timer reaches the maximum labor hours, they receive an alert message. Depending on the setting of the below option, the timer will stop or they will be able to continue. Likewise, if they manually enter a work log that exceed the maximum labor hours, they receive a warning message and can continue to work or be prohibited from entering the additional hours beyond the maximum. You can enter any number between 1 and 24. The default is 12. |
| Allow technicians to log labor hours after reaching the maximum labor hours specified above | LaborHourAllowLogOverLimit |
Once you set a maximum number of hours with the above option, use this option to control OnSite's behavior when the maximum is reached. If this option is set to Yes and you are using the timer, OnSite presents a warning message and asks if you want to continue working. You can then opt to stop the timer or continue work. If this option is set to No, OnSite presents a message and the timer stops automatically. If this is set to Yes and you are manually entering a work log, OnSite presents a warning and asks if you want to continue working. You can then opt to continue working. If you opt to stop working, OnSite logs an entry for the day with the remaining hours so that total log hours reach the maximum daily limit. |
Notifications Tab
These options control when OnSite users receive notifications about the status of work. With the first option, you can allow users to control these options themselves directly from the OnSite app. In this case, the options you set here will be the default values that the OnSite user can change.
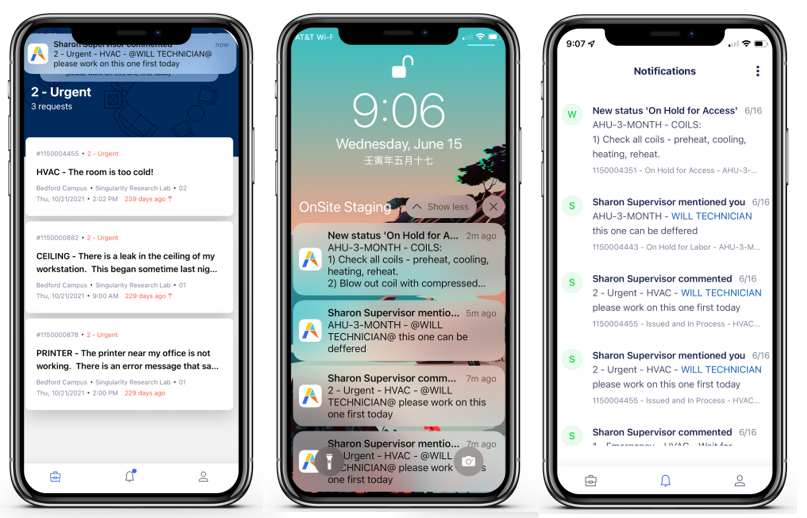
Notifications appear on the user's device, as shown below. The OnSite user can also review them from the Notifications screen, available from the bell-shaped icon at the bottom of the app.
| Option | Parameter Name | Description |
|---|---|---|
| Allow users to modify their notification settings. | PushNotificationAllowCFChange |
If you set this to Yes, each OnSite user can configure how notifications are set by completing the options directly from OnSite. The manager can set the below options with the default behavior, which technicians can then change using the OnSite app. If you set this option to No, the following notification options apply to all OnSite users in your organization. |
| Send notifications when corrective work is assigned to technicians. | PushNotificationNewCorrectiveRequest |
OnSite users can receive a notification each time new corrective work is assigned to them. Although their assigned work is listed on the opening screen, it is handy to receive this notification in case they do not immediately see the newly assigned work on the screen. Control for what priority of work OnSite users receive notifications:
|
| Send notifications when new PM work is assigned to technicians. | PushNotificationNewPMRequest | Same as above, except applies to Preventive Maintenance work. |
| When work assigned to a technician changes status. |
PushNotificationStatusUpdateForMyCorrectiveWork PushNotificationStatusUpdateForMyPMWork |
The OnSite user can receive notification each time the work request changes status (such as changing to Assigned, Approved, In Process, On Hold). Select for users to receive status notification changes for Corrective work, Preventive Maintenance, or both. If nothing is selected, the OnSite user becomes aware of status changes by periodically looking up a specific work request and viewing the status. |
| When work assigned to a technician is escalated |
PushNotificationMyEscalatedCorrectiveWork PushNotificationMyEscalatedPMWork
|
When an assigned request is overdue and becomes escalated, users can receive notification. Select to receive notifications for escalated Corrective work, Preventive Maintenance, or both. If nothing is selected, the OnSite user becomes aware of escalated work by periodically looking up a specific work request and viewing the status. |
| When a technician is tagged in a comment | PushNotificationSomeoneTaggedMe |
Check this option for the OnSite user to receive notification each time they are tagged in a comment. If this option is not selected, OnSite users will be aware of tagged comments through email. |
| When a comment is made on work assigned to a technician |
PushNotificationCommentsForMyCorrectiveWork PushNotificationCommentsForMyPMWork
|
While a work request is in progress, the OnSite user may wish to be made aware of all comments that other users make. For example, the requestor might add details to the original request or the supervisor might provide instructions. Select to receive comment notification for Corrective work, Preventive Maintenance, or both. If nothing is selected, OnSite users can become aware of comments by periodically looking up a specific work request and viewing its comments. |
Workflow Tab
The Workflow tab contains these options:
| Option | Parameter Name | Description |
|---|---|---|
| Work Completion Options | ||
| Require technicians to log their hours before completing requests. | HourLoggingRequired |
Since tracking labor hours is important for tracking costs, you might wish to enforce that OnSite users complete the hours worked on a job before they can complete the work request. When this option is set to Required, OnSite users cannot complete the work request until they enter their hours on the Add Work Log form. |
|
Require technicians to enter comments as part of completing a request |
CommentsRequiredForCompleteWR |
Comments about how a job was completed can add valuable information to the request. When this option is set to Required, OnSite users cannot complete the work request until they enter comments; the Save button will not be enabled until a comment is entered. |
| Require technicians to enter data before completing requests | InputFieldsRequiredForCompleteWR |
If you set OnSite to display the Other Costs or Diagnostics buttons (which present a set of optional fields the technician can enter while working on the job) you can use this parameter to specify which of these fields are required fields; that is, the technician must complete these fields when completing a work request. Click here to see OnSite's Diagnostic and Other Costs commands, and their resulting forms. You can set the following fields as required for completing a work order: Cause Type, Repair Type, Craftspersons Notes, Equipment Down Hours, Current Equipment Reading, Other Costs. For each field that you check, OnSite will present with a red asterisk, indicating it is a required field. The "Next" button on OnSite's "Complete Work Order" form will not be activated until the technician enters values for these required fields. Note that Labor Hours might also be a required field, based on the In order to use this parameter, you must also specify that OnSite should display the corresponding fields. To do so, set OnSite to show the fields by completing the "Show or hide the Other Costs section" and "Show or Hide the Display Options section" parameters; these parameters are located on the Display Options tab (described below) For example, if as part of this parameter, you set Repair Type as a required field, you must display Repair Type as part of the"Show or Hide the Display Options section" parameter, located on the Display Options tab. This gives the technician the chance to enter the field while the job is in progress; if they do not complete the field then, they can do so as part of completing the work order. |
| Other Options | ||
| Require technicians to enter comments as part of changing the request status to a value other than Completed. | CommentsRequiredForWRStatusChange |
When an OnSite user changes a work request status, it is good practice to document the reason for the change. For example, if they change a status to On Hold, you will want to know the reason for this status. To ensure that technician-made status changes are documented, you can have OnSite to require that a comment be entered when the OnSite user changes the status. When this option is set to Required, the technician will not be able to save the status change until they enter a comment; the Save button will not be enabled until a comment is entered. |
| Require the Problem Type field in the Create Request form. | CreateWrProbTypeRequired |
While OnSite users are in the field addressing an issue, they might see other problems and create requests to address them. Since the Problem Type determines the SLA that governs the work request, it is important that new requests have a defined Problem Type; otherwise, the work request cannot be processed and a manager will have to enter a Problem Type. When this option is set to Required, the OnSite user must complete Problem Type on the Create Request form; the Save button will not be enabled until this field is entered. |
| Give the technician the option to self-assign the request after they create it | ShowCreateWrAllowSelfAssignOption |
When OnSite users create new requests in the field, they might be able to quickly address the item while at the location. If they create a work request to report a problem they see, they can immediately assign it to themselves for processing. When this option is set to Enabled, the Create Work Request (additional options) page includes the “Would you like to assign this request to yourself?” option. When this option is set to Disabled, the self-assign option does not appear. This is handy for sites that wish to enforce that all work requests created in OnSite are routed according to SLAs. Note that when technicians work offline, the self-assign option is always available because OnSite cannot check the matched SLA for this work to see if Auto-Create Work Order is active. When the user is online again and syncs, the work request will be appropriately routed according to the SLA. |
Offline Support
Control how OnSite behaves when an Internet connection is not available. See Offline Support Configuration.
Display Options Tab
| Option | Parameter Name | Description |
|---|---|---|
|
Per-user options The technician can also set these display options from OnSite. The values you set here will be the defaults that the OnSite user can change. |
||
| Display Site Name or Site Code | ShowSiteNameOrCode |
A site can have a descriptive name such as Bedford Campus (Site Name field) and an identifying code, such as BEDFORD (Site Code field). Choose the field that you want OnSite to display. |
| Display Building Name or Building Code | ShowBuildingNameOrCode |
A building can have a descriptive name such as Boston Medical Campus (Building Name field) and an identifying code, such as BOSMED (Building Code field). Choose the field that you want OnSite to display. |
| Show or hide building address | ShowBuildingAddress |
Since the building address can take up space on the OnSite screen, you may wish to hide the building address. This is particularly useful if your company has only one building and the technicians do not need to travel between buildings. Choose Show or Hide. |
| Select how technicians group their work in the work list | GroupByOptions |
After the technician signs in, they see a screen that groups their work requests by priority, due date, schedule date, or building. The technician can use the Group By option to change how work requests are grouped. All of the Group By options may not be appropriate to operations at your site. For example, if a technician works only in one building, they do not need to set Group by Building. In this case, you may wish to not include Building in the list of Group By options Use this option to control the settings available in the Group By option. Select as many settings as apply for operations at your site. You can choose:
|
| Display the following optional fields in the work list |
ShowEqCodeOnRequestCard ShowEqStandardOnRequestCard
|
The work list (the screen you access after you select the options by which work is grouped) includes a summary with key details about each job, such as priority and building. It can optionally include the Equipment Code and Equipment Standard if you select these fields with this option. To make the work list easier to read, you may wish to hide the Equipment Code and Equipment Standard from the work list. You can then access this information once you drill into the work request details. |
| Show or hide the technician Assignments section on the Work Details page | ShowWorkAssignments |
Specify whether to show the “Assignments” section on the Work Request Details page. You may wish to set this option to Hide if you typically assign only one technician to a work request. In this case, the Assignment section will list only the current technician, which is obvious information. If you typically assign multiple technicians to a request, the Assignments section holds useful information that you might want to display. |
| Per-site options. Here, you are setting options for the entire site. The technician cannot change these options on their device. | ||
| Show or hide the Data Entry section | ShowDataEntry |
When the option is set to Show, OnSite will show:
Click here to see OnSite's Diagnostic command. If you want to mandate that the technician must complete a particular field in order to complete a work order, set this field as part of the "Require technicians to enter data before completing requests" parameter, in the Workflow tab (above). |
| Choose the fields to show on the technician's device | DataEntryInputFields |
If the above option is set to Show, use this option to specify the exact fields that appear. You can hide or display the following fields: Craftspersons Notes, Repair Type, Cause Type, Equipment Down Hours, Current Equipment Reading. |
| Show or hide the Other Costs section | ShowOtherCosts |
When the option is “Show”, OnSite will show:
Click here to see OnSite's Other Costs command and resulting edit forms. If you want to mandate that the technician must complete the Other Costs field in order to complete a work order, set this field as part of the "Require technicians to enter data before completing requests" parameter, in the Workflow tab (above). |
| Choose the fields to show on the technician's device for input other costs | DataEntryOtherCosts |
If the above option is set to Show, use this option to specify the exact fields that appear. You can hide or display the following fields: Quantity Used, Other Resource Description, Units, Actual Cost. |
See Also
OnSite User Configures Display
OnSite User Configures Notifications