Choosing the Tables to Transfer or Compare
Whether you import data into the database, or export data out of the database, you must specify the tables to transfer.
Similarly, if you run the Database Update Wizard to compare data, specify the tables to compare.
You can explicitly choose tables, or choose data based on its function.

Project-Specific Tables
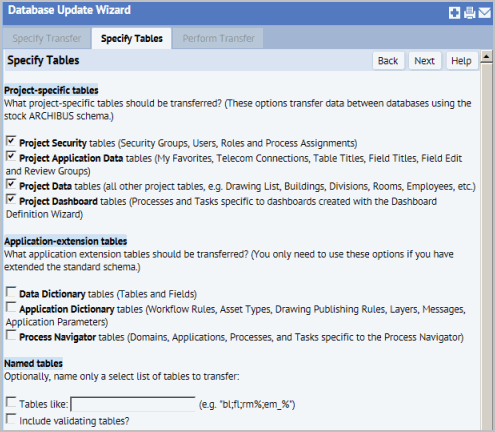
By default, the system selects all of the project-specific tables. These tables include:
- Project Security - Archibus Security Groups, Archibus Users, Roles and Process Assignments. These tables define who has access to the system and what they can do.
- Project Application Data - My Favorites, Telecom Connections, Table Titles, Field Titles, Field Edit and Review Groups. These are configurable elements of you project.
- Project Data - All other project data, such as the Rooms table, the Employees table, the Archibus Drawings table. This option transfers the bulk of the tables in your database. Select this only if you want a complete export of all of the data in your system.
Note: The Project Data option does not include tables that have afm_tbls.is_sql_view = Yes. Archibus tables that represent SQL views are not physical tables; therefore, no data needs to be imported, exported, or updated .
Application Extension Tables
Application extension tables hold customizations you may have made. These tables are:
- Data Dictionary - The tables defining the your tables and fields. If you are transferring in data dictionary tables, the system will prevent you from selecting other options. This is because merging data dictionary tables requires additional steps that should be completed separately. See Performing the Transfer: Merge Data Dictionary Tables.
- Application Dictionary - The tables that control the behavior of your application, such as the Archibus Workflow Rules, Archibus Asset Types, Archibus Drawing Publishing Rules, Archibus Layers, Archibus Messages, and the Archibus Application Parameters tables.
- Navigator - The tables that define your Navigator, such as Archibus Domains, Archibus Activities, Archibus Processes, and Archibus Tasks.
For more information, see Archibus Schema Tables.
Named Tables
The Named Tables option is another way to select tables for processing. Enter a list of tables in the Tables Like control. Separate the table names with a semicolon (;). Use the percent sign (%) as a LIKE-style wildcard. For example, entering "bl; fl; rm%" will give you the building (bl) table, the floor (fl) table and all table names that begin with rm.
Note: You cannot mix the Named Tables option and either of the pre-defined set of tables. Once you select the Named Tables option, all of the other table-groups will be unselected. Likewise, if you select one of the pre-defined table-groups, the Named Tables option will be unselected.
If you have selected the Named Tables option, you can also elect to include validating tables by checking the box. This option cascades all validating tables for any named table. For instance, if you name the Rooms (rm) table, this option adds not only the validating tables specified for rm fields, but will also include tables for validated fields in the Buildings (bl) table and validating tables for the Building table's validated fields, and so on. Entering rm and checking Include Validating Tables results in a list of more than 50 tables.
Including validating tables is a convenient way to export a data table and its supporting reference tables. For example, if you export the files with this method you will find that when you import the data to another database you will not have any constraint errors.
Click on Next to go to the next step: Perform Transfer. The wizard performs the following checks:
- If you have not specified any tables, you will get an error message indicating no tables matched your selection
- If you specify non-existent table names for the Named Tables option, you will get an error message indicating no tables matched your selection.
If you are performing a Transfer Out for any type of file, or if you are Transferring In tables other than the Data Dictionary tables, the Perform Transfer tab will be displayed.
If you are performing a Transfer In for Data Dictionary tables, the Perform Transfer / Merge Data Dictionary tab will be displayed.
Next
How to Transfer Data In (Import)
How to Transfer Data Out (Export)
Back to
Database Update Wizard: Comparing Data Overview
Database Update Wizard Overview