Database Update Wizard
How to Transfer Data In (Import)
Data that have been exported from one database using the Database Update Wizard can be imported into another database using the Transfer In option of the Database Update Wizard. Some examples of when you need to import data are:
- migrating data from test to production instances
- importing data sets for new domains
This topic covers imports for all types of data except data that is related to the Archibus data dictionary. Data dictionary imports have additional considerations and are covered in Performing the Data Transfer: Merge Data Dictionary Tables.
To transfer non-data dictionary data into your database, you will :
- Specify the transfer type.
- Specify the tables to transfer.
- Perform the transfer.
- Check the results.
- Check the log files.
Specify the Transfer Type
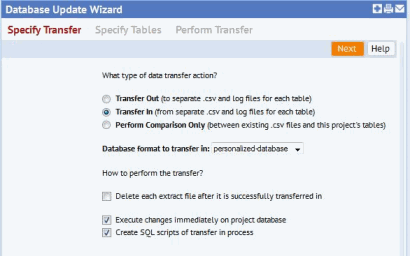
The default transfer action is Transfer Out. You need to select Transfer In which copies data from .csv files into the corresponding table in the database.

The Transfer In process looks for .csv files in the folder you select from the drop down list "Database format to transfer in:" The choices are:
- personalized-database
- v.20.2
- v.21.1
- v.21.2
- v.21.3 and so on
The v.* options are used for upgrading a project to a new version of Archibus. The personalized-database folder is used for importing (and exporting) your specific data. The location of the personalized-database folder is:
...\archibus\projects\users\public\dt\database-update\personalized-database
Note that this file location is fixed and you must copy your .csv files to this folder for import. The name of the file is the same as the table name. For example if you were importing data for the rooms table (rm). the .csv file would be rm.csv.
When performing a Transfer In, you need to specify if the extract files should be deleted after a successful transfer into the database. Deleting the files after that transfer is useful if you are running the wizard multiple times and want to re-run the wizard on just those tables that failed to import in the previous pass. By default, the files will not be deleted.
You also need to decide if you want the changes to "Execute immediately on the project database". If this box is checked, the wizard will make the changes directly in the database that you are logged in to. Use caution when choosing this option , as you can't "undo" except by restoring a backup of the database.
You can also elect to "Create SQL scripts of transfer in process". This is very useful in situations where the changes need to be ported to multiple projects. Checking this box will create the file
...\archibus\projects\users\public\dt\database-update\personalized-database\02_changes-data-dictionary.sql
Note that the file name and location are fixed. This sql file should be opened in an appropriate SQL query tool for your database and executed.
Click Next to go to the next step: Specify Tables. Once you have identified the tables to transfer, click on Next to go to the Perform Transfer step.
Perform Transfer
Once you specify the tables to import, the wizard performs the following checks:
- If you have not specified any tables, the system will present an error message indicating no tables matched your selection.
- If you specify non-existent table names for the Named Tables option, he system will present an error message indicating no tables matched your selection.

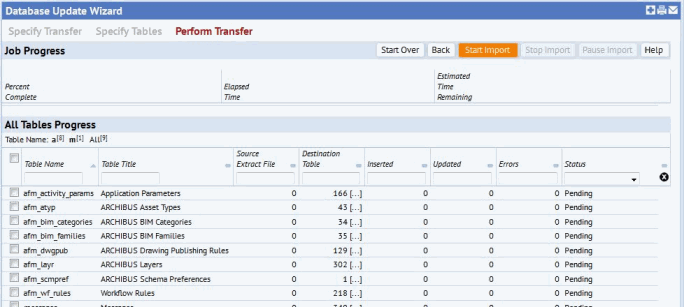
Choose the Start Import button to copy data from the .csv files to the database (if executing immediate). If the create SQL option is checked this will begin the process of creating SQL statements to recreate the data.
If you find that you need to stop the import, you can choose the Stop Import button to have the wizard to immediately terminate the transfer. This could result in a table not containing all the records in the corresponding .csv file.
Similarly, you can choose to pause and resume the import. Resuming restarts the transfer at the point it left off.
Why might you want to stop or pause the transfer?
- If you are transferring a large data set and you want to be at the computer while the transfer is taking place, you might need to pause and resume.
- If you have started the transfer and then realize that there are unresolved issues, you might want to stop the transfer, correct the issue, and then start over again.
The lower panel displays the progress of the transfer and the number of records in each table. Statuses are:
- Pending -- The initial status of all specified tables.
- In Process -- The import of the table is in process.
- Imported -- Successfully imported . However, you should still examine the logs for Inserted, Updated, and Missing records and check for errors in the Error log.
- No Extract File -- A CSV file does not exist for a specified table.
- No Project Table -- The database does not contain a table corresponding to the CSV file.
Review the Changes
Click on the ellipsis [...] to view the following additional information.
View Destination Table Drill-down In the column Destination Table, click on […] to load the Default Table View for this table showing all records. Users may wish to use the Smart Search console on the Data Transfer Status field to quickly drill in to records that are Inserted, Updated, or Missing
View Source Extract File Drill-down […] This is a URL link to the .csv extract file, which will display in Microsoft Excel.
View Inserted Records Log […] This is a URL link to the inserted records log produced by Data Transfer (e.g. /schema/per-site/datatransfer/<userid>/<table name>/<userid>-<table name>-inserted.xls ).
View Updated Records Log […] This is a URL link to the updated records log produced by Data Transfer (e.g. /schema/per-site/datatransfer/<userid>/<table name>/<userid>-<table name>-updated.xls).
View Errors Records […] This is a URL that link to the error records log produced by Data Transfer. (e.g. /schema/per-site/datatransfer/<userid>/<table name>/<userid>-<table name>-errors.xls).