Database Update Wizard
How to Transfer Data Out (Export)
You can use the Database Update Wizard to transfer your data out of the database to CSV files. Some examples of transferring data out are:
- you have a test instance in which supporting data for workflow rules or lookup tables needs to be transferred to another test instance or to the production environment.
- you need to provide a data dump to a business partner who is doing development for you or to tech support when they are investigating a problem.
- you need to transfer data between different types of databases. Because the Database Update Wizard operates independently of the database engine, it can port data from one type of database to another, for example, from Sybase to Oracle.
To transfer data out of your database, you must:
- Specify the transfer type.
- Specify the tables to transfer.
- Perform the transfer.
- Check the log files.
Specify the Transfer Type
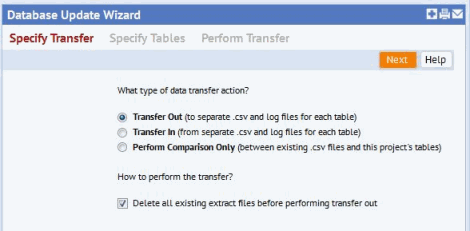
After the Database Update Wizard has been selected, the Specify Transfer tab is presented.

The default transfer action is Transfer Out. Transfer Out copies data from the database to comma separated files (.csv) in the folder: ...\archibus\projects\users\public\dt\database-update\personalized-database
The wizard creates one .csv file for each table specified in the transfer (the file name is the same as the table name).For tables associated with documents, the Wizard also copies document files to this location. If errors occur during the transfer, the Wizard generates a log file.
You also need to indicate if you want to delete all existing extract files before performing the transfer out. The default behavior is to not delete files. Consequently, any files that were transferred during another session will still be present. The caution is that you could mix data from different databases depending on what files were exported. This may, in fact. be the desired functionality if you are merging data dictionary information from a staging server and project data from a production server. Also note that if you transfer a table a second time without deleting the corresponding .csv file, the .csv file will be overwritten.
Click Next to go to the next step, Specify Tables. Once you have identified the tables to transfer, click on Next to go to the Perform Transfer step.
Perform Transfer
Before displaying the Perform Transfer tab, the wizard performs the following checks:
- If you have not specified any tables, you will get an error message indicating no tables matched your selection.
- If you specify non-existent table names for the Named Tables option, you will get an error message indicating no tables matched your selection.

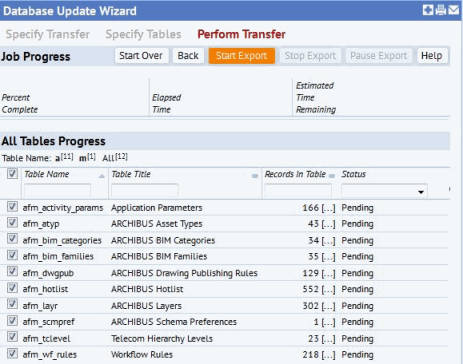
Choose the Start Export button to copy data from the database to the .csv files.
If you find that you need to stop the export, you can choose the Stop Export button to have the wizard to immediately terminate the transfer. This could result in a .csv file that does not contain all the records in the corresponding table in the database.
Similarly, you can choose to pause and resume the export. Resuming restarts the transfer at the point it left off.
Why might you want to stop or pause the transfer?
- If you are transferring a large data set and you want to be at the computer while the transfer is taking place, you might need to pause and resume.
- If you have started the transfer and then realize that there are unresolved issues, you might want to stop the transfer, correct the issue, and then start over again.
The lower panel displays the progress of the transfer and the number of records in each table. When a table has been successfully transferred to a .csv file, its status reads Exported.
See Also
Database Update Wizard Overview
Database Update Wizard: Transfer Data Overview