Hazardous Materials mobile app
Perform an Audit on an Existing Hazardous Materials Inventory
As an auditor, you are tasked with traveling throughout the facility, inspecting each location, and recording the quantity and other details about the materials that you encounter. Audits ensure that the inventory of materials at each location is accurate and up-to-date, which is important for complying with safety regulations.
Prerequisite: Facility managers prepare data for download
Before auditors can get started with the Hazardous Materials mobile app, the facility manager must prepare the background data, develop the SDS information, and perform other tasks. For information, see Hazardous Materials Mobile App: Facility Manager Tasks.
Note: This audit procedure requires that the auditor's role is assigned to the RISK-MSDS-INV and RISK-MSDS security groups.
Step 1: Drill down to buildings, floors, rooms, or sub-rooms
Your manager will have instructed you on the site to audit. On the mobile device, select a site. The system downloads all the background data, as well as the existing material inventory data for that site.
From sites, you can drill down to various location levels and then access the Materials Dashboard, which provides at-a-glance summary information for each material in the location. For information, see Drilling Down to the Materials Dashboard.
Step 2: Review the Materials Dashboard, if necessary
Once you access the Materials Dashboard for a location, you can perform such actions are refining your list, reviewing key data, accessing SDS documents, and starting the audit. If you don't need to search for a particular record or filter the data, you can proceed to Step 3.
For information, see Work with the Materials Dashboard.
Step 3: Create or resume the survey
If a survey does not exist, the Materials Dashboard will display at the bottom of the screen an Inventory button without a date. From the Materials Dashboard, choose the Inventory button. Enter today's date as the date of the start of the inventory.
If the survey already exists, the system will alert you by displaying the survey date on the Inventory button at the bottom of the Materials Dashboard. Tap the inventory button to resume the survey.
Step 4: Inventory the materials
- Within your site's room, aisle, shelf, or bin, locate the container you want to verify. You may want to scan the container bar code so that you can easily locate the container's record on the mobile device.
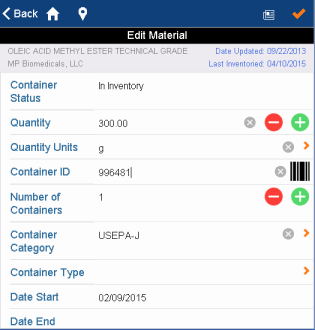
- On the Materials Dashboard, tap the item you want to verify. The system brings up the Edit Materials form with information about this material. Review the information about this item.
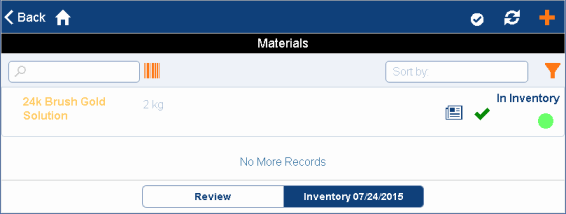
Note: As an alternate working method, you may wish to verify that the item exists in this location directly from the Materials Dashboard, without first accessing the specific details of the item in the Edit Material form. For example, you might want to quickly check down the list, simply confirming that what you see in this location is what the database record (in summary form on the list) shows you. This method is useful for organizations that do not track all the details for all locations; or, for organizations that verify details only for extremely hazardous items. For this working method, you can tap the check mark for material directly from the Materials Dashboard form. The check mark for unverified items will display in orange. As with verifying from the Edit Materials form, the system will display the item's text in orange to show that it has been verified and will set the check mark to green, as shown below. 
- Compare the record listed on the Edit Material form to the physical item. Note any discrepancies between the record and the item you see in the field by using the Edit Materials form to update the record on the mobile device.

Several situations can occur:
| If the physical material ... | As an auditor, you ... |
|---|---|
| matches the information displayed on the mobile device | tap the Verify button (the check box) in the upper right corner of the form. The system returns you to the Materials Dashboard, where you will see that the item is now displayed in orange, indicating that it has been inventoried. The Verify action automatically completes the Date Last Inventoried and Date Last Updated fields and records the name of the user that made the update. |
| has different properties than what is listed on the mobile device (except location fields) | enter the correct values in the Edit Materials form. For example, you can update the Quantity field to show that there is more of an item on the shelf than recorded in the electronic inventory. |
| does not physically sit where the database record says it should. |
update the record with the proper location. If you are scanning the container bar codes and you scan a container that is in a different location than the system reports, the system will highlight the location fields in the form to alert you to the discrepancy. Because misplaced hazardous materials can pose safety issues and indicate procedural problems, you will want to track when these events occur. Use the Material Inventory Exception report to search on items whose locations have changed. |
| does not exist in the field, but is listed on the mobile device |
update the Material Status field to one of the following;
|
| exists in the field but is not listed on the device |
create a record for it. Choose the "+" icon in the upper right corner of the Materials Dashboard to access a form for entering the new record. If the container has a bar code tag on it, tap the bar code icon next to Container ID and scan the bar code tag with your mobile device. See Using Bar Codes in Mobile Apps. If the container does not have a bar code, you can leave the Container ID field blank or create an ID according to your organization's conventions. The system will automatically complete the following information:
You will want to track items that you discover in the field but are not recorded in the system because undocumented hazardous materials can indicate safety issues and procedural problems. Search the Material Inventory Exceptions report for items added during inventory. Note: For any single record, there may be only one container if there is a container ID value. If you wish to track multiple containers of an identical product in a given location and maintain a container ID for each, you must define separate location records. Otherwise, for less precise tracking, they can leave the container ID blank and set the number of containers to any positive value they like. |
| exists in the field at this location but its properties and SDS are not already documented in the system |
Since you cannot create an SDS record from mobile, a common practice is to have the facility manager define a placeholder SDS record for “Undocumented” products. The auditor can then choose this "Undocumented" product, enter quantity and other information, and use the Comments field to record the product name, manufacturer, and other important information. When the data is uploaded to the Web Central system, a safety manager can search the Material Inventory Exceptions report for the "Undocumented" products and create SDS records that fully document these products. They can then update the "Undocumented" products with the newly-created SDS information. |
| requires further text notation | enter comments in the Comments field. The Comments field is handy for recording notes on any of the above situations and can be viewed using the Material Inventory Exceptions report. |
- When through with this item, tap the check-shaped Verify button, located at the top of the Edit Materials form. If you need to verify new items, do so from the Materials Dashboard, as described in step 5 below.
- Choose Back (if you are not adding a new item). If adding a new item, choose Save. The system returns you to the Materials Dashboard.
- You can verify newly created items by tapping in the Materials Dashboard the check-shaped icon for this material.
- If you did not verify an existing item from the Edit Materials form (step 4), you can do so now from the Materials Dashboard.
- You will see that the items that you have verified are listed in orange text and that their Verify buttons (check marks) are green. For information, see Work with the Materials Dashboard.
- If you are using a floor plan drawing to find the items to audit, the system highlights the room in orange once you have completed the audit for all materials located in the room.
- When you have completed all containers for this room, select a new location; for example, select a new aisle or select a new room from the floor plan or room list. Travel to this location and examine its items by following the above procedure.
- At any time during the survey, you can run the Sync action to upload to the tables on the server the changed records to date.
Step 5: Close the survey
- When through surveying all areas for this audit, you can close the survey. See Starting and Ending Material Surveys.
Note: Before browsing to a different site within the Hazard Material app, .you should always close out and sync the current inventory activity and return to "review" mode.