Archibus SaaS / Leases / Lease Portfolio / Cost Wizard
Real Property / Strategic Financial Analysis / Financial Analysis / Cost Wizard
Real Property / Costs / Cost Administrator / Cost Wizard
Cost Wizard Overview
The Cost Wizard (ab-rplm-cost-mgmt-costs-wiz-ls-bl-pr.axvw) guides you through the process of planning costs and recording detailed costs for your real estate portfolio items.
From the Cost Wizard you can create recurring costs and scheduled costs associated with leases, accounts, or portfolio items (buildings, properties, land, which in turn is composed of parcels). You then approve your scheduled costs to create actual costs, which are used in analysis reports. Actual costs can also be charged back and invoiced using the Chargeback & Invoicing features.

If you are using the Archibus Enhanced Global Feature Set, see Working with the Cost Wizard When Using the Enhanced Global Feature Set.
Note: The Cost Wizard is also available is the Strategic Financial Analysis / Financial Analysis process so that you can review costs or add new costs while working with SFA.
Three Types of Costs
Use the Wizard's tabs to access each type of cost: recurring costs, scheduled costs, actual costs.
From any tab, examine details for the selected lease, building, property, or account in a pop-up window by selecting Edit in the grid row; on the Approve Costs tab, you select Details.
| Goal | Tab | Help Topic |
|---|---|---|
|
Create new recurring costs. First, you must select a portfolio item (building, parcel, lease, property) from the drill-down selection tree. This activates the Add Recurring Cost button from which you can access the data entry form for entering your cost. |
Schedule Costs | Create Recurring Costs |
| Schedule recurring costs to create scheduled costs (specific instances of the cost in its own record). Creating scheduled costs in this way reduces data entry for costs that occur on a regular basis. | Schedule Costs | Schedule Recurring Costs |
|
Add a new one-time scheduled cost. Review, edit, and delete scheduled costs. Quickly locate costs that are past due, as these costs are shown with a red background. |
Approve Costs | Create One-Time Scheduled Costs |
| Approve scheduled costs, which converts them to actual costs that you have verified. | Approve Costs | Approve Scheduled Costs |
| View details for actual costs. | Review Costs | Review Actual Costs |
Note: When generating reports, if you select to use more than one cost type (recurring costs, scheduled costs, and actual costs), the program ensures that it does not duplicate costs by using Scheduled or Actual Cost records over Recurring Cost records when both exist, and by using only Recurring Cost records with a Due Date that is after the most recently generated Scheduled or Actual Cost record.
Using the Selection Tree
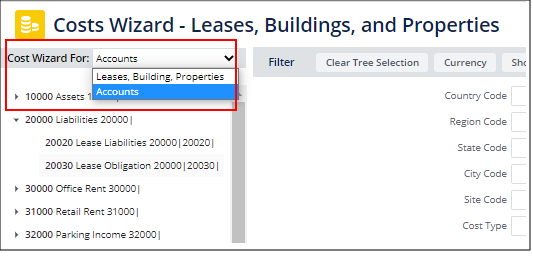
The Cost Wizard can focus on costs assigned to accounts, or costs assigned to leases, buildings, parcels, and properties. Choose from the menu in the upper left corner, and the selection tree on the left will reflect either accounts, or reflect leases, buildings, properties,parcels).

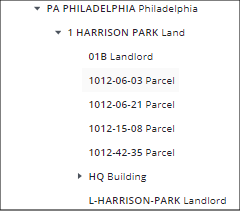
You can then use the drill-down selection tree to locate a lease, building, property, or parcel to manage its associated costs. The first image in this topic shows drilling down from a city, to a building, to a lease.
Similarly, you can drill down to parcels, as shown below.

For general information on selection trees, see Using Drill-Down Selection Lists.
Note that if you set the Cost Wizard For option (for example, to Buildings, Leases, Properties), set a filter such as to a certain building, and then reset the Cost Wizard For option (for example. to Accounts), the system clears any filter you have set.
Restrictions you set in the filter apply to the selection tree. For example, you can restrict to a City, and the selection tree updates to this filter.
Accounts
If you set the Wizard to Accounts, you can work with costs in terms of their Account Code. The below image shows the selection tree displaying accounts. Note that accounts cannot be associated with parcels.

Restricting the Cost Records
After selecting an item from the drill-down tree, the wizard shows all costs associated with your selection. You can restrict your view using the filter. These restrictions enable you to show only the specific costs you want to work with.
Note: If you do not first use the selection tree and instead start with the filter, the filter applies only to the tree and not to the grid
Note: The restriction you set is applied to the costs shown in all tabs of the wizard.
After selecting an item from the drill-down tree, use the Filter at the top of the Wizard to restrict to costs of specific cost types and categories, leases, buildings, properties, parcels, and the geographic hierarchy.
If you filter by property, the Wizard displays costs assigned to properties, as well as costs assigned to leases and parcels since they are assigned to properties.
Note: When filtering by Building Code, you will f ind that the navigation tree on the left side does not expand all the way to the leases level. However, the grid (for example, the Scheduled Costs tab) shows the cost transactions. You can use the grid’s mini filter to filter the grid by Lease Code column.
Restricting Costs by Category and Type
You might want to filter by cost category and cost type.
The available cost category selections include only categories whose Assigned To field is either All or matches the type of item you have selected (lease, building, property, or account). For example, if you are viewing costs for a lease, the Cost Category selection list shows only categories that have an 'Assigned To' value of 'All' or 'Lease'.
For more on Cost Categories and the chargeback definition selection (Assigned To - Rolls Up To - Prorates To field), see About Cost Categories.
Tracking Specific Types of Costs
Taxes
To display only TAX costs, you filter the costs by Cost Type = TAX, or choose the appropriate Cost Category for recording property taxes (that TAX – PROPERTY TAX). After entering the criteria and clicking Show, the wizard displays only the tax costs.
When creating a new tax cost transaction, you manually select the correct Cost Category that represents property taxes (for example, TAX – PROPERTY TAX)
Tracking Total Cost of Occupancy
Operating Expenses are typically used for statistics concerning the Total Cost of Occupancy. The application uses Operating Expense costs to determine facility metrics such as Cost per Area, Cost per Employee, and Cost per Line of Business (LOB) … Business Units / Divisions / Departments.
Tracking Total Cost of Ownership
Operating Expenses plus Capital Expenses (asset costs, income, depreciation and amortizations) are typically used for determining the total cost of ownership (TCO). For TCO reporting, the application uses the Cost Category – Cost Type (cost_cat.cost_type) field values for Cost Grouping. For tracking Total Cost of Ownership, the application tracks and analyzes both Operating Expense and Capital Expense costs when looking to determine Facility Metrics such as, Cost per Area by Building, Cost per Employee by Building, and Cost per Line of Business (LOB) by Building … Business Units / Divisions / Departments.
Total Cost of Ownership = OpEx + CAPEX
For Total Cost of Ownership reporting, you should:
- Assign Chart of Account group costs to Account Codes. For TCO reporting, the application groups costs by Account Codes.
- Assign Archibus accounts to cost types. See Defining Cost Categories and Types.
- Enter both Operating Expense and Capital Expense Costs (asset costs, income, depreciation and amortizations) by entering costs using the Cost Category – Cost Types that include both OPEX and CAPEX cost groups
Working with CAM and Non-CAM Costs (Landlords)
When using the Cost Wizard to enter costs, the cost administrator for the landlord can mark costs as CAM (Common Area Maintenance) or Non-CAM. Additionally, this cost administrator can filter the Cost Wizard to show:
- CAM costs only
- NON-CAM costs only
- All costs (CAM and NON-CAM)
The cost administrator for the landlord makes these selections from the "CAM Charges Display Options" list in the Filter console. This filter includes this option when you drill down in the selection tree and select:
- a building or property that has at least one landlord lease
- a landlord lease
For example, in the below image the user has selected a landlord lease, so the filter includes the CAM Charges option.
Bulk assigning costs as CAM or Non-CAM
If you are the Cost Administrator for the landlord, the Cost Wizard also includes an action button to bulk assign costs as CAM or Non-CAM.
To bulk assign / unassign costs as CAM / Non-CAM:
- From the Cost Wizard, from the Schedule Costs, Approve Costs, or Review Costs tab, use the Filter console to locate the costs you want to assign or unassign as CAM. Use the CAM Charges - Display Option list to select CAM or Non-CAM costs.
- Click Show.
The costs meeting your search criteria are shown.
- Select the check boxes for the costs you want to assign or unassign as CAM.
- Click Set CAM Status, and from the submenu, select either 'as CAM' or "as Non-CAM.
The Cam Cost? column updates to reflect your selection.
See Recording Actual CAM Costs (for Landlord Cost Administrator).
Next
Enter One-Time Scheduled Costs
See Also
Cost Wizard : Using Mutli-Currency and VAT