Archibus SaaS / Leases / Lease Portfolio / Cost Wizard
Real Property / Strategic Financial Analysis / Financial Analysis / Cost Wizard
Real Property / Costs / Cost Administrator / Cost Wizard
Create Recurring Costs
Note: This topic describes tasks from the Schedule tab of the Cost Wizard if you have not enabled the Archibus Enhanced Global Feature Set. If have enabled these features, see Schedule Costs When Using VAT and Multicurrency Features topic.
Note: You can also add a recurring costs from the Lease Portfolio Console by clicking Add New from the Recurring Costs tab. See Entering Base Rents (Portfolio Edit Wizard and Lease Portfolio Console).
To get started with lease costs, you can enter your base rents and estimates of utility and taxes as recurring costs. You can later refine these costs as scheduled costs if you wish. See Recurring Costs (Concept) and Types of Costs.
The Schedule Costs Tab
When you first load the Wizard, the Schedule Costs tab lists recurring costs assigned to the item (lease, building, property, or account) that you select in the left panel. If you select a cost type and category from the filter, the Wizard shows only costs meeting this restriction. See Restricting Costs by Category and Type. Once you select an item, the Add Recurring Cost button activates.
From the Schedule Costs tab, you can:
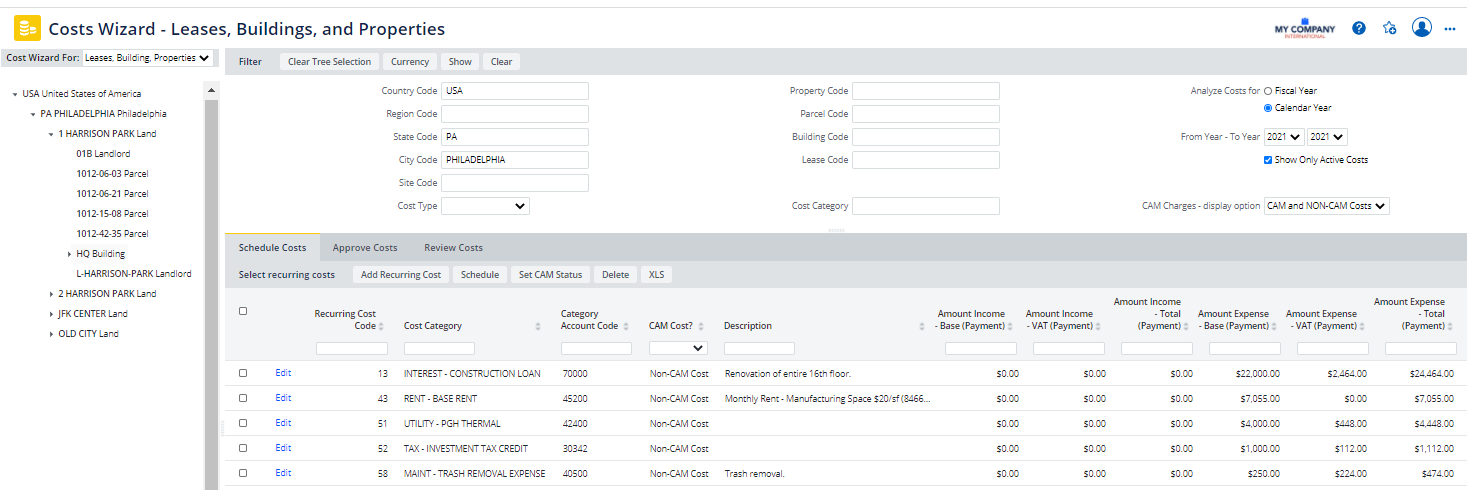
Create Recurring Costs
- Select the Cost Wizard. Select the Schedule Costs tab.
- Use the drill-down selection tree on the left to select the item for which you want to add recurring costs.
- If desired, you can first set a filter to limit the list in the selection tree.
- By having you select an entity from the drill-down selection tree, the Cost Wizard enforces that a cost is assigned to only one entity to avoid double-billing.
- Note that if you develop a cost for a parcel, the Cost Wizard automatically completes the Property Code field with the parent property.
- Once you select an item (building, property, lease, account, parcel) from the tree, the wizard presents the Add Recurring Cost button.
Click the Add Recurring Costs button to access the Add Recurring Cost Transaction form.
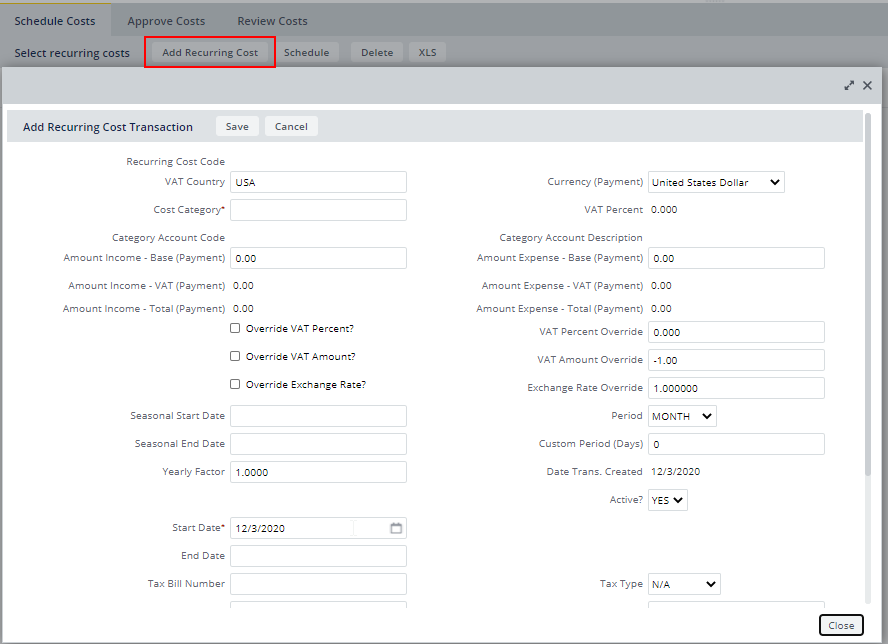
- Define the recurring cost by completing these fields:
-
Complete this tax information:
Tax Bill Number. The number of the tax bill. This facilitates tracking payments.
Tax Type. The type of tax, such as property or school. By entering the tax type, the application is able to break down the yearly tax for property and school.
Tax Period in Months. The number of months covered by this tax bill. The application uses this value to calculate the Yearly Tax Paid shown int he Property Abstracts report.
Tax Value - Assessed. The assessed value for this tax expense. The application uses this value to calculate the Value – Assessed % Tax shown in the Property Abstract report.
Tax Common Level Ratio. The ratio of assessed value to current market value. The application uses this value to calculate the True Assessed value and the Yearly Tax Paid shown in the Property Abstract report.
Tax Authority Contact. Select a contact for the tax. The list is restricted to contact type = "TAX AUTHORITY" or "TAX COLLECTOR".
- Click Save. The system automatically completes the following fields:
- Date Trans. Created -- The system completes the value with the system date at the time that your create the record.
- Recurring Cost CodeThis auto-numbered field uniquely identifies the Recurring Cost record.
- The cost record includes the primary key for the building, lease, property, or parcel you selected in the drill-down tree.
| Field | Description |
|---|---|
| Cost Category |
Select a Cost Category from the list. Cost Categories include the chargeback definition that determines which proration and chargeback strategy is used. You can also generate reports and restrict views by excluding or including costs assigned to specific categories. See About Cost Categories. |
| Start Date | Enter the date that the Recurring Cost is to begin taking effect. If you generate Scheduled Costs from Recurring Costs, the system copies the Start Date of the Recurring Cost record to the Due Date field of the first Scheduled Cost record, and uses the day of the month for the due date for subsequent Scheduled Cost records. |
| End Date | Enter the date that the Recurring Cost is to end. If you leave this field blank, in most views, the Recurring Cost is scheduled to continue indefinitely. However, in the Global Portfolio Dashboard, Recurring Costs with no End Date are not included in the calculation. For this reason, if you are using the Global Portfolio Dashboard, it is recommended to include an End Date for the cost. |
| CAM Cost | By default, this is set to Non-CAM, but you can change this to CAM to indicate that the cost is a CAM (common area maintenance cost) shared among tenants. See Recording Actual CAM Costs. |
| Description | Use this field to describe the cost, similar to the "memo" field of a check. |
| Amount - Income /Amount - Expense |
These two fields record the amount of the transaction for the time frame indicated in the Period field. For example, if you pay a quarterly utility bill, enter the amount in Amount-Expense and complete Period with "Quarterly." For each record, complete either the Amount - Income or Amount - Expense field. You can enter a negative amount in the Amount Income field for a cost. This enables you to associate the cost as a negative amount with an invoice. This is a way of indicating that a contact or business has a credit. |
| Period | The interval between payments. Choose MONTH, QUARTER, YEAR, or CUSTOM. |
| Custom Period (Days) | If you choose CUSTOM for the above field, complete this field with the custom period in days. For example, enter 45 for a 45-day period. |
| Seasonal Start Date / Seasonal End Date |
These fields model seasonal costs that enable you to generate a more accurate monthly cash flow. If you are modeling a seasonal cost, you should specify a Seasonal Start Date and a Seasonal End Date. For example, for a winter lease cost you can specify a Seasonal Start Date of November 15, 20XX and a Seasonal End Date of March 15, 20XX (where XX is any year you choose—the year has no effect, as the table's Start Date field determines when the recurring cost begins to take effect). If the Seasonal fields have values, the Schedule Recurring Costs action works only with those intervals that fall between the month and day portion of the seasonal dates; the year portion is not evaluated. Thus, a seasonal date will be valid for as many years as the Recurring Cost occurs |
| Yearly Factor | A yearly increase or decrease to factor into the cost beginning from the Start Date. For instance, you can model a 10% yearly increase in lease costs by entering a yearly factor of 1.10. If you enter a value of .75, the lease cost is defined to decrease 25% per year. |
| Active? | Use this field to indicate whether the Recurring Cost record should be included in reports, or scheduled when you schedule costs from the Schedule Costs tab of the Cost Wizard. The default is YES. If you currently do not wish the recurring costs to be used in calculations, but want to retain it for future use, set this field to NO. |
Edit Recurring Costs
To edit recurring costs:
- From the Schedule Costs tab, click Edit in the row for the Recurring Cost you want to edit.
The Edit Recurring Cost for (Lease / Building / Property / Account) dialog appears.
- Edit the fields, as necessary. You can edit any of the fields except the system-generated fields. See Add Recurring Costs for a description of the fields.
- Click Save.
Delete Recurring Costs
To delete recurring costs:
- From the Schedule Costs tab, select the Recurring Costs, and click Delete.
You are asked to confirm the deletion.
- Click OK.
The Recurring Costs are deleted.
Next
After creating recurring costs, you can optionally schedule recurring costs.
Otherwise, you can manage your costs as recurring costs.