System / CAD and BIM Manager / Catalog BIM Models
Technologies / Innovative Solutions / Forge Integration / Catalog BIM Models
Archibus SaaS / Maintenance / Corrective Maintenance / BIM Viewer
Maintenance / Corrective Maintenance / Supervisor / BIM Viewer
Assets / Assets / Asset Manager / BIM Viewer
Assets / Enterprise Assets / Facility Asset Manager / BIM Viewer
BIM Viewer Settings Command
This topic has the following sections:
Overview
Use the settings in the BIM Viewer Settings command to control how the BIM Viewer works with highlighting and selecting assets during the current session.
From the toolbar, select the BIM Viewer Settings command on the toolbar.

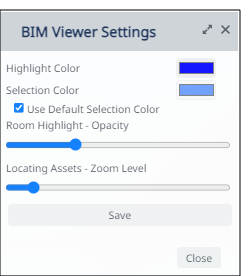
The BIM Viewer Settings button presents the following form for setting options. The form presents the default settings as configured by your site's system administrator.
Configure the settings to your desired behavior and click the form's Save button. The settings you made will apply to all future invocations of the command on all models that you work with during the current session. Once you end the session and sign in again, you will need to configure the settings again.
System administrators who have the role SYSTEM ADMINISTRATOR (ACP) can set the options on this form and have the settings apply to all users. They do so by accessing the form from the Catalog BIM Models task.
Highlight Color for Rooms and Assets
Use the Highlight Color option to choose the desired color for highlighting assets and rooms; that is, the color for indicating assets when you run the View Assets command from the Assets or View Rooms command from the Rooms tab.
In the BIM Viewer Settings form, the Highlight Color option presents a swatch with the currently-defined highlight color.
The color choice impacts only the default color for highlighting assets and spaces with the View Assets command; it does not impact the color of the Query Model command, which is set to red.
To set the highlight color
-
Choose the BIM Viewer Settings command from the ribbon
-
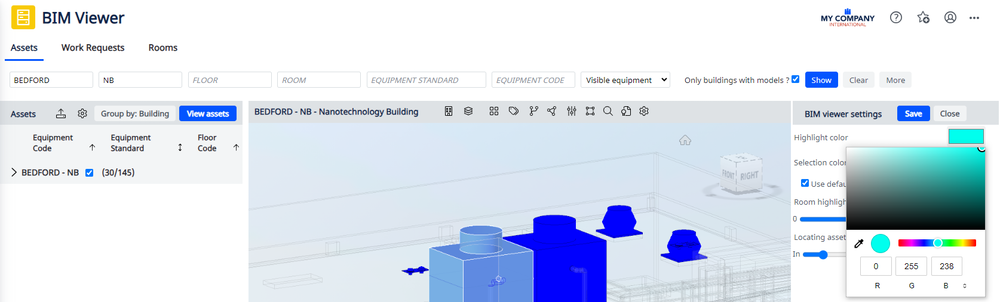
In the BIM Viewer Settings form, click on the swatch indicating the current highlight color.
-
In the color picker form, position the slider to the desired color or enter the appropriate numbers for the RGB (Red/Green/Blue) settings. The swatch updates with the selected color.
-
Click Save on the BIM Viewer Settings form.
-
The next time that you display a set of assets or rooms in the left panel and choose View Assets, the BIM Viewer will highlight them in this color.
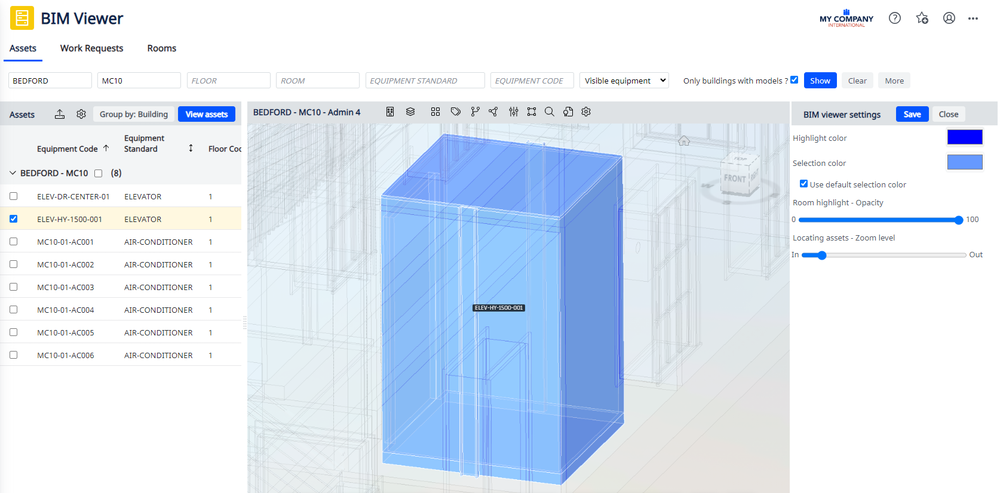
Selection Color for Rooms and Assets
When you click on an asset, the BIM Viewer highlights it according to the specified Selection Color. In the BIM Viewer Settings form, the Selection Color option presents a swatch with the currently-defined selection color.
To set the selection color
-
Choose the BIM Viewer Settings command from the ribbon.
-
The Selection Color swatch displays the color that will be used to select items.
-
If the Use Default Selection Color option is checked, the BIM Viewer uses the built-in Forge selection color, and you cannot select the Selection Color swatch to change the color.
-
-
In the BIM Viewer Settings form, clear the Use Default Selection Color checkbox. This makes the Selection Color swatch editable.
-
In the color picker form, position the slider to the desired color or enter the appropriate numbers for the RGB (Red/Green/Blue) settings. The swatch updates with the selected color.
-
Click Save on the BIM Viewer Settings form.
-
The next time that you click on an asset or room to select it, the BIM Viewer will select it in this color.
For example, in this image the has set the Highlight Color to blue and the Selection Color to Red. The user has run View Assets, which highlighted the assets in blue (Highlight Color = blue) and then selected the cooler on the right, which appears in red (the selection color).
Opacity for Highlighting Rooms
How the Viewer displays a room's color is impacted by the model's opacity setting. For example, if you have light colors assigned to your room categories and the model has a 30% hard-coded opacity, when you highlight by category the highlight color will not be visible. In other situations, a blue highlight might appear as purple.
If you find that your highlights are not accurately portrayed in the BIM Viewer, use the "Room Highlights-Opacity" option of the BIM Viewer Settings command to change the model's opacity.
Note that the option is setting opacity -- the condition of lacking transparency. Therefore, if you want a 100 percent transparent model, you set the opacity to zero.
Depending on your needs, you can set the model to be more transparent in order to allow for better viewing inside the room; or, less transparent for more accurate highlight colors.
| Goal | Transparency | Room Highlights-Opacity Setting |
|---|---|---|
| Better viewing inside the model | High | Low |
| Better highlight colors | Low | High |
For example, if you are going to highlight by room category (which uses light colors), you can use the BIM Viewer Settings command to set a high opacity (low transparency). This will result in distinguishable highlight colors. When through with the highlight, you can reset the opacity.
To set the opacity percentage for highlighting rooms
-
Choose the BIM Viewer Settings command from the ribbon.
-
In the BIM Viewer Settings form, position the slider for the "Room Highlights-Opacity" option to the desired percentage setting. The horizontal slider represents 0% opacity (far left, useful for seeing into rooms) to 100% opacity (far right, useful for highlgihts).
-
Click Save on the BIM Viewer Settings form.
-
The next time that you run a highlight, such as Highlight by Room Category, the BIM Viewer will consult this opacity setting.
Example
The following images illustrate the different highlight results you will achieve when setting opacity. In the sample HQ project, the room category highlight colors are light.
In the below image, the opacity is set to 100 percent and the room category highlights are clear and match the defined highlight colors, as depicted in the legend.
![]()
Compare this to a Room Category highlight when the opacity is set to a lesser percent. The colors do not exactly match the legend colors. In this example, there are only three room categories represented on the floor, so you can still distinguish each room's category. However, if the floor contained rooms of several categories, matching the highlighted rooms to the legend colors would be more difficult.
![]()
Zoom Level for Locating Assets
When locating equipment assets with the View Assets command, you can set a default level at which the Viewer will zoom into assets when you choose the View Assets command.
Note that this zoom percentage setting does not apply to locating rooms.
To set the zoom percentage when locating assets
-
Choose the BIM Viewer Settings command from the ribbon.
-
In the BIM Viewer Settings form, position the slider for the "Locating Assets - Zoom Level" option to the desired zoom percentage setting. The horizontal slider represents 0% zoom (far left) to 100% zoom(far right).
The further right you drag the slider, the further out the Viewer will zoom.
To have the Viewer closely zoom into an item, drag the slider so that it is close to the left edge, as shown below.
-
Click Save on the BIM Viewer Settings form.
-
The next time that you run the View Assets command, the BIM Viewer will consult this zoom setting when zooming into the assets you checked in the left pane.