Capital Projects / Projects / Execute
Capital Projects / Projects / Plan
Capital Projects / Commissioning / Design
Assets / Enterprise Assets / various roles / Project Proposal Console
Estimating Design Schedules
From the Projects application, after a project has been approved, you can estimate the design schedules for the project's actions. The design estimates are based on information that has been provided by architects, designers, and contractors who have analyzed a project's requirements. Design estimates are defined after a project has been approved, in the project planning phase. The design estimates provide you with detailed information that supplements the initial baseline cost and schedule information that you gathered prior to approving a project.
You can work with the Gantt chart from the Management Console (from either the Execute or Manage process, depending on your role). From the Management Console, you select a project and then select the Gantt tab to work with the schedule for that one project.
For Commissioning, you update commissioning plans as design professional and commissioning agents review design submissions and provide input.
The Gantt chart report provides a quick and easy visual representation of how project action items are proceeding, and enables you to find critical dependencies that need to be expedited so that the schedule is not adversely affected.
For information on estimating design costs, see Estimating Design Costs.
For information on determining baseline schedules and costs, see the Estimating Baseline Schedules and Costs topic.
After estimating design schedules and costs, you can compare the variances between the baseline and design estimates. For more information, see the Reviewing Design to Baseline Variances topic.
From the Estimate Design Schedule and Durations task, you can:
- Edit project details: Click on a project in the Gantt chart. Projects are shown with a folder icon as they contain the actions. Clicking the project brings up the Project Details screen from which you can make your edits to the project. See Request a Project for a description of the information you can enter for a project.
- Estimating Design Schedules from the Management or Commissioning Console
- Setting the Days Worked Per Week
- Estimate design schedules and durations
- Set an Action to Precede Another Action
- How the Gantt Chart Updates Dependent Actions
Estimating Design Schedules from the Enterprise Assets / Project Proposal Console
Working from the Project Proposal Console, you can estimate design schedules for projects with the status of Proposed. These projects are being developed to analyze different proposals, so the schedule is a key aspect of this evaluation. From the Project Proposal Console, you work with projects that are not approved, but you are developing design schedules as part of your evaluation.
Estimating Design Schedules from the Management or Commissioning Consoles
From the Management or Commissioning Console's Plan / Schedule Actions tab, you can estimate design schedules for project actions using the Gantt chart. Using this task from the Management or Commissioning Consoles, you can work with projects having any status. After you select a project, you can then view the actions for that project, or for that project's work packages. See Scheduling Actions Using the Management or Commissioning Consoles.
Setting the Days Worked Per Week
You will be using a Gantt chart to review and edit the design schedules. The Gantt chart timelines show time in terms of work days. It is important to remember when estimating design schedules that the timeline in the Gantt chart depends on the project/work package Days Per Week setting in addition to the start date and duration. The Days Per Week setting defines how many days per week will be work days. For example, if an action item is 20 days of duration and the Days Per Week setting is 5, then the timeline will show four weeks for this action item, because the work will not be done on weekends. Alternately, if you enter a duration for an action, the program calculates the end date (Date - Calc. Completion) using the Days Per Week value you enter.
For information on defining the work package / project Days Per Week setting, see the Creating and Editing Work Packages or the Requesting a Project topics.
Note: Before you can estimate design schedules, you must enter initial values for each action's Date to Perform and Duration - Est. Design fields. These values can be added in the Plan/Add or Edit Actions task.
Estimating Design Schedules and Duration
To estimate design schedules and durations:
Note: Alternately, you can use either of the following ways to access the Gantt chart:
- the Management Console Plan task, and then select the Schedule Actions tab to review and edit actions using the Gantt chart. From the Management Console task, you can view actions for projects having any status, and you work with a single project at a time.
- working from the Enterprise Assets / Project Proposal Console, you select a project and then the Gantt Tab to work with the project's actions on the timeline.
-
Select the Gantt chart in one of the following ways, or see the above note for how to access the task from the consoles:
- From Commissioning, select the Design Update Commissioning Plan task.
- From Projects, from the Execute or Manage process, select the Management Console task, select a project, and then select the Gantt tab from the Project Dashboard.
- From Projects, select Plan /Estimate Design Schedules task.
- Use the Filter console in the top frame to locate the project that has the actions you want to schedule:
To adjust the items that the chart displays:
- Select Work Packages, Projects, or Actions from the Display field in the Filter console.
- If you select Work Packages, you must also select a Project Name in the Filter console.
- Click Show
A Gantt chart appears for the project you selected. The project's actions are displayed on the timeline.
- To edit the Start and End Dates for an action:
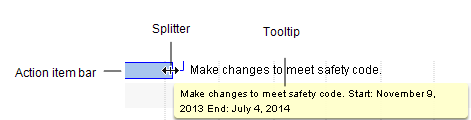
- Mouse over the action icon in the timeline until you see the splitter.
- Click and drag the splitter on the timeline to expand or contract the time allotted to the action. You can click and drag either end of the action icon to change either the start or the end date, or you can click the splitter when it is in the middle of the action icon to change the start and end dates at the same time. As you click and drag, a tooltip shows the adjusted start and end date, and the duration. Note that the Duration shown in this tooltip is not adjusted for the number of working days.
- Release the mouse when the action is positioned on the timeline at the desired start and end dates.
A pop-up appears asking if you to confirm the change. Note that this pop-up provides the Duration adjusted for the number of working days set for the project.

- Click OK to make the change, or Cancel to revert to the previous start and end dates.
- To make additional edits for an action:
- Double-click the action in the timeline.
The Action Item Details form for the selected action is displayed. - Make edits for the action item as needed. For a description of the data entered, see Add or Edit Actions to Approved Projects.
Note: The timeline depends on the project Days Per Week setting in addition to the Date to Perform and Duration - Est. Design field values that you define here. You can edit the project Days Per Week value in the Request/Edit My Projects task. You can edit the work package's Days Per Week by double-clicking the work package in the timeline.
Note: If you edit the Duration Est. Design (Days) field, the system calculates the Date - Calc. Completion based on the Days Per Week value for the action.
- Click Save in the Action Item details form.
- Double-click the action in the timeline.
- To make changes to a project:
- Double-click the project in either the list or on the timeline.
The Project Details dialog appears.
- Make edits as needed. See Requesting Projects for a description of the fields.
- Click Save.
- Double-click the project in either the list or on the timeline.
- To make changes to a work package:
- Double-click the work package in either the list to the left of the Gantt chart, or the icon for the work package in the Gantt chart.
The Work Package Details screen appears.
- Make changes as needed. See Creating and Editing Work Packages for a description of the fields.
- Click Save.
- Double-click the work package in either the list to the left of the Gantt chart, or the icon for the work package in the Gantt chart.
Setting an Action to Precede Another Action
Note: Actions are linked in a 'Finish to Start' relationship, meaning that the first action you select (the predecessor action) must end before the next action you select (the successor action) can start, and so on. When you set an action as a predecessor, a workflow rule updates the date fields for dependent actions. See How the Gantt Chart Updates Dependent Actions.
To set an action to precede another action:
- In the Gantt chart, click on the icon for the action you wish to be the predecessor.
- Hold down the <Ctrl> key and click on the action that the predecessor action should precede.
- Click the Set as Predecessor button.
A popup message asks you to confirm the change.
- Click OK. The action item number for the action that is the Predecessor is entered in the Predecessor field for the action it must precede.
How the Gantt Chart Updates Dates for Dependent Actions
When you set an action to precede another action, the Gantt Chart automatically ensures that the date field for the dependent action conforms to its predecessors' date, that is, that the dependent action begins after the predecessor action ends. For example, if a predecessor's dates are extended and now overlap with its dependent action, the dependent action's dates must be shifted to start after the end date of its predecessor.
The Gantt chart accomplishes this using a workflow rule, cascadeAllTaskDependencies, that is called whenever:
- The Gantt chart is loaded, checking all actions and ensuring that their date fields conform to their predecessors.
- The Set as Predecessor button is used to set one action as a predecessor of another.
- The Predecessors field is edited directly using the Action Item Details form (opened by double-clicking on an action item in the Gantt) or when adding a new action (using the Add New button)
- A date field is edited for any action either by dragging the action dates in the Gantt chart, or by opening the Action Item Details form.
The cascadeAllTaskDependencies workflow rule does the following:
- Checks the predecessor field of the action and modifies both baseline and design dates to come after the corresponding predecessor's dates.
- Checks the days_per_week field of the action's enclosing work package (or of the project if not in a work package), and modifies the start and end dates to take into account the working days per week for the work package or project.
- Cascades any changes; that is, checks if the action is a predecessor of other actions and checks those action dates against their predecessors. A chain of dependent actions may exist and all actions in the chain shift over when a predecessor's dates are extended.
- Checks for dependent loops; for example, Action A is listed as a predecessor of Action B and Action B is listed as a predecessor of Action A, whether directly or indirectly. As this is an impossible scenario, a warning is issued if this condition exists.