Capital Projects / Projects / Plan / Management Console: Plan
Capital Projects / Commissioning / Design
Scheduling Actions Using the Management or Commissioning Consoles
From the Management Console or the Commissioning Console, using the Plan/Schedule Actions tab, you can estimate design schedules for one project at a time using the Gantt chart. Using this task from either of these consoles, you can work with projects having any status. By default, the Commissioning Console shows Commissioning projects, but you can use the Filter to view any Project Type. After you select a project, you can then view the actions for that project, or for that project's work packages.
From either console's Schedule Actions tab, you can:
Note: Alternately, you can use the Estimate Design Schedules and Duration task to review and edit actions using the Gantt chart. From this action, you can view actions for only Approved projects. Initially the timeline shows all Approved projects on the timeline at the same time.
Scheduling Actions
To schedule actions:
- Access the console in one of the following ways:
- Select the Projects /Plan /Management Console: Plan task.
- Select the Commissioning / Design / Commissioning Console: Design Phase task.
- Select the Schedule Actions tab.
By default, the Gantt charts show projects, work packages and actions for the project you selected.
- Use the Filter Console to limit the actions shown.
- By default, the Gantt chart shows work packages, approved projects, and actions. To adjust the items that the chart displays, make a selection (Work Packages, Projects, Actions, or Projects and Work Packages) from the Display field in the Filter console. If you select Work Packages, you must also select a Project Name in the Filter console.
- Select the From Date/To Date to view actions for a specific time frame
- Select a specific project and work package to see only its actions.
- Select an Action Type to see only actions of the selected type.
- Click Show.
- To edit the Start and End Dates for an action:
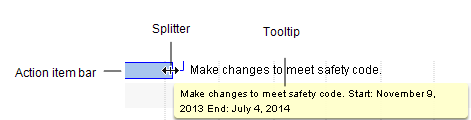
- Mouse over the action icon in the timeline until you see the splitter.
- Click and drag the splitter on the timeline to expand or contract the time allotted to the action. You can click and drag either end of the action icon to change either the start or the end date, or you can click the splitter when it is in the middle of the action icon to change the start and end dates at the same time. As you click and drag, a tooltip shows the adjusted start and end date, and the duration. Note that the Duration shown in this tooltip is not adjusted for the number of working days.
- Release the mouse when the action is positioned on the timeline at the desired start and end dates.
A pop-up appears asking if you to confirm the change. Note that this pop-up provides the Duration adjusted for the number of working days set for the project.

- Click OK to make the change, or Cancel to revert to the previous start and end dates.
- To make additional edits for an action:
- Double-click the action in the timeline.
The Action Item Details form for the selected action is displayed. - Make edits for the action item as needed. For a description of the data entered, see Add or Edit Actions to Approved Projects.
Note: The timeline depends on the project Days Per Week setting in addition to the Date to Perform and Duration - Est. Design field values that you define here. You can edit the project Days Per Week value in the Request/Edit My Projects task. You can edit the work package's Days Per Week by double-clicking the work package in the timeline.
Note: If you edit the Duration Est. Design (Days) field, the system calculates the Date - Calc. Completion based on the Days Per Week value for the action.
- Click Save in the Action Item details form.
- Double-click the action in the timeline.
- To make changes to a project:
- Double-click the project in either the list or on the timeline.
The Project Details dialog appears.
- Make edits as needed. See Requesting Projects for a description of the fields.
- Click Save.
- Double-click the project in either the list or on the timeline.
- To make changes to a work package:
- Double-click the work package name in the list to the left of the Gantt chart timeline, or double-click the icon for the work package in the Gantt chart.
The Work Package Details screen appears.
- Make changes as needed. See Creating and Editing Work Packages for a description of the fields.
- Click Save.
- Double-click the work package name in the list to the left of the Gantt chart timeline, or double-click the icon for the work package in the Gantt chart.
Setting a Task to Precede Another Task
Note: Actions are linked in a 'Finish to Start' relationship, meaning that the first action you select (the predecessor action) must end before the next action you select (the successor action) can start, and so on. When you set an action as a predecessor, a workflow rule updates the date fields for dependent actions. See How the Gantt Chart Updates Dependent Actions.
To set an action to precede another action:
- In the Gantt chart, click on the icon for the action you wish to be the predecessor.
- Hold down the <Ctrl> key and click on the action that the predecessor action should precede.
- Click the Set as Predecessor button.
A popup message asks you to confirm the change.
- Click OK. The action item number for the action that is the Predecessor is entered in the Predecessor field for the action it must precede.