Sustainability & Risk / Hazardous Materials / Background Data - Hazmat
Define Hazard Categories
For the various hazard classification systems that you will use at your site (such as HMIS and GHS), use this task to define hazard categories -- the third level of the hazard classification system. For example, for the GSH classification system's Physical Hazard class, use this task to define the categories within this class.
Before defining hazard classes, you must first define the hazard classification system using the Define Hazard Classification System task and its classes using the Define Hazard Classes task.
When you define hazard categories, you can then run the Background Data - Reports / Hazard Classification Categories List report. See Container Reports.
As a convenience, the tables composing the hazard classification system are already completed with a number of standard international classification systems.
Selecting Hazard Categories

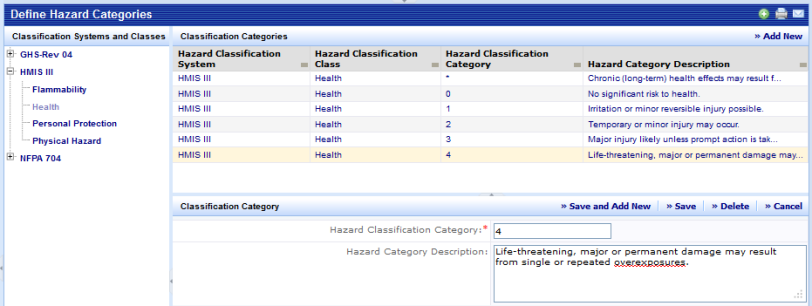
When the view is first presented, a drill-down selection list displays the currently defined Classification Systems. Expand the list and select a class within the system. The screen will now show a grid listing of the categories applicable to that class in a pane to the right of the selection list. A Smart Search console in the grid allows you to filter or sort data on any of the displayed columns.
Hazard Category Fields
The edit form is activated by either selecting Add New or by clicking on a category in the grid.
| Field | Purpose |
|---|---|
|
Hazard Classification Category |
(Required Field) The identifier for the category within the class. The classification system together with the class and category must be unique. Having a compound key means that you could have the same category in many different classifications systems. If you look at the systems shipped with the material you will notice that categories are often a sequence of numbers. |
|
Hazard Category Description |
A free-form text description of the class. |
Add a New Hazard Category
To add a new hazard category:
- Select Background Data - Hazmat / Define Hazard Categories.
- Expand the Classification Systems and Classes list to display its associated classes.
- Select the class for the category.
The Classification Categories pane lists any categories that are defined for the selected class.
- Click Add New in the Classification Categories pane.
The Classification Category pane appears.
- Enter information about the category. See the table above for definitions of each of the fields.
- Click Save. Or, if you are adding multiple categories to a class, you can select "Save and Add New" which will save the record just entered and open a new blank record.
Edit a Hazard Category
To edit data for an existing hazard category:
- Select Background Data - Hazmat / Define Hazard Categories.
- Expand the Classification Systems and Classes list to display its associated classes.
- Select the class containing the category you wish to edit.
The Classification Categories pane lists any categories that are defined for the selected class.
- Select a category in the grid and the Classification Category pane appears showing information for the category.
- Modify information about the category as needed. See the table above for definitions of each of the fields.
- Click Save. Or, if you are adding multiple categories to a class, you can select "Save and Add New" which will save the record just entered and open a new blank record.
Delete a Hazard Category
To delete data for an existing hazard category:
- Select Background Data - Hazmat / Define Hazard Categories.
- Expand the Classification Systems and Classes list to display its associated classes.
- Select the class containing the category you wish to delete
- The system will now list categories that are defined for the selected class in the grid to the right of the tree panel.
- Select a category in the grid and the system will then display an editing form below the grid that is populated with the selected category's data.
- Click Delete.