Hazardous Materials mobile app
Perform an Audit as a Starting Point for the Materials Location Inventory
The Hazardous Materials app is also handy for generating your electronic inventory of materials at each location. Suppose your company has just acquired another company and you need to enter the locations of this organization's materials into the system. If you first define the materials and their SDSs in Web Central, field auditors can use the Hazardous Materials mobile app to survey the facility and note the quantity of each material at each location.
As another example, a hazard specialist at a receiving dock might take possession of a shipment of products destined for other locations throughout the facility. The hazard specialist might immediately ensure that the organization has SDSs on file for all received chemicals by quickly looking them up using the Hazardous Materials mobile app. For those materials without SDSs, the hazard specialist can create the SDS using the Web Central Hazardous Materials application. Next, before distributing the materials to their destinations, the specialist might affix bar codes to each container and use the Hazardous Materials mobile app to start a survey, and catalog the materials and their intended recipients and locations. Once they deliver the materials to the destinations, they can verify the items and close the survey.
Prerequisite: Facility managers prepare data for download
Before staff can get started with the Hazardous Materials mobile app, the facility manager must prepare the background data, develop the SDS information, and perform other tasks. For information, see Hazardous Materials Mobile App: Facility Manager Tasks.
This procedure requires that your role is assigned to the RISK-MSDS and RISK-MSDS_INV security groups.
Procedure
- In Web Central, use the Hazardous Materials application to define the SDS documents and materials at your site using the Environmental & Risk / Hazardous Materials / Manage - SDS / Define Safety Data Sheets (SDSs) task.
- Your manager will have instructed you on the areas to audit. On the mobile device, select a site. The system then downloads all the background data, as well as any existing material inventory data for that site.
- Drill down to the area that you want to survey. See Drilling Down to the Materials Dashboard
- From the Materials Dashboard, choose the Inventory button at the bottom of the screen so that you can start the survey.
- Enter today's date as the date of the inventory start date.
- If you return to the floor plan, it will now be set to the Inventory Status plan, which uses orange and yellow highlights to indicate completed (orange) and to-do (yellow) rooms.
- Visit the selected location, and for each material that you find choose the "+" icon in the upper right corner of the Materials Dashboard to access a form for entering a new record for this item at this location.
- Complete a new record for this material at this location by completing the form's fields.
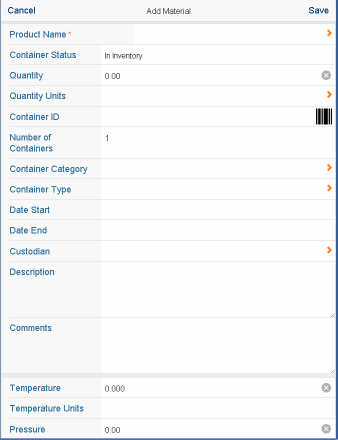
- If the container is tagged with a bar code, you can use this to complete the Container Code field. To do so, tap the bar code icon (which invokes the device's camera) and then scan the bar code tag on the item. See Using Bar Codes in Mobile Apps.
- If the container does not have a bar code, you can enter an identifying number.
- The system will automatically complete the building, floor, and room fields with the location you selected on the mobile app; you can further refine the location by completing the aisle, shelf, and bin fields.
- If you encounter an item in the field for which an SDS document and material description for Product Name does not exist, you will need to consult practices at your site. As a best practice, your safety manager can create a placeholder SDS and name it "Undocumented." When auditors find a material in the field for which an SDS does not exist, they can choose the "Undocumented" record, enter quantity and other information that they observe, and use the Comments field to record the product name, manufacturer, and other important information. When the data is uploaded to the Web Central system, a safety manager can search the Sustainability & Risk/ Hazardous Materials / Material Inventory Exceptions report for the "Undocumented" items. They can then create the necessary SDS records to fully document these products and update the "Undocumented" records created during the audit with the new SDS information.
- Once you enter all information, choose Save and the system returns you to the Materials Dashboard. You can now tap the Verify check mark button to verify the item so that it shows as completed in your survey.
- When through surveying the assigned area, close the survey. This automatically syncs the data and uploads it to the database server.