Space / Space Planning / Examples
Real Property / Advanced Forecasting / Advanced Portfolio Forecasting / Examples
Example 6: Share Data from the Jansen Integration Scenario with Others
Facility managers want to be able to provide detailed information to other stakeholders about changes, maintenance, repairs, and so on that will be made in order to accommodate space changes. These other stakeholders can include managers of departments that will be the new occupants, maintenance and HVAC supervisors, building operations managers, and so on.
To accommodate this need, Space & Portfolio Planning Console provides many options to markup floor plans to share information about proposed work or changes to floor space.
This example continues with Example 5: Find Space for an Acquired Company and shows how to highlight the scenario's information so that you can share it with others.
For more information on the markup tools discussed in this topic, see Marking Up Images and Floor Plans.
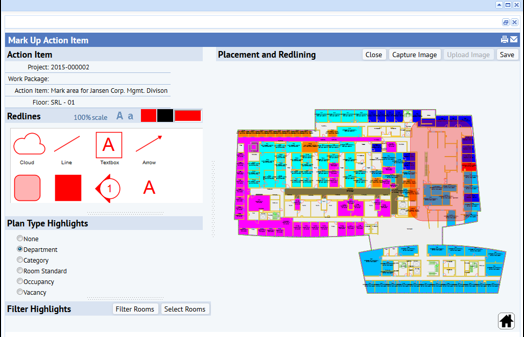
Outline an Area in the Floor Plan
In Example 5, Step 5 you marked up SRL-01 to indicate the location to which Jansen's CORPORATE MANAGEMENT department will move.

Highlight the Floor Plan by a Defined Plan Type
Another useful capability is viewing the floor plan by a variety of plan type highlights, such as Department, Room Category, Room Standard, Occupancy, or Vacancy. The images below show examples of two highlights for the same floor: by Department, and by Occupancy. The highlight capability is useful to identify nearby departments that might be affected by the change. For example, the highlight clearly identifies which departments or employees next to the proposed floor renovations need to be alerted to the renovation and be provided with alternate routes and safety instructions.

Highlight Specific Rooms
Example 5: Step 9, called for creating work packages to convert four storage rooms to offices. You can mark up the affected rooms in the floor plan drawing.
- In the “Mark Up Action Item” form, in the “Filter Highlights” panel, click “Select Rooms.”
- Choose an action item (created in Example 5) to which you want to add markup.
- Enter a title for this highlight, such as “storage areas to be renovated.”
- Pick a color for the highlight (example: green). Click on each room (storage area) to select it.
- The system highlights with the chosen color (green).
- Click “Add filter” to save the filter. In this way, multiple filters can be specified for each floor, each representing different information about its highlighted rooms.

Use Two Filter Highlights and a Text Note
The image below shows SRL-02 with an action item named “Renovation Project – other repairs.” Two filters have been created: “Replace Windows” and “Replace Hallway Carpets.” A text note, created with the Arrow and Textbox tools, indicates that only a two-week window is available for carpet installation.
Use Three Filter Highlights and a Text Note
Finally, note that you can filter standard organization and space hierarchy to identify specific by occupancy or type.
- From the “Filter Highlights” panel, click on “Filter Rooms.”
- In the form shown below, select a highlight title and color.
- Select the specific organization hierarchy (division, department) and space hierarchy to filter on.
- Enter other fields as needed.
- Click “Add Filter” to save the filter.

The image below shows the filter “Software Soln Division” added to the filter list using the above method. The rooms corresponding to the filter are highlighted in lime color. By dragging and dropping the swatch onto the floor plan canvas, you can create a legend to indicate that all rooms with lime color need new laptops installed. The swatch is useful for creating legends to provide additional information about rooms that cannot be captured by just room highlights. Swatches are also useful if marking up the rooms with text boxes makes the floor plan too cluttered.

Share your Scenario and Markups
After you mark up your floor plans, you will want to share the markups with others in the organization.
For example, if you are moving a department, it is helpful to share this markup with the department managers so that the managers have a general idea about where their people will be located on the floor.
You can also use markup to obtain feedback before major changes have begun.
There are a few ways to share markup:
- If you generate a Powerpoint of the portfolio scenario, the resulting PowerPoint file will include the markups for the scenario's action items. The Powerpoint will also include the scenario's stack plans and maps.
- The Capture Image button (in the upper right corner) saves the floor plan with its markups as a PNG file. The system opens a new browser tab with the markup image, which you can then print or download to a desired location.
-
When you click Save, the system creates a screen-scrape and saves it to the Document 4 document field of the Action Items table (the
activity_logtable). The system saves to the Archibus Redlines table (afm_redlines) the data that is necessary to re-create the markup and highlighting so you can edit it later on. The screen-scrape itself does not have enough information for you to later edit.
If desired, generate a Powerpoint of the Jansen Merger portfolio scenario from Exercise 5 by following these steps:
- On the Stack Plan tab of the Space & Portfolio Planning Console, click the Generate Powerpoint button in the upper right corner.
- The system starts a long-running job, similar to the method used for generating paginated reports.
- When the job completes, the system presents a link to the Powerpoint presentation. You can continue working in Archibus while the job runs. The generated Powerpoint includes a slide for each markup in the scenario.
- Edit the generated Powerpoint to focus on the data that you want to present. For example, you can:
- Delete slides that you do not need
- Combine images onto fewer pages
- Add titles and callouts
- Use a different page size, such as 11 x 17
- Move slides to support the goals of your presentation, such as moving both the "from" and "to" plans for move tasks to the same page to be able to present to department heads where their departments will be moving from and to.