Space / Space Planning / Examples
Real Property / Advanced Forecasting / Advanced Portfolio Forecasting / Examples
Example 5: Find Space for an Acquired Company
TGD, Inc. recently acquired Jansen, Inc. This example shows using a portfolio scenario, along with a project, to develop a strategy for moving Jansen’s departments from the JANSEN building to TGD's buildings (building SRL and other buildings if needed).
To work through this scenario, you start with the Projects application. This example uses several portfolio management features including linked scenarios and projects, allocation reductions, marking up floor plans, creating project work packages for required renovations.
This example has the following steps:
- Step 1: Create a Project for the Merger
- Step 2: Define Space Requirements for Jansen
- Step 3: Edit a Generated Space Requirement Item
- Step 4: Create a Portfolio Scenario
- Step 5: Move Jansen's Executive Management Department to SRL
- Step 6: Bring the Space Requirements into the Scenario
- Step 7: Reduce the Size of the Administrative Services Department
- Step 8: Create Work Packages to Execute the Required Renovations
- Step 9: Mark Up Floor Plans to Show Storage Areas that will be Renovated
- Step 10: Move the Finance Department to SRL
- Step 11: Move the Information Services Department to SRL
- Step 12: Move Remaining Jansen Departments to Building AB
- Step 13: Review the Gap Analysis Chart
- Step 14: Share your Scenario with Others
Step 1: Create a Project for the Merger
Begin by creating a project called “Jansen Merger Facilities Integration.”
- Select Capital Projects / Projects / Request / Request Project.
- Fill out the requested project start and end dates and project type. Click “Save and Next”.
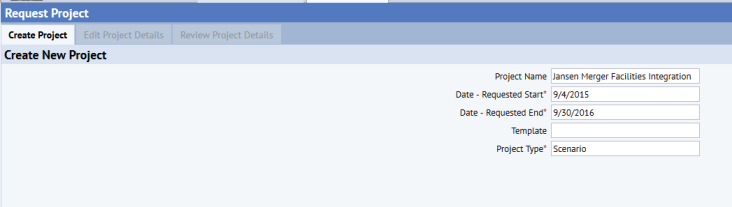
- The system moves you to the Edit Project Profile tab. Enter project details as show below. Select SRL as the Building Code. Click “Save Changes” and then click “Request” to request the project. If you wish, you can follow other workflow steps in the Projects application (such as project approval) as needed.

Step 2: Define Space Requirements for Jansen
- Go to Space Planning / Space Planner / Define Space Requirements.
- Create new space requirement with these values:
| Option | Value |
|---|---|
| Requirements Name | 2015 Jansen Integration |
| Description | Integration of Jansen into TGD |
| Select to level | Department |
| Summarize Allocation? | Yes, by Building and Floor |
| Summarize Space From | Room as Areas |
| Select Floors | building JANSEN (all floors) |
- The system moves you to the Edit Requirement tab, where you will see the space requirement items that the system generated.
Step 3: Edit a Generated Space Requirement Item
For this project, the BUSINESS ADMIN-ADMIN SVCS department will need less space when it moves to TGD's buildings. Its current (2250 feet) and future (980 feet) occupied areas are shown in the tables below.


- You need to adjust the space requirement for BUSINESS ADMIN-ADMIN SVCS to reflect the smaller space it will require after the merger.
- Click on the Space Requirement Item record for BUSINESS ADMIN-ADMIN SVCS and complete the resulting Edit Space Requirement form by retaining the Baseline (2250), but changing the “Space Requirements” field to 980 (the future area for the department). You will later see how this is used when working with the stack plan.

Step 4: Create a Portfolio Scenario
Create a new scenario.
- Run the Space / Space Planning / Space Planner / Space & Portfolio Planning Console task.
- Choose Add and complete the Add Portfolio Scenario form.
- Enter a Portfolio Scenario with the name "Jansen Merger."
- In Portfolio Scenario Name, select the name “Jansen Merger Facilities Integration” from the list of projects in the “Select Value – Link to Project” form. This links this scenario to the existing project, developed in Step 1.
- Enter Department as the level.
- For Description, enter "TGD plans to acquire Jansen. This scenario models the space allocations resulting from the merger."
- Keep the default start date of today.
- The system will move you to the Stack Plan tab.
- Add buildings JANSEN and SRL to the scenario and display their stack plans.
Step 5: Move Jansen's Executive Management Department to SRL-01 and Mark Up the Floor Plan
Begin Phase 1 allocations and re-locations by making space on floor SRL-01 for Jansen's departments.
Note: In the subsequent steps, you will be moving allocations (elements in the stack plan) from one stack plan to another. Often, the complete department name does not display on the allocation; you can hover over the allocation to see the complete name. For your convenience, the instructions in this topic will point out the color of the allocation and its label as shown in the images.
- To make space available on SRL-01 for later use by Jansen departments, drag and drop the FACILITIES-DESIGN department from SRL-01 to SRL-03. On the stack plan, this department is bright pink and labeled "FACI." The below image shows the stack after the move, where you can see the FACILITIES-DESIGN department is now on SRL-03. The Events panel shows the corresponding event.

- Click on SRL-01 in the stack plan and then click the “Mark Up” button.
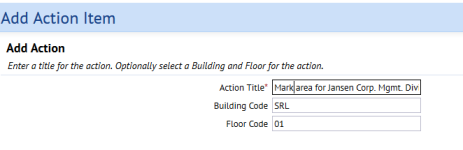
- In the “Add Action Item” form, enter a title for an action item to mark up space on the floor plan for SRL-01. The marked up space will show the location to which the Executive Management department of Jansen will be moved. Enter Building Code as “SRL” and Floor Code as “01”. Click Save.
- The “Mark Up Action Item” form opens up showing the floor plan for SRL-01. From the redline icon panel, drag the area icon onto the place on the floor plan where Jansen's Executive Management will be moved, as per below image. (In the below image you need to scroll the Redlines panel to see the Area tool.) You can also use any other redlines as you think necessary to note information. Save the marked up floor plan by clicking “Save”.

- In the stack plan, drag and drop the Executive Management department (pink allocation) from JANSEN onto SRL-01. Enter the event details in the pop-up form. The event will then be listed in the Events panel. The below image shows the moved department.

Step 6: Bring the Space Requirements into the Portfolio Scenario
Bring in the space requirements “2015 Jansen Integration” that were created earlier.
- Click "Space Requirements: Add" to access the “Allocate Requirements” form.
- Select “2015 Jansen Integration” from the list of existing requirements.
- Enter a start date and event name for the date on which the requirements will take effect. Click “Submit”.
Step 7: Reduce the Size of the Administration Services Department
In the requirements just brought into the scenario, you can see that the BUSINESS ADMIN-ADMIN SVCS department is located on the -01 floor of UNALLOC and therefore has a negative space allocation of 1270 feet. This negative space allocation will be used to reduce area of this department (as specified in the requirements) to a smaller size (980 square feet). For information on negatively numbered floors in UNALLOC and space reductions, see Reduce Allocated Space.
The Events panel shows the corresponding event: 2015-09-18 “UNALLOC…. Create Group.” 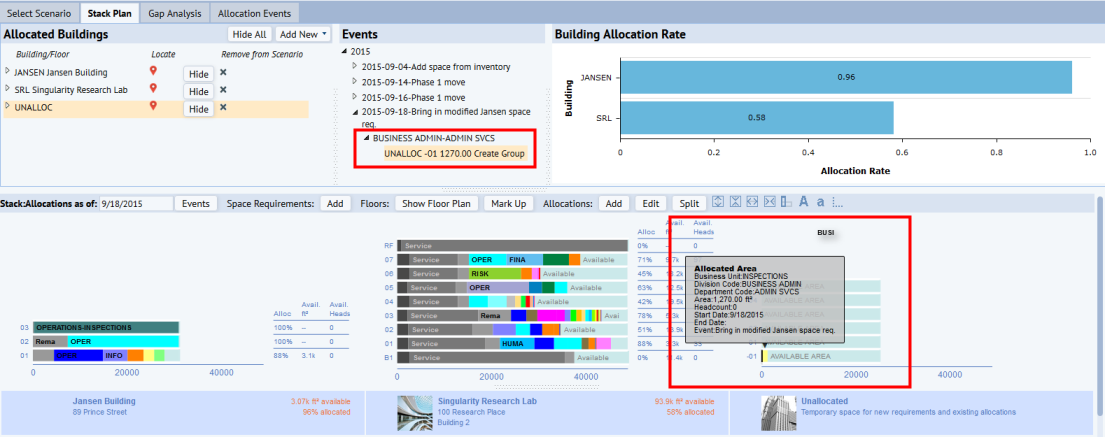
To apply this reduced allocation, follow these steps.
- On JANSEN-01's stack plan, drag and drop the negative space for BUSINESS ADMIN-ADMIN SVCS from UNALLOC onto the stack element for BUSINESS ADMIN-ADMIN SVCS (yellow).
- The system presents the “Reduce Allocated Space” form, completed with the necessary values to make this change. Retain these values the click Confirm.

- Hover over the Admin Services department in JANSEN's stack plan, per below image, and note:
- The size of the department has been reduced from 2250 to 980.
- The system modified the original event that was created for the negative space in UNALLOC to “JANSEN ….. Reduce Space.”
- The system does not create an additional event because the date for the reducing the negative space onto JANSEN was the same as the date for the creation of the negative space in UNALLOC. This reflects that in the real world, you don’t need a holding area like UNALLOC to reduce space. Using UNALLOC as placeholder for the negative space helps you track which departments will have reduced space in their new allocations.

- Drag and drop the reduced allocation for Administrative Services from JANSEN-01 to SRL-02. Do not change the event date in the pop-up event form. Review the Events panel.
- Note:
- an additional event is not created, but the existing “JANSEN … Reduce Space” event is modified and now is says "Move from JANSEN 01 to SRL 02”.
- This reflects the real-world situation in which the reduced space calculation does not require events for the holding area like UNALLOC or for the reduction of the space. In the real world, the reduction is done directly at the destination location and the department is moved to the reduced space.
Step 8: Create Work Packages to Execute the Required Renovations
In this step, you go back to the Projects application to create the work packages to renovate four storage areas on SRL-02 so that they can house staff. After renovation, these areas will be allocated to Jansen's BUSINESS ADMIN-FINANCE department .
- Select Capital Projects / Projects / Plan / Add or Edit Work Packages. Add a new work package with the project code created earlier, name it “Storage Area Renovation,” and save.

- Add new Action Items to the Work Package and save the action items. The below image shows four action items to install HVAC in the four rooms that are currently storage areas on SRL-02. Since these storage areas are being converted to offices, they will require renovation including HVAC.

- For demonstration purposes, you will add only these work packages. To completely convert the storage rooms to offices, you could develop additional work packages to track the additional required steps.
Step 9: Mark Up the Floor Plan to Show Storage Areas that will be Renovated
Move to the Space & Portfolio Planning Console, where you can mark up floor plans to show the storage areas that must be renovated. This step illustrates how a project's action items can be accessed from the linked portfolio scenario.
- Run the Space / Space Planning / Space Planner / Space & Portfolio Planning Console task and select the Jansen Merger Facilities Integration scenario.
- Move to the Stack Plan tab.
- In the stack plan, select SRL-02, and click on “Mark Up.”
- In the resulting Action Items form, note the four actions items that you just created in the linked project. For each of these action items, you can mark up the floor plan to point out the storage areas where the renovation will take place. As desired, work with the markup features to indicate these storage areas.

Step 10: Move the Finance Department from JANSEN to SRL
The renovations to the four storage areas on SRL-02 are scheduled to be completed on 10-23-2015 (see the work package details in Projects).
Since the work will be done by October 23, you can model that these offices will be occupied on October 26, Drag and drop the BUSINESS ADMIN-FINANCE department from JANSEN onto SRL-02 and give this event a date of 2015-10-26, as shown in the below image. The stack plan shows that the move of this department from JANSEN to SRL will take place after the renovations are complete. This completes Phase 1 of the scenario.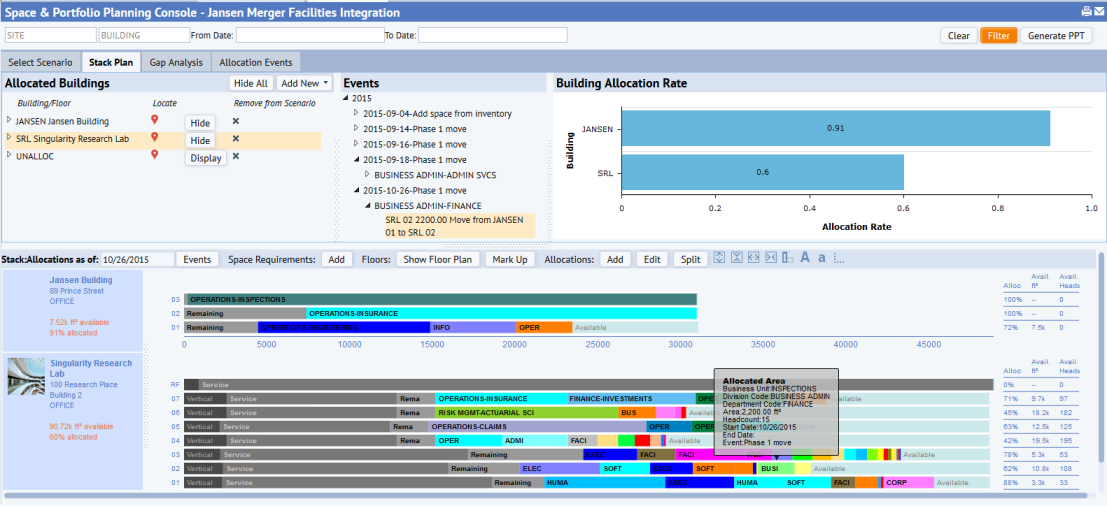
Step 11: Move the Information Services Department from JANSEN to SRL
- From the JANSEN building, drag and drop the INFORMATION TECH-INFORMATION SVCS department to SRL-01. This allocation is labeled "INFO" and is light purple. Assume that this department has a lot of equipment and needs to be located close to street level for easy maintenance and transportation.
- After draggingthe department, complete the event form. The event is listed in the Events panel as shown in the below image. Note that there is not enough space on SRL-01 to hold the entire department; in the below image, you can see that the INFO allocation exceeds the SRL-01 stack plan. You will solve this problem in the next step.

- Select the INFORMATION SVCS department that you just moved from JANSEN-01 to SRL-01. Click on the “Split” button. In the form “Split Allocated Space” enter the percentage or area of each part of the split you are about to make. Save the form.

- The system splits the allocation on the stack. This split can be identified by a light line separating the two areas of the department.
- Note that no new event is created. Instead, the existing event (moving from JANSEN to SRL) gets modified into two parts: moving one split section from JANSEN to SRL and moving second split section separately from JANSEN to SRL. This is for the same real-world reasons described earlier.
- Drag and drop the second split section from SRL-01 to SRL-02, as shown in the below image. Recall, you want to keep the INFORMATION SVCS close to a ground floor, if possible.

- Note that:
- The system does not create new events, but modifies the existing event to show one move from JANSEN to SRL-01 (first section of split) and another move from SRL-01 to SRL-02 (the second section of split). This completes the allocation plan for Jansen’s INFORMATION SVCS department to SRL.
- This ends Phase 2 of the scenario.
Step 12: Move Remaining Jansen Departments to Building AB
Begin Phase 3 of the scenario: Jansen's INSPECTIONS business unit has a number of departments that still must be integrated into the TGD organization. There is not enough space in building SRL to accomplish this. Therefore, in this step you add building AB (which exists in the space inventory) to the portfolio scenario. Building AB’s lease begins on 1/4/2016, so you bring building AB into the scenario on the same date.
- On the Stack Plan tab, click "Add New/ Buildings and Floor from Inventory."
- From the resulting form, choose building AB. This adds all of AB's floors to the scenario.
- Review the below image which shows the stack plan for JANSEN (with the remaining departments to be moved), and the stack plan for newly-added building AB. The Events panel shows the new event for adding building AB to the scenario on 2016-01-04.

- Drag and drop the remaining departments that belong to the INSPECTIONS business unit from building JANSEN to the desired floors in building SRL. Complete the Event form for each of these moves. The image below shows three departments (OPERATIONS-ENGINEERING, OPERATIONS-COMPLIANCE, OPERATIONS-INSURANCE) that are allocated space on 2016-01-04, and the OPERATIONS-INSPECTIONS is allocated space on 2016-01-11. Building JANSEN is now empty and can be disposed of.

Step 13: Review the Gap Analysis Chart
Reviewing the gap analysis shows how the space integration project impacts the allocation and capacity across all the available space in the scenario. From the beginning of the scenario, allocation rate stays constant at 68% until building AB is added to the scenario on 2016-01-04. This immediately lowers the allocation rate as more usable space is now available.
Change in allocated area is almost non-existent and stays constant at 207,905 feet. Small area modifications (like the lower area of 980 sq. feet for Jansen’s ADMIN SVCS department) have negligible impact on the overall capacity. Once AB’s lease expires on 2018-12-31, capacity again falls, resulting in an increase in allocation rate.

Next: Share your Scenario with Others
Your portfolio scenario has a lot of data that will be of interest to others in your organization. Continue on to Example 6: Share Data from the Jansen Integration Scenario with Others with provides steps for further annotating the floor plans and sharing the scenario with others.