Space / Occupancy / Client (Transactional)
Request a Group Move
Depending on practices at your site, several types of employees may need to request moves for groups of employees. For example:
- A department manager may request to move a group of employees who are merging with another department.
- A facility manager may be aware that a constructions project is coming up and needs to move the occupants of the affected rooms to new rooms.
- A space manager may be consolidating space to fewer floors and needs to move employees from the current floor which they plan to no longer lease.
With the Request a Group Move task, any employee with the appropriate access to this task can request a move for multiple employees and group them on one move request. (For moving individual employees at one time, see Request an Individual Move).
The system manages group moves through Archibus service requests, specifically the Service Desk- Group Move type of service request. How the system processes your space request depends upon the Service Level Agreement (SLA) governing the Service Desk- Group Move request type. An SLA is defined by your facility manager or service desk manager determines such factors as whether a request needs to be routed for approval, or if email notifications must be issued.
When choosing a destination room for your employees, be sure to take a few minutes to view the floor plan drawing so that you can see exactly where the room is located. For example, will the employees be near others in their department? If an employee has a physical condition, you may want to choose a room that is close to exits and rest rooms.
Additionally, the floor plan drawing highlights rooms that are available to employees, distinguishing between rooms that are vacant and those that have at least one occupant but are designed to hold multiple occupants and are not yet at capacity. If you are a department manager trying to minimize the space you are charged for, you may want to fill all rooms to capacity before occupying vacant rooms; this strategy enables you to consolidate your rooms and then later release the vacant rooms so that you are not charged for them.
Note: If the group move request is being processed by the Moves application, the system creates furniture and equipment move data only if the move is from the employee’s primary location (rmpct.primary_em = 1). If an employee move is from a satellite location, then the system will not create any equipment or furniture move records.
Step 1: Start the Request
Select Space / Occupancy / Client / Request Group Move
The system presents the Basic tab and fills in your name as the requestor and your telephone number (which you can edit). The system displays basic information about the SLA governing this request, which is not editable.
Press Next to continue to the Detailed Information tab.
Step 2: Describe the Move
On the Detailed Request Information at the top of the form, you specify the details of your move. You are required to complete all of these fields.
- Enter a description of why you are requesting this move or other notes about your request. Later, you will have the chance to pick the exact rooms that you want, so it is not necessary to enter any specific details in this option.
- Specify the date range during which you want the move to occur. Note that you must enter today's date or a future date. If you want the move to occur within one day, enter this date for both Start Date and End Date. If you are moving a large group of employees and the move will occur over multiple days, you can enter a date range. Note that when the system considers availability, it assesses availability as of the End Date.
- Enter a department contact within the department involved in this move by choosing a value from the list. For example, if you are moving several employees due to a departmental re-organization, you may wish to enter the name of the Department Manager. You can choose any employee in the database for this option.
- Enter the buildingto which employees will move.
- Enter a project name -- This is a free-form field and is not validated by a projects table. Use this field to group similar moves.
- Click Next to move to the Assignments tab.
Step 3: Load the Floor Plan and Set its Labels
With the Assignments tab, you choose the employee to move and the destination rooms -- the rooms to move to. First, you need to load a floor plan drawing of the destination rooms and set its labels.
- The system presents a filter console at the top of the view, and a drill-down tree for selecting the floor plan drawing of the floor to which you wish to move employees. The filter will automatically be set to the building that your chose in step 2. (You can change this building if you wish.) The filter controls the options that appear in the Select Floor pane.
- If you have several floors from which to select, use the filter to limit the drill-down frames to showing just the data that you indicate in the filter.
- For example, if you want the drill-down frames to present only floors in the HQ building, set the Building Code to HQ in the filter console. Or, if you want floors whose rooms are assigned to a certain department, enter the department in the filter console.
- Select the floor whose rooms you wish to view. The drill-down frame presents only those floors for which CAD drawings have been developed and which meet the restriction specified in the filter console.
- Once you select the floor, the system presents its drawing in the right pane. The system highlights rooms that have available capacity on the date of the requested move. For information on room capacity, availability, and vacancy, see Occupancy (Concept). The legend to the right of the drawing indicates the highlight color for each status. All other rooms are displayed in gray.
Note: If you have access to the Space Manager process, your drawing will show the status of all rooms on the floor, and your room list will list all rooms. You will be able to assign employees to over-capacity and at-capacity rooms, as well as rooms that do not match the employee standard of the employee being placed. This approach provides the Space Manager with flexibility in temporarily placing employees until more space becomes available.
- If you wish to see additional information about the rooms, such as the department owning a room or its current employee assignment, select the appropriate attribute for the Labels option.
- For example, you may wish to know to which department a room is assigned. Or, if the room holds multiple employees, you may wish to know the employees already occupying this room.
- If the drawing is zoomed in enough, you will be able to see this information displayed in each room. Otherwise, you can hover over the room to see the information.
- In addition to the type of information that you choose in the Labels option, the system displays the Room Capacity and Room Occupancy.
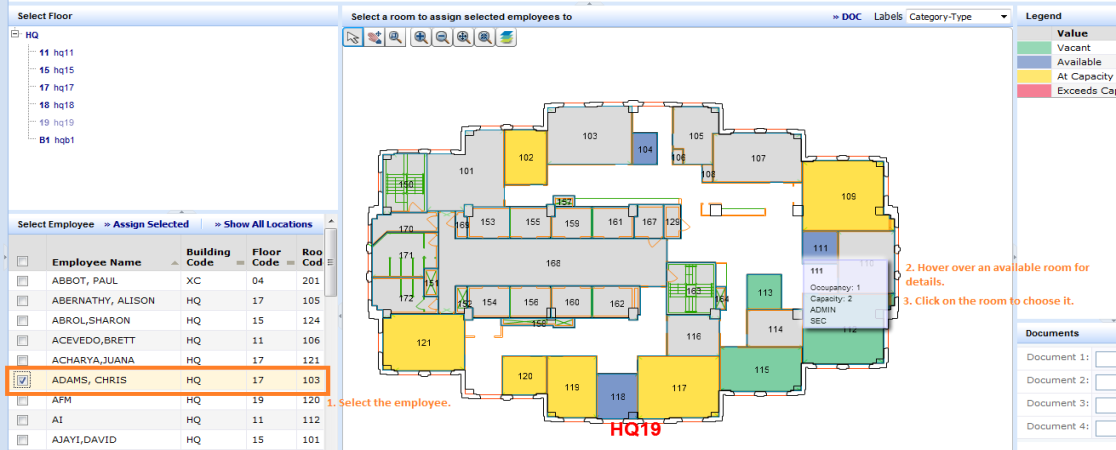
- In the below image, the user has chosen to display Room Category and Room Type and has hovered over room 111 to see this information, along with Room Capacity and Room Occupancy. If the user zooms in on this room, they will be able to see this information displayed as text in the drawing.
Step 4: Indicate the Employee and Destination Rooms
To select employees and choose their destination rooms:
- In the Employees list in the lower left frame, the system lists as many employee records as it can hold. You may wish to use the smart search console in the Employees frame to access a specific employee.
- Select the employee that you wish to assign to a room. Scroll to the right to see the current assignment, if any.
- Choose the Show All Locations button if you want the system to list both primary and satellite locations in this frame. The far right column indicates if a location is primary or satellite.
- If you chose to display all locations, you can select an employee and its satellite location as the move item.
Note You can select only one employee at a time when choosing destination rooms in the floor plan drawing.
- In the drawing, click on the room to which you want to assign this employee.
- If after placing this employee there will still be space in this room, the system prompts you to choose the part of the room that you want to associate with this employee. For example, if the room has a capacity of 3, is currently vacant, and has Percentage of Space values of 30, 20, and 50, you can choose which percentage you want for this employee.
- If the assignment changes the room's capacity, the system redisplays the room in the appropriate color. For example, if you assign the employee to a vacant room that can hold two employees, the highlight color changes from the Vacancy color to the Available color. Note that if you have the employee name displayed as a label, this text will not be updated until you actually save the change.
- If you choose an employee whose room standard is not appropriate for the employee standard of the selected employee, the system alerts you. The system uses the rmstd_emstd table and adheres to the below rules. These relationships are established with the Background Data / Assign Employee Standards to Room Standard task.
- Employees with Employee Standards that are not listed in the rmstd_emstd table can have a room of any room standard
- Rooms with Room Standards that are not listed in the rmstd_emstd table can be requested by any employee standard.
- In the Assignments tab, the system adds the employee and destination to the list the employees to move, their current rooms, and their destination rooms. The Assignments tab indicates if the Move From location is a primary or satellite location. You have a few other options when working with the Assignments tab. For information, see Other Move Options at the end of this topic.
- To add additional employees to this group move order, repeat steps 2 and 3 above. The system will redisplay the rooms in the appropriate highlight color and list your moves in the Assignments frame.
- When you have finished moving employees to rooms on this floor plan, select another floor plan in the left pane and request moves to its rooms.
- (Optional) Add any supporting documents by completing the document fields. For example, if the employee is moving because the current room has an unresolvable maintenance problem, you could upload a picture of the problem. If the employee is a new hire, you may wish to include documentation from Human Resources. For information on using the document fields, see Using the Document Management System.
- When you have finished adding move assignments to this group move order, choose the Submit button in the upper right corner.
Step 5: Review your Request
Once you select the Submit button, the system presents the Overview tab so that you can review your request.
If you want to create another, choose Create New Request in the upper right corner.
Next Steps
Once you request a move order, the system processes it according to the service level agreement (SLA) governing this request. For example, the SLA may define that it be routed for approval to one or more parties. Or, the SLA may define that the request be passed to the Moves application for additional processing, such as cost estimating. Similarly, the SLA may define that as requestor, you receive notification of the progress of the move request.
Each site can configure a workflow process that reflects the needs of their particular site. For information, see Service Request Workflow for Move Requests and Departmental Space Requests.
Other Move Options
When working with group moves, you may also do the following when working on the Assignments tab in Step 4.
Select Employees to Move without Assigning them to Specific Rooms
You may want to include employees in a move order, but not assign them specific rooms at this time. For example, you may not have any available space for them at this time, but you still want to include them in the move order so that you can later assign space when it becomes available.
- In the Employees panel, select one or multiple employee and choose the Assign Selected button.
- The system adds them to the Assignments panel. The To Building, To Floor, and To Room fields are empty since this information has not been specified.

When the move order is routed to a space manager for issuing, the space manager can review the available space and make the specific room assignments for each employee.
Remove an Move Assignment from the Move Order
If you decide that an employee should not be moved and you have not yet submitted the move order, you may remove the move assignment from the Assignments panel.
- In the Assignments panel, select one or multiple employees.
- Choose the Remove Selected button.
- The system removes the move assignments from the Assignments panel.
- In the drawing, the system redisplays the highlights as necessary. For example, if a move assignment changed a room from Vacant to Available, and you then choose the Remove Selected button for this move assignment, the system updates the highlight back to Vacant.
Change an Employee's From Location
When you select an employee in the Employees frame in Step 4 above, the system lists this employee and its associated room in the Assignments frame. For example, if you chose to display all locations and chose an employee and its satellite location, the system displays this satellite location in the Assignments frame. You can change this information if you wish by using the Change From Location button. In the resulting form, you can choose another room or choose the option to not list a from location.
For example, if you chose an employee and its satellite location and you wish to move from the primary location, you can use this button to select the primary location.
Choose a Room that is not in the Floor Plan Drawing
If seeing the exact location of a destination room on the floor planning drawing is not important to moving an employee, you can simply choose the destination room from a list. This enables you choose a destination room on any floor without taking the time to load the floor plan drawing.
- Add the employee to move to the Assignments panel either by choosing an employee and a destination room in the drawing, or choosing an employee and using the Assign Selected button to list them in the Assignments panel without a destination room.
- In the assignments panel, select an employee. Choose the "Select To Location" button. The system presents a list of available rooms as of this move date. Additionally, if the rmstd_emstd table has been completed, the list will be limited to rooms that are appropriate to the employee's employee standard . For information, see Background Data / Assign Employee Standards to Room Standard task.
- Choose a room from this list, and the system enters this room in the destination fields, replacing the current destination, if specified.