Assets / Enterprise Assets / Background Data - Assets
Assign Custodians to Assets
To track an asset's chain of custody, you assign asset custodians and owner custodians to your assets. An asset custodian can be an employee, vendor, or contact who is also a team member. The asset custodian must be defined in the Team Members (team) table, and thereby also in one of the following tables: Employees, Vendors, or Contacts.
With the Assets / Enterprise Assets / Background Data - Assets / Assign Custodians to Assets task (ab-eam-define-custodians.axvw), you can:
- See a list of your custodians and restrict this list by various criteria
- Locate a custodian and see a list of assets assigned to that custodian
- Create a new asset custodian or a new owner custodian and add assets. You can also do this with the Assign Assets to Custodian task.
Note: Your organization may choose to have an outside party (vendor or contact) serve as the custodian and may choose to not give the these parties access to Archibus. In this case, the custodian will collect information outside of Archibus and then pass it to an Archibus user who will enter it either manually or by importing a spreadsheet. The schema does not have links to the Archibus Users table (afm_users) for custodians.
From the Assign Custodians to Assets view, you can do the following:
- Review a list of custodians
- Review assets assigned to a custodian
- Assign assets to an owner custodian
- Assign assets to a non-owner custodian
Complete the filter
Load the Assets / Enterprise Assets / Background Data - Assets / Assign Custodians to Assets task and use the filter at the top of the Asset Custodians panel to limit the list of custodians that the panel displays. You can search for custodians based on:
- Asset Type (Building, Property, Equipment, or Furniture)
- Asset Standard
- Custodian Type -- Show owner custodians, or non-owner custodians. For non-owner custodians, you can choose an associated Custodian Type, such as IT or Financial.
- Custodian Status -- Set this to Active to show custodians who have assets for which they are the Active custodian. Set this to Inactive to show custodians who were formerly owner custodians for assets.
- The building and floor in which assets are located. The panel will show all custodians for assets in this location as well as custodians that reside in this location.
- The division or department assigned to an asset. The panel will show all custodians for assets of this department as well as custodians assigned to this department.
Thus, if you enter building HQ in the filter, you receive all custodians whose Building Code value is HQ, as well as all custodians who are assigned to assets whose Building Code is HQ.
Review custodians
You can use the Assign Custodians to Assets view to see a comprehensive list of your custodians.
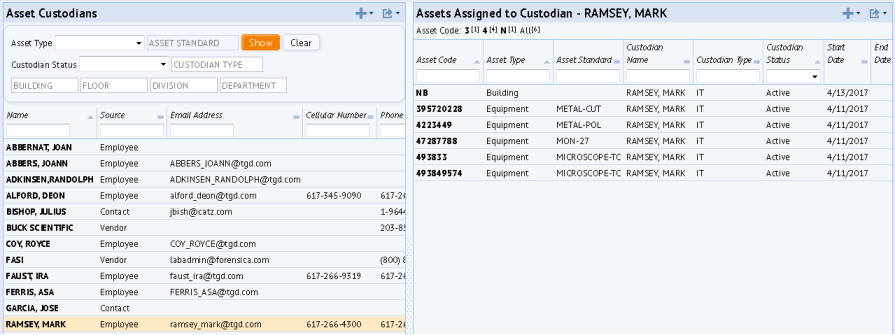
The Asset Custodians panel lists all custodians that meet your filter conditions. For example, do not set a filter to see a list of all custodians: owner and non-owner, active and inactive.
Since custodians can derive from employees, contacts, and vendors, you can review the Source field for an understanding of the origin of each custodian.
Use the Export button to generate a listing of your custodians.
You can also review custodians using the List of Assets by Custodian report.

Review assets assigned to a custodian
- Set a filter, if desired.
- Select a custodian from the Asset Custodians panel.
- The Assigned Assets to Custodian panel lists all assets assigned to the selected custodian.
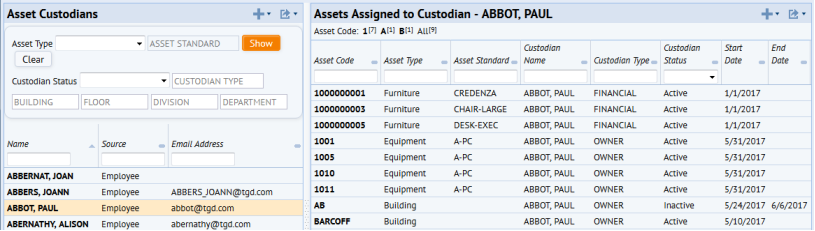
- Review the Custodian Status and End Date to see assets for which the custodian was a previous owner custodian. For example, in the below image, Paul Abbott is no longer the owner custodian for the AB building and has a Custodian Status of Inactive. Also note that Paul Abbot is a non-owner custodian for the furniture items, as indicated with the Custodian Type value of FINANCIAL for these items.
Assign assets to an owner custodian
When you create a new owner custodian, the system automatically sets the Custodian Status to Owner.
- In the Assets Assigned to Custodians panel, choose the Add button (+ sign button).
- The button presents a menu for adding an Other Custodian or adding an Owner Custodian. Choose Owner Custodian.
- The view presents the Select Assets form.
- On the Select Assets tab, select the assets that you want to assign to the same owner custodian. You can use the filter at the top of the form to limit the asset list according to assigned status and asset type. For example, you may want to see only equipment assets that are not assigned to a custodian.

- Click Next and you move to the Assign Owner tab. Click on the New Owner Name field to access a form for choosing an employee, vendor, contact, or team member to assign as the owner custodian. Move to the appropriate tab to find the party you want to assign as an owner custodian. After you select a party and return to the Change Owner form, the form indicates the Source from which the owner custodian derived. For example, if you chose a party from the Vendors tab, the Change Owner form would list "Source: Vendor."

- Complete Date Membership Start with the date that the custodian will take responsibility for this item as the owner custodian.
- Enter any required notes about this custodianship.
- If you need to add more assets to your selection list, you can use the Previous button to return to the Select Assets form, change the asset list, and then return to the Assign Owner form.
- Click Save on the Change Owner form.
- The view refreshes and activates the Digital Signature field. Use this document field to upload a document specifying that the team member is accepting responsibility as the owner custodian.
Assign assets to a non-owner custodian
- In the Asset Custodians panel, choose the Add button (+ sign button) and choose Other Custodian from the menu.
- The view presents the Select Assets form.
- On the Select Assets tab, select the assets that you want to assign to the same non-owner custodian. You can use the filter at the top of the form to limit the asset list according to assigned status and asset type. For example, you may want to see only equipment assets that are not assigned to a custodian.
- Click Next and you move to the Assign Custodian tab. If you need to add more assets to your selection list, you can use the Previous button to return to the Select Assets form, change the asset list, and then return to the Assign Custodian form.
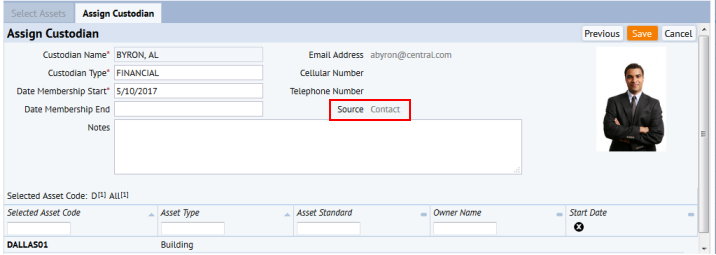
- Click on the Custodian Name field to access a form for choosing an employee, vendor, contact, or team member to assign as the custodian. Move to the appropriate tab to find the party you want to assign as a custodian. After you select a party and return to the Assign Custodian form, the form indicates the Source from which the owner custodian derived. For example, if you chose a party from the Contacts tab, the Assign Custodian form would list "Source: Vendor."
- Enter the date that custody starts. If you know the End Date, you can enter it as well. Otherwise, leave it blank.
- Complete Custodian Type with the type of custody for this custodian, such as FINANCIAL or IT. Note that this field is not available when assigning an owner custodian because the system automatically completes Custodian Type with Owner.
- Enter any required notes about this custodianship.
- Click Save on the Assign Custodian form.