Archibus SaaS / Foundations / Space and Moves / Space Console
Archibus SaaS / Space / Space Manager / Space Console
Space / Space Inventory / Space Manager / Space Console (non-transactional)
Space / Occupancy / Manager / Space Console (non-transactional)
Space Console: Find the Data and Floor Plans that you Need
To help you find the data that you require, use the Space Console's search features to restrict the data displayed by the Space Console. You can search on many properties, such as vacancy, capacity, room size, department assignment, floor, room number, and so on.
This topic has the following sections:
- Overview
- Basic procedure
- Loading the floor plan
- Use a recent search
- Clear a search
- Controlling if you need to filter when the Space Console opens
- Next steps
See these topics for details on each type of search:
- Search Box Overview
- Quick Search
- Query Statement Search
- Employee Search
- Advanced Search
- Search by Map and Site Plan
Overview
When you search, you receive data pertaining to the locations that match your search criteria. For example, if you search for a specific department, the Space Console displays only:
- floors containing rooms assigned to this department
- rooms assigned to this department
- employees located in rooms assigned to this department
- room categories and types of rooms that are assigned to this department.
Once you set a filter, the system updates:
- the list of floor plans to show only those floors whose rooms meet the restriction you specified. If you load the floor plan, it highlights the floor according to the restriction.
- the list of data in the Details tabs at the bottom of the Space Console to show only the data matching the search (if the default Apply Filters is checked). You can clear Apply Filters and control the content of individual tabs with the tab's funnel-shaped icon.
The restriction stays in effect as you switch between Space and Occupancy modes, or between the Space Console's Details tabs.

Basic procedure
To search for floors and restrict the data in the Details tabs:
- Clear any previous filter.
- Use the Clear button on the Advanced Search form.
- If the search was made using the search box, you can click the "x" in the Search box.
- Enter your search:
- Enter search values in the Advanced Search form.
- Select an existing filter from Recent Search.
- Use the search box.
- Note: The “Advanced” and “Smart” searches are independent of each other; when you switch from one to another, the other search will be cleared.
- In the Floors list, the Space Console presents a list of floors whose rooms meet the search criteria.
- Depending on your search method, the Space Console might immediately load your floor plan and hide the Floors list.
- Choose a floor from the list, and Space Console loads the floor plan. Depending on the item on which you searched, the Console highlights the floor plan.
- Once you load a floor plan, you may wish to hide the Floors list so that the Details tabs can display more values.
- In the Details tabs (the tabs below the Floors list), the data is restricted according to the filter. You can control this.
Loading the floor plan
Once you select a floor from the search results, the Space Console displays it in the right pane. Note the following behaviors for displaying a floor plan in the right area of the Space Console.
- If you know the floor that you want to work with:
- Enter the floor or building in the search box, and you can choose the floor from the resulting pop-up list. When you choose the floor from the pop-up list, the Space Console displays the floor plan on the right and hides the Floors list (if displayed).
- Alternately, enter it in the Floors field of the Advanced Search form and the Console will display it. This way, you do not need to take the extra step to select it from the Floors list.
- For some search criteria, the Space Console immediately highlights the floor plan according to the criteria you entered. For example, if you searched for all floors housing a department by entering ENGINEERING in Department Code, and then select a floor plan, the Space Console highlights the rooms in the floor plan that belong to ENGINEERING.
- When your search criteria returns only one floor, the Space Console automatically selects the floor in the Floors list, hides the Floors list, and loads the floor plan.
- For example, if you enter one floor in the Advanced Search box, the search results will return one floor. The Space Console immediately loads this floor plan, collapses the floor list, and highlights the floor plan according to default criteria.
- When the floor plan highlights rooms according to search criteria, it considers all criteria entered in the Advanced Search form. For example, if you searched for Office (room category) rooms that are under capacity, and then you select a floor, the Space Console highlights the rooms meeting this criteria. Note that if you subsequently run one of the defined highlights, such as Highlight by Division, the highlight is only on those rooms on the floor that meet the restriction set in the Advanced Search form.
Once you load a floor plan, you may want to return to the list of floors that your search displayed. Click in the search box to reactivate the search and display the list of floors. For example, if you search on HQ and select HQ-19 from the list of floors, you can click the search box to redisplay the list of floors for HQ. You can also select it from the Recent Search list, as discussed later in this topic.
Zooming the loaded floor plan
Depending on the type of search and the search results, the drawing may automatically zoom to show the search results:
| With this Search ... | The drawing will zoom to ... |
|---|---|
| Employee Search | the room housing the employee (either a permanently-assigned or a hoteled seat) |
| Advanced Search, search results return a single room | the room |
| Advanced Search, search results return a single employee | the room housing the employee (permanently-assigned seat) |
| Advanced Search, search results return multiple rooms or employees | the drawing will not zoom |
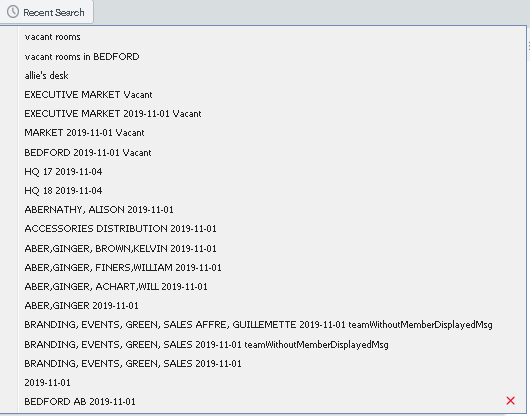
Use a recent searches
You may have recently set a filter and want to use it again. Click the Recent Searches option (to the right of the Advanced Search button), and you receive a list of previous searches that you made. 
The list includes all search methods:
| Search Method | Description |
|---|---|
| Advanced Search | Searches you created by clicking Save in the Advanced Search box. The Recent Searches list displays the search criteria that you entered. Note that the date in the text string is the "As of" date for teams. |
| Saved Advanced Searches | Searches that you named by clicking Save As in the Advanced Search box and providing a descriptive name. These searches appear at the top of the search list. |
|
For these types of searches, you enter text in the search box. You do not explicitly save these searches; the Space Console always saves them and includes them in the Recent Search list. The Recent Search list places them after searches that were explicitly saved using Advanced Search.
|
Select a search from this list, and the system loads the corresponding drawing. The Advanced Search form or the text box will reflect the search criteria of the selected entry. If you recently made a detailed Advanced Search and now want to make a similar search, you can select it from the Recent Search list and then adjust the settings in the Advanced Search form.
The list holds up to 20 searches. When your list reaches 20 entries, the system automatically removes the oldest entries that you made by completing the search box.
The searches that you save using the Advanced Search box remain in the list until you delete them by selecting the "x" to the right of the entry.
Clear a search
Entering a new search clears the current search. However, if you want to explicitly clear the current search, there are a few methods:
- To clear a search made with the text box, click the "x" button located on the right edge of the search box.

- To clear a search made by Advanced Search or a search selected from the Recent Searches list:
- Load the Advanced Search form.
- Click Clear to clear the values in the form.
- Click Search Floors to clear the current search results.
- To clear the restriction from the Details tabs, clear the Apply Filters and Selected Drawings Only options on the funnel-shaped button.
Controlling if you need to filter when the Space Console opens
You can control whether or not the Space Console displays data when it opens
-
It automatically includes all of the project's space information when it opens (the default operation).
-
It presents an empty Space Console and you use search features to restrict the project information.
In deployments with hundreds of buildings and thousands of floors, the Space Console can open slowly if it must display space information for the entire project; showing an empty Space Console enables the Space Console to more quickly load.
The AbSpaceRoomInventoryBAR.SpaceConsoleLoadDataOnOpen application parameter controls whether or not the Space Console shows all space information when it loads. However, the AbSystemAdministration.DemoMode application parameter overrides AbSpaceRoomInventoryBAR.SpaceConsoleLoadDataOnOpen.
When the demo mode parameter is active (set to 1), the Space Console ignores the SpaceConsoleLoadDataOnOpen parameter and always opens showing data. To set these parameters, run the Configure Application Parameters task, which can be found at: System / Archibus Administrator - Application Configuration / Configure Application Parameters.
Next steps
Continue your exploration of the Space Console with:
- Display Floor Plans and Floor Information
- Review Organization, Room Category, Room, and Employee Information (the Space Console's tabs)