Assets / Enterprise Assets / Project Proposal Console
Project Proposal Console: Getting Started with Space Requirements
Working from the Project Proposal Console, you can create space and asset requirements for your capital projects based on locations you select for the project. When you run the Create Requirements action, either from the Space Requirements or Asset Requirements tab, you can create requirements for any combination of space, equipment, and furniture requirements. The cost of these requirements can then be included in your project analysis.
When you run the Create Requirements action, you create one space requirement that includes requirement items for space, equipment assets, and furniture assets (depending on your selections.). All requirement items are stored in the Space Budget Items table. The way to distinguish between the requirement items is that space requirement items contain a value in the Room Standard (rm_std) field, the equipment requirement items contain a value in the Equipment Standard (eq_std) field, while the furniture requirement items contain values in the Furniture Standard (ta.fnstd) field.
For information on asset requirements, see Getting Started with Asset Requirements.
Space requirements and space requirement items
When you run the Create Space Requirements action, the workflow rule creates a space requirement that summarizes the space (and optionally equipment, and furniture requirements) for the project locations. The space requirement is made up of space requirement items that detail the items by which you summarized space, equipment, and furniture asset needs, and the costs and areas of these items. For example, when creating the requirement, if you sum areas at the division level, the space requirement will have one space requirement item for each division in your inventory and each space requirement item will document the cost and required area for this division.
When you run the Create Space Requirements action from either the Space Requirements tab or the Asset Requirements tab of the Project Proposal Console, the application examines the current inventory and creates:
- Creates the baseline inventory of space, equipment, and furniture for your project locations. You can select to create any combination of these requirements from the same form.
- Copies this value to the Period 1 field, so that you can use it as a starting point.
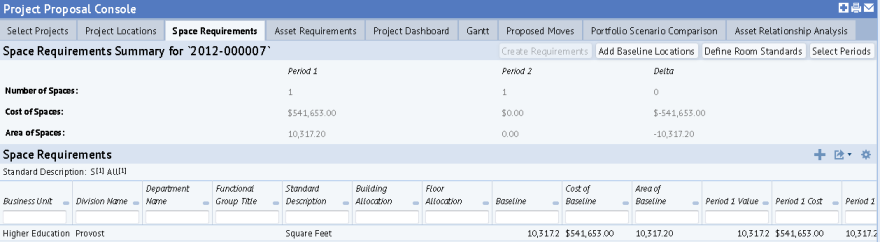
After you run the Create Space Requirements action, the space requirement items appear in the Space Requirements pane and their cost is included in the statistics presented on the Space Requirements Summary pane:
- Number of Spaces
- Cost of Space
- Area of Space
You can manually add space requirement items to the requirement b y clicking Add in the Space Requirements pane.
Baseline inventory and Period 1 through Period 12 fields
When you run the Create Space Requirements action, the application examines your current inventory and creates the baseline inventory and stores this in the Baseline (Period 1 field of the Space Budget Items table). The action also copies this value to the Period 1 field. Both the Period 0 Value and the Period 1 Value field contain the number of units (area, number of employees, or number of standards - equipment or room). Once you create the baseline inventory, you can add new baseline locations, but you cannot change the baseline value for the existing locations.
As you develop the proposed project, you can forecast future needs and enter them in the Period 2 through Period 12 fields.
There are two use cases for creating Space and Asset Requirements with multiple periods.
- The primary use case is to create a projection of requirements for up to 12 periods out, where each period builds off of the prior periods. This is appropriate when creating a continuous forecast, such as a forecast for the next 12 quarters.
- Another use case is creating multiple alternative forecasts within a single requirement. Each period of the requirement can represent different forecasts for the same time frame. For example, you might create a requirement that depends on the approval of a large project. One period might be based on the inclusion of that project, and another period would not include it. Both periods would actually represent the same time period (quarter, year, and so on).
When reviewing your data, you can choose to focus on just a few periods at a time. If you choose to display just two periods, the Delta column shows the difference between the two values of the selected periods. In the above image, you can see that the Delta column, located on the right, displays the difference between the Period 1 and Period 2 fields.
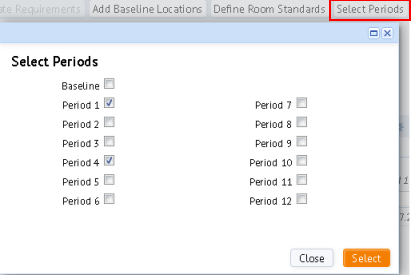
Use the Select Periods button, located in the upper right corner of the Space Requirements tab, to control the periods that display in the analysis (upper) portion of the Space Requirements tab. You can select any periods to display, and periods do not need to be consecutive (for example, you can select to show Periods 3 and 8).
Linking a project to a portfolio scenario or space requirement
If your organization has a license for the Space Planning or the Portfolio Forecasting applications, you can link the proposed project to a portfolio scenario or space requirement created in those applications. This link is made when the Project Name (project.project_name) for the proposed project matches the Portfolio Scenario Name field in the Portfolio Scenario table (portfolio_scenario.scn_name), or the Space Requirements Name field in the Space Budgets table (sb.sb_name).
When you create requirements for a project that is linked in this way, these space requirements become available in the Space & Portfolio Planning Console. If requirements have been created in the Space & Portfolio Planning Console, these requirements are available in the Project Proposal Console. With linking, you can share and update the data from each of these consoles. Similarly, if you generate a group move from the portfolio scenario or proposed project, you can link the move project to the portfolio scenario or proposed project by naming the move project the same as the portfolio scenario or proposed project.
Once the project is linked to the portfolio scenario, the program assigns any tasks or redlines you add for the scenario directly to the linked project. For example, if you add mark-ups showing proposed moves to the portfolio scenario, these markups will be available in the move project.
You can create the project, portfolio scenario, and space requirements in any order. Typically, the move project is generated from the portfolio scenario or proposed project.
- If you create a project and give it the same name as an existing portfolio scenario or space requirement, the link is automatically made when you save the project. (That is, the link is made if the Portfolio Name equals the Portfolio Scenario Name or Space Requirement Name.)
- If you want to link the project to a portfolio scenario or space requirement after creating the project, you can edit the Project Name to be the same as the Portfolio Scenario Name or Space Requirements Name to make the link.
- If you are working from the Space Planning or Portfolio Forecasting applications, when you create the portfolio scenario, if the project is already created, you can select the Project Name from the Select Value - Link to Project dialog. This ensures that the Portfolio Scenario Name is the same as the Project Name. Be sure to select a project that has the Status of Requested or Proposed from the Select Value list.
Important:
Linked Projects and Portfolio Scenarios. If you edit a Project Name and the project is already linked to a portfolio scenario, be aware that you need to update the Portfolio Scenario Name to maintain the link. This update is not automatically done. This also applies when renaming portfolio scenarios that are linked to a proposed project or space requirement; in this case you must update the Project Name to match the new Portfolio Scenario Name.
Unique names. Ensure that the Project Name is unique among all your Proposed projects, and that the Portfolio Scenario Name is unique among your portfolio scenarios. This ensures that you can distinguish scenarios and projects from others, and that only one portfolio scenario is linked to one proposed project.
Have a naming convention. Have a naming convention, and apply it consistently. This facilitates keeping names unique, locating projects and scenarios, and keeping related projects or scenarios together in lists. The naming convention that works best varies depending on practices at your site. For example, you might begin names with the name of the capital project that the space planning is part of, or the business unit initiating the project. This could be followed by a numbering sequence to make the name unique.
When working with portfolio scenarios in the Space Planning or Portfolio Forecasting applications, you cannot work with a space requirement's asset requirements. You work with individual asset requirement items only in the Enterprise Assets application.
Step 1. Review your room standards
The following are some suggested steps for getting started with creating space requirements.
Space requirements are based on space standards that are defined in the Room Standards table. When you run the Create Requirements action, the Room Standards record that is used for the calculations depends on your selection for the 'Summarize Space From' field on the Create Requirements form.
To get started, you might want to review the space standards used for room area, headcount, or room standards to review the values entered for each of them, and how the application uses these values. See Reviewing Room Standards.
Step 2. Add project locations and actions
When you create space requirements, locations that you selected for the project and that have an action are automatically added to the requirement. You can modify the locations as needed. However, if you first add your project locations, and actions you do not have to select these locations from the Create Requirements form. For this reason, you might want to add your locations before creating requirements. See Adding Project Locations and Actions.
Step 3. Automatically create space requirements
You run the Create Requirements action to have the application automatically create the area and cost data for your space requirements. See Creating Space Requirements for Proposed Projects.
Step 4. Adjust the space requirement as your planning evolves
When you create space requirements, you start from your baseline inventory. As your planning progresses, you will want to adjust the requirements to reflect your planning. You do this by entering values for the forecast periods and adding additional space requirement items to the space requirement. See Adding and Editing Space Requirement Items.
You also might want to add new baseline locations that do not exist in your current inventory. See Adding Baseline Locations.