Space / Space Inventory / Department Manager / Request Dept. Space (Transactional)
Changing your Department's Space
As a department manager, you need to ensure that when a new employee or contractor arrives on their first day on the job that there is a designated space for them to work at. Similarly, if your department downsizes, you want to release space from your department and make it available to other departments. This is particularly important if your company charges each department for the space that is allocated to them; you do not want to be charged for space that you are not using.
With the Request Department Space task, a department manager can:
- claim vacant rooms for your department
- release rooms that are assigned to your department but which you department is no longer using
You claim additional space and release space you are no longer using by indicating on a floor plan drawing the exact rooms that you want to affect. You can also choose rooms from a room list.
You can enter the exact date that you wish to claim or release the space so that you are not charged for its use while you are not using it. For example, if you are planning space for a new employee who will arrive in three weeks, you can enter the required future date as part of the request. Although you can claim this space now, the system will not charge you for this space until the new employee actually occupies it in three weeks.
The system manages departmental space requests through Archibus service requests, specifically the Service Desk- Department Space type of service request. How the system processes your space request depends upon the Service Level Agreement (SLA) governing the Service Desk- Department Space request type. An SLA is defined by your facility manager or service desk manager determines such factors as whether a space request needs to be routed for approval, or if email notifications must be issued.
Note that if you are signed in as a division manager and do not have a value for the Department Code field, the system shows rooms for your division.
Step 1: Start the Request
Select the Space / Space Inventory / Department Manager / Request Department Space task.
The system presents the Basic tab and fills in your name as the requestor and your telephone number (which you can edit). The system displays basic information about the SLA governing the Service Desk- Department Space type of service request, which is not editable.
Press Next to continue to the Detailed Information tab.
Note that if you have already made a request today, the system notifies you that a similar request exists. Choose Continue at the top of the form and you can continue with entering this new request.
Step 2: Enter a Description and Date
On the Detailed Information tab, you:
- enter a description of why you are requesting or releasing space or other notes about your request. Later, you will have the chance to pick the exact rooms that you want, so it is not necessary to do so in this option.
- specify the date on which you want to use this new space, or on which you no longer require the released space. Note that you must enter today's date or a future date. The system will charge you for space used according to the date specified in this option, so you will want to enter the most accurate date possible. For example, if a new employee needs the space beginning in two weeks, there is no need to enter today's date as the required date. Doing so would make the room unavailable for these two weeks and charge your department for use of the space during these two weeks.
Press Next to continue to the Assignments tab.
Step 3: Choose the Rooms to Change
The system moves you to the Assignments tab so that you can specify the rooms to claim and release. Note that when you choose a room to claim or release, 100 percent of the space in that room is assigned or released from you.
- The system presents a filter console, and a drill-down tree for selecting the floor plan.
- If you have several records to drill through, you may wish to use the filter at the top of the view. The filter limits the drill-down frames to showing just the data that you indicate in the filter.
- For example, if you want the drill-down frames to present only floors in the HQ building, set the Building Code to HQ in the filter console.
- In the left panel, drill down to select the floor plan.
-
The system displays the floor plan with its room numbers. You can optionally display additional labels by choosing the desired option from the Labels button above the floor plan drawing.
- For example, you may wish to see room standard in a floor plan drawing so that if you are releasing space, you know the kind of room that you are releasing. Typically, you need to zoom into the drawing in order for this information to display.
- If you don't want to zoom into the drawing to see these labels, you can still access this information by hovering over the room. For example, if you choose Employee Name as the label, you can hover over a room and the system will display the names of employees currently assigned to this room. In addition to the type of information that you choose in the Labels option, the system also displays the Room Capacity and Room Occupancy as hover text.
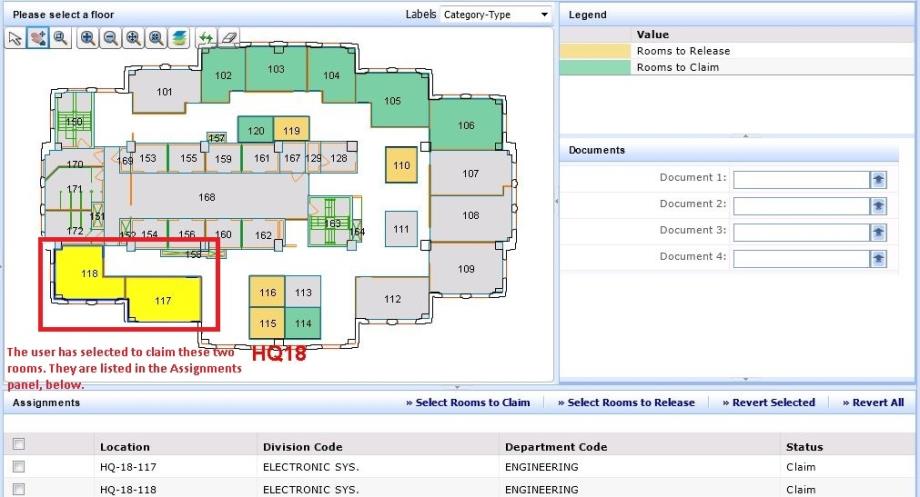
- Examine the floor plan. The system highlights rooms on this floor that are available to claim and rooms assigned to your department that you can release. The legend to the right of the drawing indicates the highlight color for each status. You can hover over the room for information about the room's capacity and standard.
- On the floor plan drawing, select the rooms to claim or release and the system lists the rooms in the Assignments pane located beneath the drawing. The system lists the action that will occur (the Status) so that you can mix rooms to claim and rooms to release in one execution of the task.
- If you wish, select additional rooms that are not available on the current floor plan drawing by choosing them from a room list. To do this, choose the "Select Rooms to Claim" or "Select Rooms to Release" button. The system presents a form with a list of rooms that you can claim or release. Select rooms from these forms, close the forms, and the system lists the selected rooms in the Assignments frame.
- If you have any documents related to your request you can attach it in the Document fields. For example, you might have notification from HR about a new employee that has been hired and needs an office. For information on using the document fields, see Using the Document Management System.
- Review the rooms listed in the Assignments frame. If you wish to remove any rooms from the list, select them and choose the Revert button. Clear the Assignments completely by choosing the Revert All button.
- When you are satisfied with your list of changes, choose the Submit button located in the top right corner.
- The system moves you to the Overview tab so that you can review your request.
- If you'd like to create additional requests, choose the Create New Request button.
Note: How the system allocates released space is determined by the AssignUnallocatedSpace application parameter. See Configure Space Application Parameters.
Note: If you claim or release space and then change your mind, note that the drawing cannot redisplay the room's highlight in its original color until you save your changes. For example, if you click on a room highlighted in green to claim it, and then change your mind, the system cannot redisplay the room in green until you save your changes.
Note: If a space was assigned to a department by other means than this task, then it is possible to have a room which has a room category that deems it as non-occupiable, but yet the space is still assigned to a department. In this situation, a department manager cannot use this task to release this room from the department. Instead, you must directly edit the data.
Next Steps
Once you process your request, the system processes according it to the terms of the service level agreement governing the request.