Assets / Enterprise Assets / Project Proposal Console
Managing Actions for Project Work Packages
By specifying the tasks that need to be done, actions enable you to track the cost and schedule for a project.
Working from the Project Dashboard, you can:
- review all actions by work package for the project
- add or edit actions
- bulk update actions using the Update Selected action
- Copy actions to other projects that you select (Copy Selected action)
- Add a new action to a work package by selecting an existing action (Copy action)
Procedure: Adding a new action item
To add a new action item:
- From the Proposed Project Console, select a project and then select the Project Dashboard.
- From the Work Packages section of the Project Dashboard, select a work package.
The actions for the work package appear in the Actions pane.
- Click Add.
The Profile form for adding an action appears.
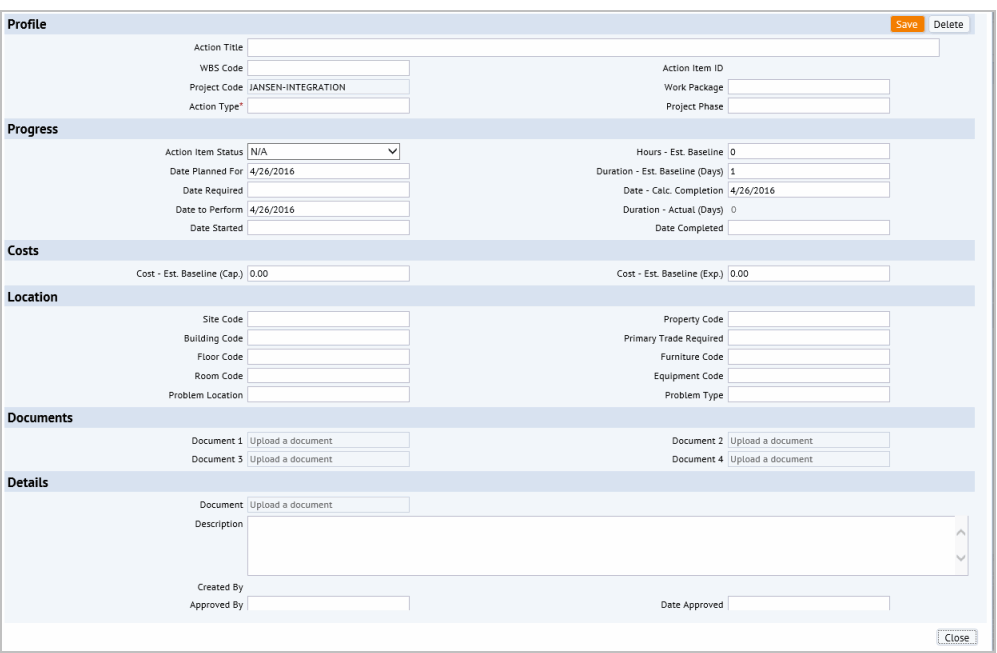
- In the Profile section, enter the following:
Action Title to identify the action.
WSB Code: The WBS Code is a way to order and categorize your action items. In general, actions which are performed earlier will have a lower WBS code value. If the work package has a WBS Code entered for it, this code is copied to the field. Generally, the action item's WSB code is prefixed with the WBS Code of the Work Package. For example, if the work package has a WBS Code of 2.0, the first action item to be performed for this work package will have a code of 2.0.1
Work Package. Select from the list of work packages you have defined for this project. You can create an action without it being associated with a work package. Work packages can be added for an action at any time. If you add an action without adding it to an work package, it appears in the drill-down list under the title No Work Package. If you export project data to PowerPoint, only actions that are associated with a work package are exported.
Action Type. Action types enable you to locate and report on actions. You can also associate a document with an action type, so that the document is always accessible for actions having this type.
Project Phase. You can locate and report on this action by the Project Phase it is associated with.
- In the Progress section, enter the following:
Hours Est. - Baseline. Enter the number of person-hours you estimate for this action. For example, if the action's Duration is two days, and two people will be working on this action for eight-hour days, then the person-hours for this action is 32 hours. The S-Curve analysis (from Projects application) uses person-hours in its calculations for work, so it is important to enter these hours if you are generating S-Curve charts.
Date Planned For: Date the action is planned to begin. By default, this is set to the current date.
Duration - Est. Baseline (Days) - your estimate of the time to complete the action, if this information is available to you. By default, 1 is entered as a placeholder.
Note: If you are planning on using the Baseline Gantt chart to estimate baseline schedules, you should enter approximate values for the Date Planned For, and Duration - Est. Baseline fields for each action. You can then use the Gantt chart to refine your schedules by editing action dates and durations. For information on estimating baseline schedules with a Gantt chart, see the Estimating Baseline Schedules and Costs topic.
Date Required. Select the date the craftsperson is needed.
Date Calc. Completion. If you edit the Duration Est. Design (Days) field, the system calculates the Date - Calc. Completion based on the Days Per Week value for the action.
Date To Perform. Date you plan to begin the action. By default, this is set to the current date. Enter an estimated date if you are planning on tracking design schedules using the design Gantt chart. This field is used with the Duration - Est. Design field after the project is approved, See Estimating Design Schedules.
Duration - Actual (Days). This field is calculated from the Date Start, Date Completed, and Days Per Week fields, and is not editable.
Date Started / Date Completed. When you enter the Date Completed, the application enters the Duration - Actual (Days.)
- In the Costs section, enter:
Cost Est. - Baseline (Exp) and Cost Est. - Baseline (Cap) for this action. The estimates you enter are summed for the project. See baseline costs.
- In the Location section, enter:
Site / Building / Floor / Room / or Equipment Code / Furniture Code for the location, according to the level of detail you require.
Property Code. If the action is associated with a property, enter the Property Code.
Primary Trade Required. Select the type of craftsperson required to perform this work.
Problem Type. Select the type of problem this action item is addressing.
- In the Details section, enter:
Description. Enter any notes for this action.
Created By. Defaults to the logged-on user who created the record for this action.
Approved By. Enter the name of the person approving this action.
Date Approved. Select the date when the action was approved.
- Click Save.
- In the Documents section, you can now check in a document by clicking the Check In New Document button. This button appears after saving the action.
Add a new action by copying
Sometimes action items share some of the same information. In these cases, you can add a new action item by copying an existing one.
To copy an existing action:
- From the Proposed Project Console, select a project and then select the Project Dashboard.
- From the Project Dashboard, select the work package that has the action to be copied.
- In the Actions pane, click Copy in the row for the action.
The Profile form for the action appears.
- Make changes as needed. For example, change dates or costs and the Action Title, so that this new action item can be distinguished form the original action.
- Click Save.
The action appears in the Actions pane. If you did not change the Action Title, the title now has Copy in the name to help you distinguish this action from others.
Edit an action item
To edit an action item, click on the action in the Actions pane. The Profile form for the actions appears.
For a description of the data you can enter, see the above procedure for adding a new action item.
Update multiple actions in one operation
The Update Selected button enables you to update a single action or to bulk update action items. For example, you can change the location, duration, or cost estimates.
To update actions:
- From the Proposed Project Console, select a project, and then select the Project Dashboard.
- From the Project Dashboard, select a work package in the Work Package pane.
The actions for the work package appear in the Actions pane.
- Select the actions to be updated, and click Update Selected.
The Action Items form appears.
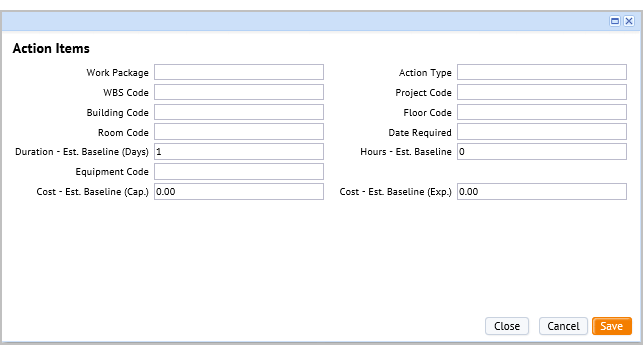
- Update the following information as needed. The information entered overwrites the value for each of the records. If you do not make an entry for a field, the value in the record is not overwritten with a null value.
Work Package. Select the work package for this action.
Action Type: Select from the action types in the list. Action Types facilitate locating and reporting on actions. You can associate documents with action types, so that the document is available for any action having this action type.
Project. Select the project this action item is for.
WBS Code: The WBS Code is a way to order and categorize your action items. In general, actions which are performed earlier will have a lower WBS code value. If the work package has a WBS Code entered for it, this code is copied to the field. Generally, the action item's WSB code is prefixed with the WBS Code of the Work Package. For example, if the work package has a WBS Code of 2.0, the first action item to be performed for this work package will have a code of 2.0.1
Building / Floor / Room Code: Select the location for this action item.
Date Required: Select the date the action should be performed.
Duration - Est. Baseline (Days). This is a preliminary estimate of the work days for this action. See baseline schedule.
Hours - Est. Baseline. Enter your preliminary estimate of the number of hours this action will take. If you are using the Projects application, enter the number of person-hours you estimate for this action. For example, if the action's Duration is two days, and two people will be working on this action for eight-hour days, then the person-hours for this action is 32 hours. The S-Curve analysis (from Projects application) uses person-hours in its calculations for work, so it is important to enter these hours if you are generating S-Curve charts.
Equipment Code: select the equipment if this action is for an existing equipment asset.
Cost - Est. Baseline (Cap.) and Cost Est. - Baseline (Exp.): Enter the baseline cost estimates. These are your preliminary cost estimates. See baseline schedule.
- Click Save.
Copy actions to another project and work package (Copy Selected)
Use the Copy Selected action in the Actions pane of the Project Dashboard to copy actions to a selected project and work package. You must be a team member for the project to be able to copy data into it.
To copy actions to another project and work package:
- Select one or more actions in the Actions pane and click Copy Selected.
The Project form shows the projects for which you are a team member.
- Select the project and work package from the list.
- Click Copy.
You can now access these actions from the project to which you copied the actions.
- Select the Select Project tab, and select the project you copied the actions to.
- Select the Project Dashboard.
The Actions panel shows the copied actions with a check mark.
- Click Update Selected to bulk update the actions, or click the action item in the grid to update just that action item.