System / CAD and BIM Manager
Technologies / Innovative Solutions / Forge Integration
Catalog Locations in BIM Models
As outlined in the Catalog BIM Models overview topic, the Catalog BIM Models task provides a convenient way to link your Revit models to Archibus.
This topic focuses on linking your Revit locations to Archibus.
Link Buildings and Floors to an Uncataloged Model
First, you will link your buildings and levels (floors) to Archibus.
When you load an uncataloged model, the left panel lists options for you to assign the model to an existing Archibus building, or create a new building and set of floors.
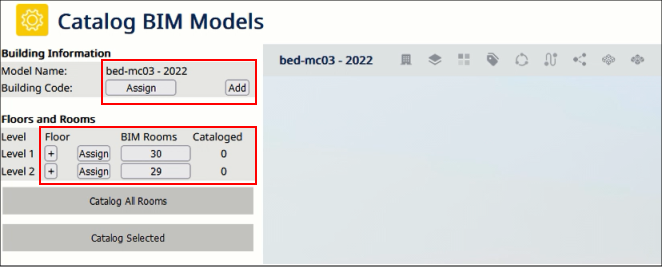
As seen in the below image, once you link the building and floors :
-
The new Building Code and Floor Codes appear in the panel.
-
The Assign and Add buttons are no longer present.
Also, the Buildings drop-down in the Viewer pane on the right displays the Archibus Building Code, and the Levels drop-down displays the Floor Codes for the selected building.
Assign a Model to an Existing Building, and Levels to Existing Floors
-
Load the System / CAD and BIM Manager / Catalog BIM Models task from the Navigator.
-
From the upper toolbar, click on the Building icon.
-
From the Buildings drop-down, select an uncataloged model -- a model that does not have characters to the left of the pipe (|) character.
-
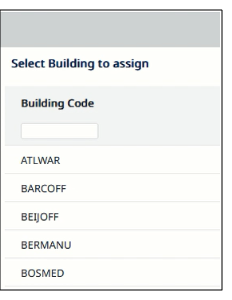
In the Building Information panel on the left, click on the Assign button and choose a building from the pop-up list.
-
For each level in the model, use the Assign button to link the level to an existing floor in the building by choosing the floor from the pop-up list.
Create a Building and Floors and then Link the Model and Levels
Alternatively, if the buildings and floors do not exist in Archibus, follow this procedure:
-
Load the System / CAD and BIM Manager / Catalog BIM Models task from the Navigator.
-
From the upper toolbar, click on the Building icon.
-
From the Buildings drop-down, select an uncataloged model -- a model that does not have characters to the left of the pipe (|) character.
-
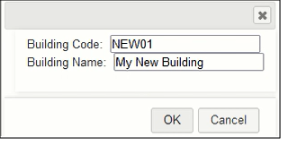
In the Building Information panel on the left, click on the Add button and enter a Building Code and Building Name in the resulting pop-up.
-
In the Floors and Rooms section, click the "+" button to access the form for entering new floors so that you can catalog the model's levels. Best practice is to name the floors to match the levels of the model.
Catalog Rooms
With the Archibus Building Code and Floor Codes assigned, you are now ready to catalog the rooms.
When the catalog process creates Room records, it copies the Revit properties-- such as area, room type, room category, department, division -- to the corresponding fields in the Rooms table.
The mappings defined in the Archibus BIM Parameters table (afm_bim_params) determine how the fields of the Rooms table are completed. You can review these mappings by loading the System / CAD and BIM Manager / Archibus BIM Parameters task and filtering on Table Name = rm
-
The Parameter Name contains the name of the Revit Parameter to which the room field is mapped.
-
The Field Name contains the name of the Archibus rm field to which the Revit parameter maps.
When completing the validated fields of the Rooms table (such as Room Type, Room Category, and Division Code), the catalog routine checks that the value exists in the validating table. If it does not exist, it automatically creates the record in the validating table. For example, if a room in Revit has a value of MARKETING for Division, the Catalog routine checks that a MARKETING exists in the Divisions table in Archibus; if this record does not exist, the Catalog routine creates it.
Note: If the room name in Revit is larger than the Archibus Room Name (rm.name) field, than the imported room name will be trimmed to the size of the Archibus field. This applies to all text parameters imported into text fields.
Catalog All Rooms
Click this button to catalog all rooms in the model. This may take some time, depending upon the number or rooms. When through, the Floors and Rooms section of the left pane will list the number of cataloged rooms.

Catalog Selected Rooms
If you wish to catalog a select set of rooms, select them in the model and then click Catalog Selected. For example, you can show a particular level of the model and then select a set rooms on this level to catalog. The Catalog Selected button displays a count of the selected rooms.
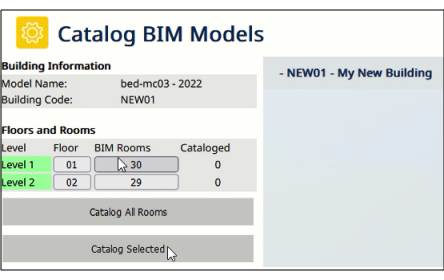
In the below image, the user has loaded Level 1 of NEW01 building (created above) and selected one room; the Catalog Selected button lists that one room is selected.
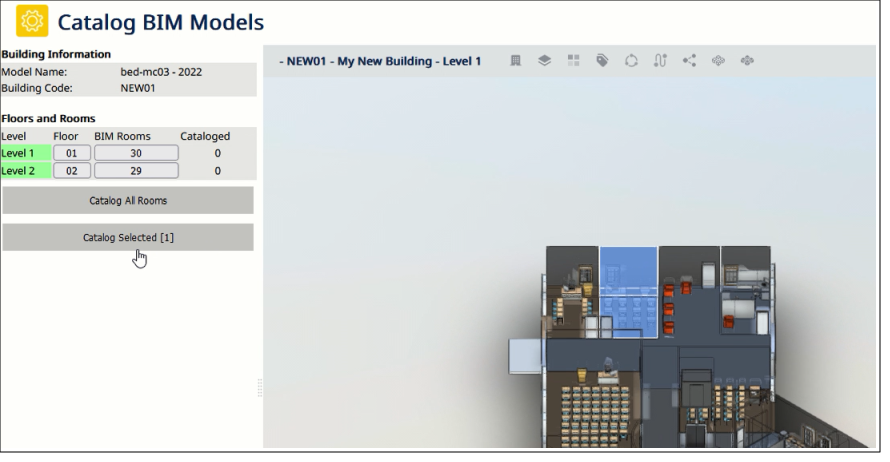
Click Catalog Selected and the Catalog routine creates a Room record for this room and updates the count of cataloged rooms.
Review the Catalog Results
One the Catalog routine completes, you can check that the Building, Floor, and Room records were created and exist in Archibus. In the above example, we created building NEW01 and floors 01 and 02, to correspond to the bed-mc03-2022 model that has Level 1with 30 rooms and Level 2 with 29 rooms.
Load the Space / Space Inventory / Building Performance / Define Locations view and locate building NEW01 and drill down to see the two Floor records.
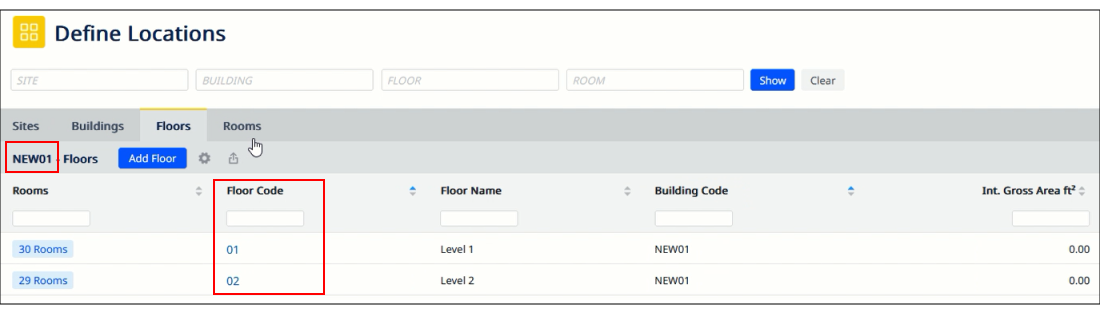
Drill down to the rooms in Floor 01 and you see the new Room records. Note that the catalog process brought in the various values that exist for the rooms in the Revit model.
Cataloging also created the appropriate validating records, if needed. For example, if divisions such as PROVOST or ADMINISTRATION did not exist in the Divisions table, the catalog process created these records. You could now go into the Divisions table and further define the properties of these new records.

See Also
-
Forge Viewer: Onboarding (System Management Help)