Archibus Web Central
Completing Validated Fields (Select Values form)
In a project database, database tables often contain validated fields—fields that must be completed with values that already exist in another database table (a validating table). Validated fields help maintain data integrity by ensuring that you enter appropriate values for database fields.
For example, the project database might contain an Employees table and an Employee Standards table; the Employees table contains an Employee Standard field, which assigns an employee standard to the employee. When you complete the Employee Standard field for an Employee record, Archibus checks that the value you enter for Employee Standard is an existing value in the Employee Standards table.
To help you complete validated fields with appropriate values, validated fields offer the Select Values list, which presents values from the validating table, that is to say, values have already been defined for this type of information.
As soon as you mouse over or activate a validated field, the system displays the Select Value button ( ), such as the Employee Standard field of the Employees table, below.

Note: Some non-validated text fields also present the Select Values form and behave similarly to validated fields. Non-validated text fields are discussed at the bottom of this topic.
Note: This topic discusses completing validated fields. Web Central views may also present validated fields in filters and drill-down selection lists that restrict the data in the view. Use the methods outlined below to complete validated fields when they appear in these tools.
There are a few ways to complete validated fields, as outlined below:
Method 1: Select a Value from the Select Values List
Click the Select Values (ellipses) button (as shown in the above image of the Employee Standard field), and the system presents a list of existing values. For example, if you are completing the Employee Standard field of an Employee record, clicking the ellipses button brings up the Select Value form so that you can choose an existing employee standard from the database. Select a value from the form, and the system completes the Employee Standard field of the Employees record with this value.
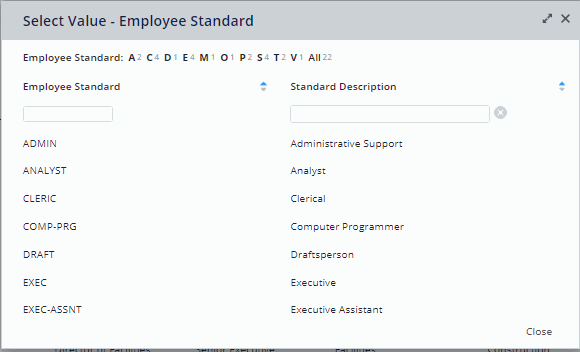
Sometimes the list presented in the Select Value form is too long for you to scan through the list of existing values. In this case, you can use the Smart Search feature to search for the list for a value. See Restricting Data Using the Smart Search Feature.
Method 2: Directly Type the Value in the Field
If you know the desired value that you want to enter, you may find it easier to directly type it, rather than choose it from the Select Values list. In this case, simply type the value. As you type, the system invokes the auto-complete feature and presents a drop-down list of values in the database that match the characters you type. For example, if you type "EX" for the Employee Standard field, the system presents a list of existing values for Employee Standard that begins with these characters. From this list, you can choose your value. Or, if you wish, ignore the drop-down list and continue typing your entry.
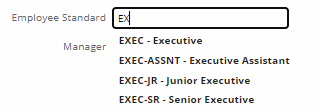
If you directly type a value and this value does not exist in the validating table, when you attempt to move off the field the system will check if the entered value exists in the validating table. If the value does not exist, the system presents an error message and prompts you to correct your value.
Hierarchical fields respect the value entered in the higher level. However, if you leave the owning field blank, the lower field shows all combinations of the two fields. For example, in the below image, Country Code has not been completed, so Region Code shows all combinations of Country Code and Region Code. Selecting a Region fills in both the Country and Region values in one step.

Note: The auto-complete list obeys a Virtual-Private Archibus restriction, if active.
Note: When completing fields in a Smart Search console, the system does not auto-complete the fields. For information, see Restricting Data Using Smart Search.
Note: Application view that have their own personalized Select Values dialog, such as Lease Cost Profile Details, do not support the auto-complete feature.
Method 3: Choose from a List of Values
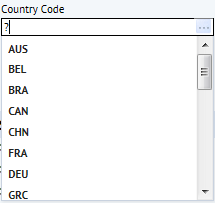
Another way of choosing from a list of existing values is to type "?" in the field so that they system calls up the full set of values in a drop-down list. From this list, you can select a value. This method is similar to invoking the Select Values dialog but differs in that you are working directly in the grid field and so do not need to close the Select Values dialog. Also, this method does not display descriptive text as does the Select Values dialog.
Non-Validated Text Fields
For the convenience of data entry, some views include the Select Value button for non-validated text fields. These fields present a list of existing values for this field in the current table; they do not present values from a validating table.
For example, the Street Address field presented by the US Federal Property / Background Data / Add New Property task is not validated by a validating table, yet it offers a Select Value button. The Select Value button presents a list of all values for the Street Address field in the current table (Properties).

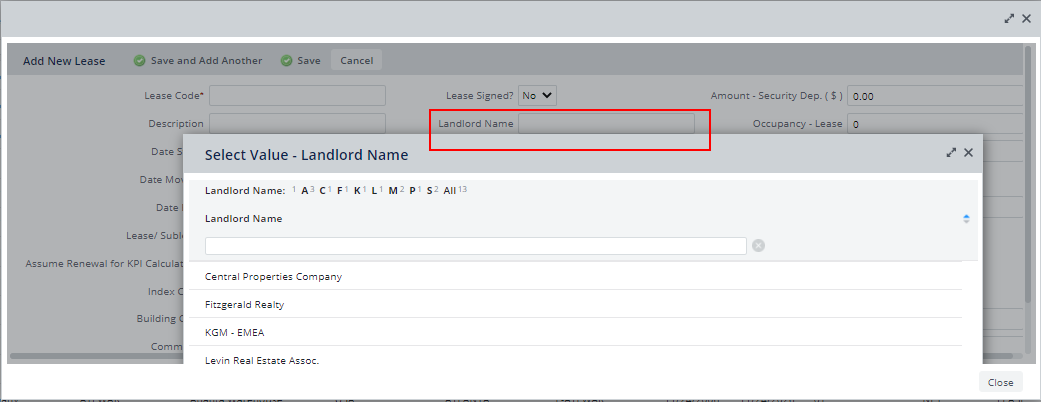
The Landlord Name field of the Leases table is another example; this field presents a Select Value dialog that lists the existing values for Landlord Name in the Leases table; the Landlord Name field is not validated by another table.
Completing Non-Validated Fields that have Select Value Lists
Using the Select Value lists available from non-validated text fields is a handy way to increase consistency and reduce the amount of typing.
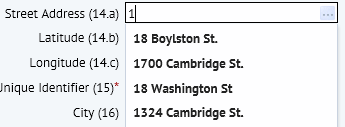
Complete this type of field in the same manner as described above, remembering that you are accessing a list of existing values for this field within the current table, and not from a validating table. For example, in the below image of the Street Address field, the user has typed "1" and received a list of all values for this field in the Properties table that begin with this character.
When you enter your own value in the non-validated field and save the record, the value you enter is added to the database; no validation occurs. The next time you access the Select Value list for this field, the list will include the value that you entered.