System / Add-in Manager / View Definition Wizard
Setting View Characteristics
The View Definition Wizard presents a View Characteristics form with options and buttons for setting the view title, as well as the properties of each table presented by the view.
Once you finish with the View Characteristics form, you save your view changes by working through the remaining forms of the View Definition Wizard.
View Title
You can change the View Title -- the text that displays in the top center of the completed view. For an illustration of a view title, see the image under "Options" later in this topic.
Select Fields
For each table in the view, you can specify the fields that the view should display and the order in which it should display these fields.
For the desired table, choose the Select Fields button to access a list of fields for this table.
- To add a field to the view, locate it in the bottom panel of the view and click its box; the system displays it to the upper panel. Use the Up and Down buttons to place the field it in the desired order.
- To remove a field from the view, locate it in the upper panel and choose its Remove button.
- To change the order in which a view displays fields, work with the Up and Down buttons.
- To clear the entire set of visible fields so that you can start over, choose Reset.
- Each table in the view must present at least one field.
- When you are satisfied with the table's set of fields and the order in which they will display, choose Save and Return to Summary.
Add Virtual Fields
You can add calculated fields based on SQL expressions to your views using the View Definition Wizard. These fields are called virtual fields, as they are calculated on demand and are not stored in the database.
For SQL snippet examples, and information on which report patterns are supported for adding virtual fields, see About Adding Virtual Fields Using the View Definition Wizard.
To add a virtual field to your view:
- On the Select Fields tab, click Add Virtual Field. This button is shown only for the supported patterns.
The Add Virtual Field dialog appears for defining the virtual field.
- Enter the following required information. The Table Name is filled in with the name of the main table in the view.
Field ID - Enter a name for the field so that it can be identified in the dataSource.
Data Type - Select Text, Number, Date, or Time to specify the data type for this virtual field.
Field Heading - This is the title that the system uses to label the virtual field in your view.
Calculation / SQL Query - Enter the calculation or SQL query that defines the virtual field for one or more of the SQL dialects. You can enter Generic, Oracle, SQL Server, and Sybase.
- Click Add.
The pop-up window closes, and the virtual field is listed in the 'Reorder fields that are already visible in the view' panel.
- Use the Up and Down buttons to position the virtual field.
- Click Save and Return to Summary.
- To test the virtual field:
- Click Continue to Preview.
- Click Display View. If there are any errors, the SQL error will appear in a pop-up dialog when you test the view.
- If the virtual field is causing any errors, you can do the following:
- Click Enable Advanced Editing. The code for the view appears in a memo box. You can make changes in the memo box. Click Save Changes to preserve your work.
- Select the Set Characteristics tab and then click Select Fields for the table that has the virtual field. The Select Fields tab appears. Click the Edit button in the row for the virtual field to edit information entered for the field, including the SQL snippet.
- To remove the virtual field, go to the Select Fields tab, and click Remove in the row for the virtual field.
For more information on troubleshooting, see Testing and Troubleshooting the SQL or Working with Advanced SQL in Debug Mode.
Sort Order/Grouping
Note: Depending on the type of view, you specify either a sort order or a grouping.
For a view analysis-style view, you choose the groupings -- that is, the fields that form categories of data and which fields summarize and categorize the data as a whole. For information, see Working with View Analysis Views.
Sort orders dictate by which fields the view will present the date. For example, you can sort Building records by total area, listing them in order from smallest square footage to largest.
For the desired table, choose the Set Sort Order button to examine the current sort order. You can set the primary sort field, and optionally, set secondary sort fields.
- Click the "Set" button next to the field by which you want the view to present data. For example, if you want Building records to be listed according to Rentable Area, click on the Rentable Area's "Set" button.
- To sort records whose value is the same for the sort order field, you can include secondary sort fields. For example, if there are several buildings with the same Rentable Area, you can specify Building Code as the second sort field so that buildings with the same rentable area value will be listed alphabetically by their Building Code value.
- You can set as many secondary sort fields as necessary. The value in the Sort Order field shows the order by which the view uses the secondary sort fields. You can choose only fields that are displayed by the view.
- To clear the sort order so that you can start again, choose the "Clear Selected Sort Order" button.
- When you are satisfied with the table's sort order, choose Save and Return to Summary.
Note: From the View Definition Wizard, you can sort only on fields that are visible in the view. If you wish to sort on a non-visible field, you must directly edit the .axvw file.
Standard
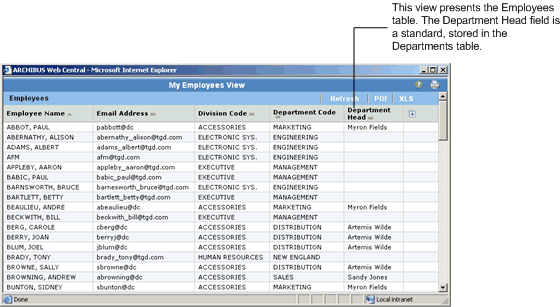
In addition to the fields of the specified tables, you may wish to display fields from tables that validate on fields in these tables.
For example, suppose a view presenting the Employees table lists the Department Code field (a validated field of the Employees table). When examining an employee's record, it might be helpful to also see the Department Head for the employee's department.
Since the Department Head field is stored in the Departments table, you choose this field by selecting the Add Standard button. The View Definition Wizard displays all fields from all tables that validate on fields in the Employees table. From here, you can choose the Department Head field of the Departments table.
Once you specify standard fields to display, you can return to the Select Fields tab to set the order of the standard fields.
Restriction
Many views filter (or restrict) a table's records and present only records that meet specified criteria. For example, you may wish to show only employees who are assigned to a department; that is to say, Employee records that have a value for Department Code.
For each table in your view, you can restrict the records that the view displays according to one or multiple conditions that you specify. For example, the following restriction for the Employees table specifies that the view should show all Employee records that do not have a value for the Department Code field.

For the desired table in your view, choose the Set Restriction button to examine the current restriction, if any. The view presents a form for setting the restriction:
- To remove a restriction from the view, choose the Remove button in the Review Existing Filter Clauses panel (the upper panel).
- To specify a new restriction, work with the Add New Filter clause panel. When you finish specifying the restriction, the system will display it in the upper panel.
- When choosing the field to restrict by, you can choose only fields that are displayed by the view. If necessary, you can change the table's field visibility by exiting from this form and returning to the Select Fields form.
- When choosing the value, you can select from the existing set of values in the database by choosing the ellipsis button, or you can type in your own value.
- Choose the operator, such as equals, greater than, lesser than, and so forth.
- For the LIKE and NOT LIKE operators, use "_" to represent any single character and use "%" to substitute any string of characters, including an empty string. For example, if you select Building Code for the field and LIKE as the operator, enter a value of "H_" to set the view to restrict to all buildings whose codes begin with H, such as HQ.
- To clear the restriction so that you can start again, choose the Reset button.
- When you are satisfied with the table's restriction, choose Save and Return to Summary.
Note: You can specify multiple conditions using the Conjunction option. For the first restriction, or if you are specifying only one condition, the Conjunction option displays the value that you enter, but the system ignores this conjunction.
Grouping Conjunctions with Parentheses
You can group conjunctions using the Set Restriction command's ")AND(" and ")OR(" operators. If you use these operators instead of "AND" and "OR" they parenthesize all of the conditions up to that point. You don't need to enter the opening or closing parentheses -- these are assumed.
For instance, the following restriction on the Rooms table:
Room Standard = CONF OR Room Standard = EXEC OR Room Standard = PROF )AND( Area > 100.0
will parenthesize the Room Standard restrictions and show all rooms with a standard of CONF, EXEC, or PROF that also have areas greater than 100.0 square feet (or square meters for metric databases). If you simply used AND, the view would show all rooms with a standard of PROF and that have areas greater than 100.0 square feet.
This equates to the SQL expression:
(rm_std='CONF' OR rm_std='EXEC OR rm_std='PROF') AND (area > 100.0)
Options
The options that you can set for your view depend upon the type of view you are creating.
Note: A virtual field cannot be a statistics field. Therefore, on the Set Options tab, the statistics options are not available for virtual fields:
Calculations
If you are working with a view-analysis view, you set your calculations with the Options tab. See Defining View Analysis-Style Views
Panel Title
The below image illustrates panel titles and view titles.

- For a selected table, choose the Set Options button to access a form for entering panel text.
- Enter your desired text in the option.
- To clear the current text so that you can start again, choose the Reset button.
- When you are satisfied with the table's panel text, choose Save and Return to Summary.