Archibus SaaS / Archibus Foundations
Define Users for Archibus
A manager needs to enter the users who are authorized to log into Archibus Workplace, the modules, and log in as a Foundations Manager. Users can be internal employees, outside contractors, craftspersons, and so forth. Create a User record for any person who should be able to access the Archibus system.
The Archibus Users table stores the parties who are authorized to sign into the Archibus system and to receive email notifications. The Archibus Users table stores the password, email address, user identity, and so on. The sign-in process uses this information when users sign in to Archibus.
Typically, a party designated as an Archibus user will also exist in one of three Archibus tables:
This topic has the following sections:
- To access the Archibus Users table
- To review user records
- To define a new user
- To create an Archibus Workplace user
- To set up a department manager Workplace user
- To reset a user who has failed to sign in
- To reset a user's password.
To access the Archibus Users table
There are a few methods for accessing the Archibus Users table:
| User | Sample User | Task | Path | View File | Access to Users | Notes |
|---|---|---|---|---|---|---|
| SaaS Administrator |
AFM-CLI | Define Users | System / SaaS Administrator | ab-ess-def-users.axvw |
Excludes users that are assigned the following roles, as these roles are for power users:
|
View has a filter. |
| SaaS Partner Administrator | AFM-BP | Add and Edit Users | System / Archibus Administrator - User and Security | ab-edit-users.axvw |
Excludes users that are assigned the following role:
|
For information on this view, see Add and Edit Users. |
| System Administrator |
ADMIN | Add and Edit Users | System / Archibus Administrator - User and Security | ab-edit-users.axvw | Can access all users |
For information on this view, see Add and Edit Users. |
Sample users AFM-FDN and AFM-MOD
Archibus sample users AFM-FDN and AFM-MOD do not have access to the Define Users task.
When exploring Archibus using the sample roles, you can provide the sample AFM-FDN and AFM-MOD users access to defining users. This must be done by a SaaS Partner Administrator or SaaS Administrator.
- Sign in as sample user AFM-BP and access the System / Archibus Administrator - User and Security / Assign Security Groups to Roles task,
- Assign the SYS-MGR security group to:
- the 4 - PROCESS OWNER - FOUNDATIONS (ACP) role
- the 4 - PROCESS OWNER - MODULES (ACP) role
Since the AFM-FDN and AFM-MOD users are assigned to these roles, they will now be able to access the Define Users task.
- Add the Define Users task as favorites in the Foundations Manager and Modules Manager home pages.
To review user records
Load the Define Users task or Add and Edit Users task, using one of the above paths; the left panel offers valuable information about the users defined for your system. Click on a user, and you see other details in the right pane.
Use the filter at the top of the view to restrict the user list by role (Archibus Foundations Manager or self-service user) or by vendor, craftsperson, or employee.
Since user records are connected with records in the Craftspersons, Vendors, and Employees tables, the Define Users view can present information from these tables to help you identify and understand User records. For example, in the below image, the Employee Name and Vendor fields display values from the Employees and Vendors table for this user. The Building Name value comes from the Employees table. As you can see, this image shows that one user is also a vendor (Vendor field), and that the other users are employees (Employee Name field)
You can use the gear-shaped icon to display the below additional fields in the left panel. Displaying these fields may help you identify the type of user you are examining.
- Title (from the Employees and Craftspersons tables)
- Trade (from the Craftspersons table)
- Company (from the Vendors table)
You can also use the restriction filter and restrict by Employee, Craftsperson, or Vendor to see a user's connection to other tables.

For information on the sample users in the HQ project, see Sample Users for Archibus Foundations.
To define a new user for the Archibus system
- Load the Define Users task or Add and Edit Users task using the above paths.
- The view presents defined users on the left, and the details about a selected user on the right.
- To create a new user, select the Add New User button and complete the resulting form as follows:
| Field | Description |
|---|---|
| User Name |
The user will use this value to sign into the Archibus system. |
| Role Name |
The role defines the Archibus features that the user can access. For information on roles, see Working with Roles (in System Management Help). For Archibus Foundations, you typically assign these roles:
When administrators assign users to roles, they can assign only to the roles with access at the administrator's level or below. For example, a Client Administrator can not assign a user to "System Administrator" role. This is to prevent them from assigning themselves to a high level role then gaining access to high security level that they should not have. The hierarchy of roles, from lowest to highest, is:
|
| Password | Enter the password that the user will use to sign into the system. |
| Number of Failed Login Retries Attempted |
This is the number of times the user tried to login and failed. On successful login, the Sign-in page sets the value to zero. The system administrator can unlock a locked user account by clicking the "Reset" button, and then clicking Save. This sets the value back to zero. |
| Email Address | Archibus can automatically send email messages about the status of an item. This value is necessary for email notifications and for connecting the user to a record in the Employees, Vendors, or Craftspersons tables. Be sure to complete this field if you wan the Archibus applications to send email messages to this user. The value you enter must match the value in the corresponding Employees, Craftspersons, or Vendors table for this user. |
| Locale | Select a Locale for the user. This controls the country, language, date format, and currency that you use with Archibus. See Set Sample Archibus Foundations Users to Non-English Locales |
| Create Employee? | If you have not yet used the Define Employees view to enter an employee, select this option and the system will create a record in the Employees table and complete Employee Code with the same value that you specified in the User Name field and will complete the Email Address field in the Employees table with the same value as you specified for the user. |
- Once you save the record, it appears in the left pane. If the record has the same email address as a record in the Vendors, Employees, or Craftspersons tables, values from these records (such as Trade, Company, and Building) will appear in the right pane.
-
If you have made changes that affect a role assignment, click Flush Cached User Accounts and Roles to flush all cached user roles for the current project so that the changes can take effect.
To create an Archibus Workplace user
- Enter users into the Archibus Users table (described above) and assign them a user role of GUEST.
- Enter the user in the Employees table, Craftspersons table, or Vendors table using the same email address as you entered in the Archibus Users table.
- In the Employees table, upload an employee photo so that it can display in the User section of Archibus Workplace, along with other key user data.
-
Supply this user with the URL in a format:
http://<server>/archibus/workplace,or provide them with access to the Workplace tasks on the Navigator or the Workplace mobile app.
Note: Any user can access Archibus Workplace by selecting the "Sign in as Guest" option on the Archibus sign-in page. They are actually signing in as the GUEST user, defined in the Archibus Users table. For details, see Signing into Workplace.
To set up a department manager Workplace user
Department managers have a slightly different Workplace interface which provides the ability to:
- move multiple employees
- request a move for a team member
- release the office space of an employe leaving the company
- add new employees to the department list.
Procedure
There is not a special role for department managers. Employees established with the below procedure have access to the manager features of Archibus Workplace.
- Define an employee in the Employees table and set the Manager field to this employee. Or. in the Departments table, set the Department Head field to this employee.
- Add this employee as a user in the Archibus Users table. See above for details on completing the Users table.
- Supply this user with the URL in a format:
http://<server>/archibus/workplace, or provide them with access to the Workplace tasks on the Navigator or the Workplace mobile app.
To reset a user who has failed to sign in
A user may be attempting to sign into Archibus but not entering the correct password or user name. If a user attempts too many times, the system will lock them out. When this happens, a system administrator needs to unlock the account. To do so, click the Reset button, located next to the Number of Failed Login Retries Attempted field. This sets the Number of Failed Login Retries Attempted value back to 0.
To reset a user's password
The sign-in form counts the number of times a user fails to sign in because they are using an invalid password. If the user tries too many times, the sign-in form locks out the user and presents the message “Too many failed password attempts. Request that your system administrator reset your password.” In this case, the system administrator can reset the password for the user.
- Load the Define Users task, and edit the user's record.
- Click on the Change Password button next to the Password field.
- The system presents a form for the administrator to reset the password.
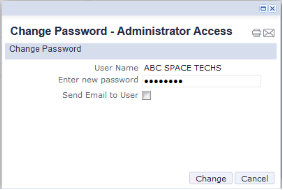
- Enter a new password and optionally choose to send an automated message to the user alerting them that the password has been changed.
- Click the Change button at the bottom of the form.
- Save the record.