Archibus SaaS / Assets / Background Data - Assets
Capital Projects / Condition Assessment / Background Data / Define Classifications
Sustainability & Risk / Sustainability Assessment / Background Data / Define Classifications
Assets / Asset Portal / Background Data / Define Classifications
Assets / Assets / Background Data - Assets / Define Classifications
Assets / Enterprise Assets / Background Data - Assets / Define Classifications
Create Classification Standards and Classifications
From the Define Classifications view, you can:
Create or Modify a Classification Standard
Create a Classification Standard
To create a classification standard:
-
Load the Define Classifications view from one of the above paths.
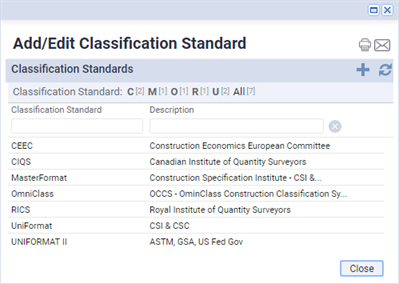
From the Define Classifications view, click the Classification Standards button in the Classifications pane.
The Add/Edit Classification Standard form opens.
-
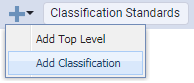
Click the plus sign.
The Classification Standard form opens in the right pane.
-
Enter the name of the standard, and a short description, then click Save.
The new Top Level classification appears in the list of standards on the left.
- Click Close to return to the Define Classifications view.
Edit an Existing Classification Standard
To edit an existing classification standard:
-
Click the Classification Standards button in the Classifications pane.
The Add/Edit Classification Standard form opens.
-
Click the Classification Standard name or description on the left.
The Classification Standard form appears on the right, with name and description filled in.
-
Edit the classification standard's name and description, as required, then click Save.
Modifications appear on the left.
- Click Close to return to the Define Classifications view.
Create a Classification
To add a new classification:
-
To start, open the Define Classifications view from one of the paths listed at the top of this topic.
The Define Classifications view displays two panes. Use the left pane to drill down through the classification tree, which shows the various levels of a classification. Use the right pane to enter classification data. For information about data that define each classification, see Classifications and Classification Standards: Overview.
-
Expand the desired Top Level in the left pane.
For this example, expand "0 Top Level MasterFormat."
-
Drill down through the tree in the left pane to find the classification under which you want to create a new classification.
This example creates a new Level 3 classification underneath CONCRETE / CONCRETE FORMS AND ACCESSORIES:
- Expand the desired Top Level to get started.
- Expand Level 1, 03000 – CONCRETE.
-
Expand Level 2, 03100 – CONCRETE FORMS AND ACCESSORIES.
Note the number already in use for a Level 3 classification: 03150 – CONCRETE ACCESSORIES. You will want to follow a similar numbering convention for the new Level 3 classification you are creating.
-
Click the plus sign, then select Add Classification in the drop-down list.
-
In the right pane, enter a value for the Classification Code that corresponds with your current position in the hierarchy, and which is not already in use.
In this example, you might enter a value of 03155.
-
Enter a description of the new classification. For this example, Concrete Forms would be appropriate.
If you have a license for the Extensions for BUILDER™ SMS, you can additionally complete BUILDER™ SMS Component Type Code.
-
Click Save at the upper right.
The new classification appears in the classifications list, under the level you selected.
Create a Top-Level Classification
The above example shows creating a Level 3 classification.
However, in other circumstance you might be creating a top-level classification. In this case, click the Add Top Level button. A Top-Level Classification is typically the name of the classification standard. When you create a top-level classification using this view, you cannot delete the Top Level classification later, or change its Classification Code from this view. To make these changes, load the Classifications table in Smart Client and make your edits there.
Edit an Existing Classification
To edit a classification code or description:
- Click the expand button at each level of the classifications list, to show the classification you want to edit.
-
Click the desired classification.
Its current values appear in the right pane.
-
Edit the Classification Code and Classification Description, as required.
-
Click Save at the upper right.
Modified entries for the selected classification appear in the left pane.
See also
Classifications and Classification Standards: Overview