Sustainability & Risk / Hazardous Materials / Objectives
Use Case: Develop an Inventory of Hazardous Products and their SDSs
Objective
To get started with the SDS application, and to comply with regulations, you will need an inventory of the hazardous products stored and used at your facility and their corresponding SDSs. You might prefer to develop this information incrementally.
Solution
You can begin by developing a list that identifies:
- the product
- the manufacturer
- the supplier
- the location where the products is used
- the location where the products is stored and the quantity stored
Every manufacturer of a potentially hazardous product is required to provide a standard set of information that is included in the SDS. This information can be obtained from the manufacturer, or the supplier, or may be available in a library of SDS information. As you are generating your inventory, it is a good practice to note your source for the SDS to have as a reference when updating information..
A benefit of the system is that you don't have to enter all of the detail at the outset. It might work better for you to start out slowly by just entering the identifying information and loading the manufacturer's SDS. Having just this information provides major advantages over storing only a hard copy of the SDS. You can then tackle the additional information in separate phases. Although, it is not necessary to enter detailed information, in general, entering more details into the system increases your ability to analyze and quantify hazards at your facility.
Developing your Inventory Incrementally
The following describes how you can develop your inventory incrementally:
Phase 1: Identify and catalog the SDSs
However, it is more common for facilities to have hundreds or thousands of hazardous products that are used and stored in many locations throughout a site. Consider a substance such as toilet bowl cleaner -- a common cleaning agent that may be present in every janitorial closet in the facility. The binder method requires a lot of leg work to get the SDS to the location, and then continual review to make sure no one walked off with the binder or tore the toilet bowl cleaner SDS sheet out. If all you do is enter identifying information and upload the SDS, you are ahead of the paper process because personnel can access the SDS from their mobile devices (if integrating the Hazardous Materials mobile app) or from anywhere there is a network-connected workstation.
Phase 2: Associate SDSs and their products with locations
Further benefits can be gained by expanding on the basic "identify and catalog" approach. In addition to storing the manufacturer's SDS, you can associate products with specific locations in your facility -- as general as a complete building or floor, or as specific as a room, cabinet, shelf, and bin. If you have the Hazardous Materials mobile app, you can have safety auditors visit each location and record this data. See Inventorying Hazardous Materials with the Hazardous Materials mobile app.
Having location information gives you the ability to locate those hazardous products using different methods:
- Reports:
- On a floor plan - SDS Locations Highlight
- On a map - SDS Geographic Drill-Down
Phase 3: Develop detailed data
To further develop your data, you can also enter the hazard classifications, constituent chemicals, and physical properties associated with each product. Having this data gives you more capabilities for evaluating potential hazards, assisting during an emergency response, locating specific chemicals, and generating chemical inventory reports. Often, this additional data is readily available on the manufacturer's SDS and additional research is not typically needed.
Step 1: Develop Background Data
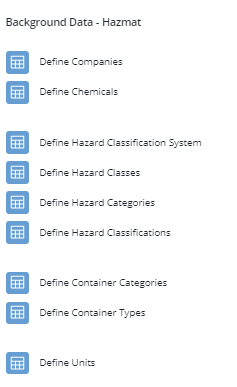
The process of entering SDSs will be more streamlined if the background data is entered into the system first. Once you have identified your initial objectives, you will want to make sure the appropriate background data is in the system. Background data is managed in the Background Data - Hazmat process, and includes company, chemical, hazard classification, container and unit data.

For details, see:
Overview: Background Data - Hazmat.
Define Hazard Classification System
- Define Hazard Classes
- Define Hazard Categories
- Define Hazard Classifications (define all levels at once)
Step 2: Define SDSs and Assign Products to Locations
In general, facilities need a separate list of hazardous products for each work area. Each list identifies the corresponding SDS for each product. The safety and health manager is responsible for maintaining a master list of these products. You use the Define Materials and Safety Data Sheets (SDS) task to enter definition and identification information for each product. Then, the Assign Material Locations or Assign SDSs to Floor Plan task can be used to enter multiple storage and/or usage locations for the SDS.
The hazardous products list must be available to all employees where that product is used or stored. In the Archibus SDS application, the SDSs Locations List task provides convenient access to employees to browse the locations that have SDSs assigned. In addition, employees can obtain a printable list of products to post at the location. They can also access the SDSs for the location by signing in to Archibus and using Retrieve SDS to perform a search.
Procedure
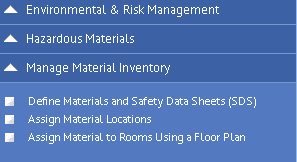
The Manage Material Inventory process provides the access point for the tasks needed for defining SDSs and assigning them to locations.

- Obtain the SDS for the product to be entered. (Examples are available at Dow Chemical Safety Data Sheets & Product Finder).
- Navigate to Define Materials and Safety Data Sheets (SDS) task so that you can enter the SDS information. Five tabs help organize the data entry:
- SDS - complete all the fields with available information from your SDS document.
- Document - upload a copy of your SDS document.
- Hazard Classification - enter the hazard classification(s). The SDS may present one or more sets of classification criteria, and will usually name the system (for example, HMIS, NFPA, or GHS are the most common, with GHS becoming most common).
- Constituents - enter details about any hazardous chemical ingredients listed on the SDS.
- Physical Properties - record any provided details about physical properties like Volatile Organic Content (VOC), vapor density, specific gravity, flashpoint, and physical state. Click Save to save changes.
- Assign products to a location housing this substance and enter the quantity of the substance using these methods:
- Assign Materials to Locations Using a Form to assign products to one or more locations using a form.
- Assign Materials to Locations Using a Floor Plan to select products to be assigned to rooms on a floor plan.
Step 3: Prepare Location Reports
Typically, facilities will keep a hard copy of the SDSs for all of the products used in a location. The hard copy guarantees that workers can access the SDS information even if the computer is down. It is also a backup for cases where someone may not be authorized to access the computer. To prepare a list of products at a location use the Print SDSs task.
- Select the Review Material Inventory / Print SDS task.
- Use the Filter console to isolate the location of interest (buildings, floor, or room) by selecting the location and clicking Show.
- Select the SDSs to be printed.
- Click Print Selected SDSs. The print action outputs one copy of each unique SDS in the selection.