Space / Space Planning / Examples
Real Property / Advanced Forecasting / Advanced Portfolio Forecasting / Examples
Example 1: Plan for a Growth Forecast and Acquire New Space
This example walks you through creating a 5-year space forecast to reflect an annual increase in headcount. By developing this portfolio scenario, space planners can determine if they need additional square feet (new leased or owned buildings) to accommodate the projected increased headcount.
Step 1: Create the Space Forecast by Business Unit
First, define the projected growth for each period by developing a forecast.
Note: A forecast is a special type of space requirement, so you will see the term "space requirement" in the interface as you work through this exercise.
- Run the Space / Space Planning / Space Planner / Define Space Requirements task.
- Choose Add New.
- Complete the form with these values:
| Field | Value |
|---|---|
| Title | 5 year forecast |
| Description | 5 year forecast for SRL by business unit and employee headcount |
| Level of requirements | Business unit |
| Summarize allocation | Yes, by building and floor |
| Summarize space from | Employee as headcount |
| Select floors | Building SRL (all floors) |
- All business units in building SRL are now part of the space forecast data. The system moves you to the Edit Requirement tab so that you can define the forecast for each business unit.
- In the grid, select a business unit, such as Corporate, and complete the form with information about the forecast.
- Since you elected in step 3 to summarize space from employee headcount, as you complete the forecast you will be estimating the projected employee headcount for each business unit for the selected period. As you complete the forecast, note that the value you enter for a Period is the total headcount after the increase from the previous period; it is not the amount of the increase.
- Note the Standard Area Ft field in the below form. In this case, it is 100 square feet for each employee of the Corporate business unit. The system uses this amount to calculate the required square footage per business unit.
- Be sure to complete Unit Headcount with 1.0 to represent that the period values reflect 1 unit; that is, Baseline refers to 461 employees (461 x 1).
- Define five forecasts for CORPORATE, increasing each Period value from the previous, as shown in the below form.
- Repeat for the other business units in the forecast. To reflect a gradual increase in required space, complete each Period value with an amount higher than the previous Period value. For example, the screen captures used in this example increased each period value by an average of 70 people.

- When through defining the forecast requirements, move to the Chart tab so that you can graphically see how the forecast areas change over time.
- Set the filter to show the Baseline and Period 1 through Period 5.
- Notice the trend of your increased required space.
- Hover over a point on the graph to see the exact space requirement for a business unit for a particular period.
Step 2: Create a Portfolio Scenario
Create the portfolio scenario in which the space forecast will be used. The portfolio scenario is the tool that you use to work with stack plans, view gap analysis charts, work with different what-if scenarios, ans so on.
- Run the Space / Space Planning / Space Planner / Space & Portfolio Planning Console task.
- Choose Add and complete the Add Portfolio Scenario form.
- Enter a Portfolio Scenario name of your choice (this scenario will not be linked to a project so the name does not need to match a project name).
- Enter Business Unit as the level since your space forecast (space requirement) from Step 1 is at the business unit level.
- Keep the default start date of today.
- The system moves you to the Stack Plan tab.
- Since the space forecast uses the SRL building and floor data, you need to add this building to the portfolio scenario. Choose "Add New/ Buildings and Floors" from Inventory and choose building SRL.
- Building SRL and its floors are now part of the portfolio scenario. The system displays a chart of the current building allocation rate.
- Display SRL's stack plan by clicking on Display in the Allocated Buildings pane. The system displays the stack plan in the lower pane. This stack plan is showing how space is currently allocated in building SRL.
Step 3: Add the Space Requirements to the Portfolio Scenario
You now need to bring the space forecast into the portfolio scenario.
- Click the “Space Requirements: Add” button, located in the Stack Plan panel.
- The system presents the Allocate Requirements form so that you can specify the start date and event name for each allocation period.
- Complete the form similar to below.

- Note that the form presents 5 periods because you defined 5 periods in the space requirement forecast. Recall, when you defined the space requirement forecast, you simply completed the Period fields with expected growth values; you did not define the time frame for these periods. With the above form, you are associating Periods with time frames and events.
- Once you process the form, the system adds the events to the Events pane at the top of the Space & Portfolio Planning Console.
Step 4: Review the Forecast Space Requirements on the Stack Plan
The Events pane now lists the Events that you created in Step 3 above. In the Events pane, drill down to a forecast event, such as 2019 Forecast, and the system updates the stack plan to show the required forecast space as of this date.
- Display the Unallocated building if it is not already displayed by clicking "Display" in the Allocated Buildings pane.
- Select a forecast event, such as 2017 Forecast or 2019 Forecast from the Events pane.
- In the Stack pane, the system updates the stack plans for SLR and Unallocated to reflect the forecast space. The system adds the baseline allocations to the SRL stack plan, and adds the extra forecast space to the Unallocated building.
For example, the below image shows the forecast space for the 2017 Forecast. In the SRL stack plan, the system has added the baseline allocations to the floor bars; it has placed the additional new space in the Unallocated building.

As another example, as shown below, you can review the 2020 forecast event and can see the maximum amount of space you need to fulfill this forecast in 2020.

At this point, you could start to drag the allocations from the Unallocated building to the SRL building to determine if SRL can accommodate this space in the configuration that you desire. However, suppose you are interested only in seeing a broad impact of the forecast on space availability. In this case, you can move to the Gap Analysis chart and not worry about placing the forecast allocations in your current buildings.
Note: For more information on how the system works with the imported requirements, see Add Space Requirements to a Portfolio Scenario.
Step 5: Review the Forecast Space Requirements in the Gap Analysis Chart
- Click on the “Gap Analysis” tab.
- Note the total allocated area in the scenario increases with each period with a corresponding increase in the allocation rate because capacity stays the same.
- Hover over 2020 (forecast Period 5). If you gradually increased your headcount for each period as directed above, it is likely that in 2020 (5th period), you will see that the allocated area becomes greater than area capacity. For example, below you can see that the allocation rate is 101%. (This was obtained by increasing each area value by an average of 70. Depending on the values that you entered in the forecast, your allocation rate will vary.)

Step 6: Add New Space to Accommodate the Projected Growth
As illustrated by the gap analysis chart, you will need to acquire some new owned or leased space before the start of Period 5; otherwise, there will not be enough space to fit the projected additional headcount.
One way to handle the shortage of space is for the company to obtain new leased space in the 4th period (2019) in order to ensure that space is available for the 2020 projected forecast.
You can add new space to the portfolio scenario to reflect the new space you need to acquire.
- Return to the Stack Plan tab.
- Click the Add New button in the Allocated Buildings pane and select New Space.
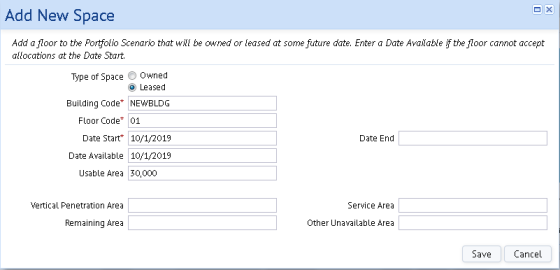
- Complete the “Add New Space” form.
- For example, suppose that you want to lease 30,000 sq. feet of usable area in a new building , and you want the lease to start on 10/1/2019 so that you have time to prepare the space for the new hires in 2020.
- Since you don't know other properties about the space to lease, you can assign a building name such as NEWBLDG and leave the other fields empty, or complete them with values that you can later edit once you obtain the lease.
- You do need to enter a Start Date. In the below example, Date Start reflect the desired date for the lease for this new space.
- The Space & Portfolio Planning Console now includes a stack plan for NEWBLDG and the Events pane includes an event for adding this leased space. in 2019.

- You can now move to the Gap Analysis tab, and you will see that you have adequate space for your projected needs in 2020.
Suppose you do not wish to acquire new space, but work within your current space. Example 2: Plan for a Growth Forecast Using Existing Space example outlines this use case.