Space / Space Planning / Examples
Real Property / Advanced Forecasting / Advanced Portfolio Forecasting / Examples
Example 4: Join Together Different Staff as a Functional Group
In Example 3: Join Together Different Departments as a Functional Group, the members of the “Manufacturing Team” functional group belonged to different departments from the same business unit (Manufacturing). They were grouped together as a functional group so that they could be located together on the first floor.
Continuing with functional groups. this example shows grouping together in a functional group employees from across business units, divisions, departments, and buildings. This is a common use case for situations in which employees temporarily work together on teams for a special project
Step 1: Create a Portfolio Scenario
- Run the Space / Space Planning / Space Planner / Space & Portfolio Planning Console task.
- Choose Add and complete the Add Portfolio Scenario form.
- Enter a Portfolio Scenario with the name "Consulting Project”.
- In Portfolio Scenario Name, enter the same value as above or a more descriptive name if you desire.
- Enter Functional Group as the level.
- Keep the default start date of today. In the below images, you will see that the system date when these images were captured was 2016-01-15.
Step 2: Create a Space Requirement
When you create a portfolio scenario at the functional group level, the system automatically generates a linked space requirement of the same name. Therefore, you do not need to move to the Define Space Requirements task, as you do in Example 1 and Example 2. The system has already created the space requirement to which you can now add space requirement items.
- Move to the Space Requirement tab.
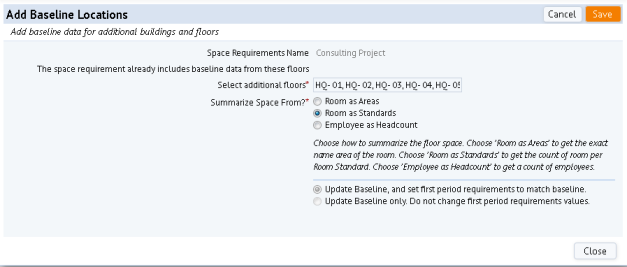
- Choose Add Baseline Locations. Note that resulting form lists the name of the linked space requirement (Consulting Project) that the system created in Step 1.
- Add building SRL (all floors) and HQ (all floors) to this space requirement, and select “Rooms as Standards” for "Summarize Space From."
- The system creates a space requirement item for each room standard of each department on each floor of the SRL and HQ buildings.
- Now, assign a set of space requirement items to a functional group entitled "Consultant Executive Team" by editing the Functional Group Title field of selected records, as shown in the image below,. When through, space of various departments belonging to different business units (SERVICES and CORPORATE) and from different buildings (HQ and SRL) will be part of the “Consultant Executive Team” functional group. To verify that you have edited the proper records, you may wish to set a filter on the Functional Group Title field and compare your results to the below image.

- If you specify that a department on a floor belongs to a functional group, you must define a functional group for all space requirement items for this department. That is to say, you cannot break some components of a department into a functional group but leave the other components at the department level; these leftover components must become their own functional group in order for the Sync action to operate. The Executive Management department on floor HQ-18 has a few more space requirement items. Assign these to the "Non-Consultant Executive Team" functional group, as shown below. Note that if you do not make this change, whey you Sync the system will prompt you to assign these items to a functional group.

Step 3: Sync the Scenario and Space Requirement
- Move to the Stack Plan tab.
- Click the “Sync” button to bring in the functional group space requirement.
- Enter a name for the allocation event, such as "Bring in Functional Group Requirements" and enter a date a few days after today's date.
- On this date, any differences from the baseline take effect.
- The image below shows the portfolio scenario after the sync. Note the following:
- In the stack plans for HQ and SRL, the system removed from the appropriate allocations the different departments that are now included in the “Consultant Executive Team” functional group.
- The system grouped these into a single stack element called “Consultant Executive Team”, and placed it in UNALLOC. You can hover over this element to see the contributing space.
- The Events panel shows the date (2016-01-17) for which you ran Sync and the system placed the new functional group on UNALLOC.
- The second functional group, Non-Consultant Executive Team, represents the other items on HQ-18 belonging to the Executive-Management department. This functional group remains on HQ-18 because its component values match the baseline. If you hover over the allocations in the HQ-18 stack plan, you will see it.
- The Events panel shows 2016-01-15 as the date space was added from inventory because this is the date that the system created the portfolio and the linked space requirement.

Step 4: Work with the Stack Plan
From this point on, continue with the same steps as outlined in Example 3. You can drag and drop the functional group from UNALLOC to any building in the scenario. The events will get updated in a similar manner as explained in Example 3.