Space / Space Planning / Examples
Real Property / Advanced Forecasting / Advanced Portfolio Forecasting / Examples
Example 3: Join Together Different Departments as a Functional Group
Suppose a company needs departments with different skills, but all belonging to the same business unit, to work closely together on the same product as a team. The team must be located on Floor 1 (the ground floor) in order to facilitate equipment and product transportation. To model this situation, you can develop a portfolio scenario that groups these departments as a functional group. In this example, you will determine if all departments of the Manufacturing business unit can fit on SRL-01 and the re-locations that must take place in order for there to be space on SRL-01.
Step 1: Create a Portfolio Scenario
- Run the Space / Space Planning / Space Planner / Space & Portfolio Planning Console task.
- Choose Add and complete the Add Portfolio Scenario form.
- Enter a Portfolio Scenario , such as "Manufacturing Reconfiguration."
- In Portfolio Scenario Name, enter the same value as above or a more descriptive name if you desire.
- Enter Functional Group as the level.
- Keep the default start date of today.
Step 2: Create a Space Requirement
When you create a portfolio scenario at the functional group level, the system automatically generates a linked space requirement of the same name. Therefore, you do not need to move to the Define Space Requirements task, as you do in Example 1 and Example 2. The system has already created the space requirement to which you can now add space requirement items.
- Move to the Space Requirement tab.
- Choose Add Baseline Locations. Note that resulting form lists the name of the linked space requirement that the system created in Step 1..
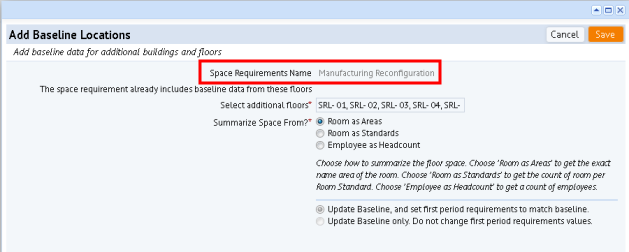
- Add building SRL (all floors) to this space requirement, and select “Rooms as Areas” for "Summarize Space From."
- The system creates a space requirement item for each department on each floor of the SRL buildings, as you can see in the below image.
- You can now edit the individual space requirement items to assign them to a functional group. Click on each of the individual departments that you want to include in a functional group. In the below image, the Electronic Sys- Administration department is being added to the Manufacturing Team functional group. When completing Functional Group Title, you can create a functional group by typing a value, or you can choose from existing functional groups using the ellipses button.

- Continue assigning the departments of the Manufacturing business unit to the Manufacturing Team functional group. Note that two manufacturing departments (accounting and operations-maintenance) that are already on Floor 1 are not included in the functional group since they will stay where they are.

Step 3: Sync the Scenario and Space Requirement
- Move to the Stack Plan tab.
- Click the “Sync” button to bring in the functional group requirements.
- Enter a name for the allocation event, such as "Bring in Functional Group Requirements" and enter today's date.
- On this date, any differences from the baseline (such as placing departments into functional groups) will take effect.
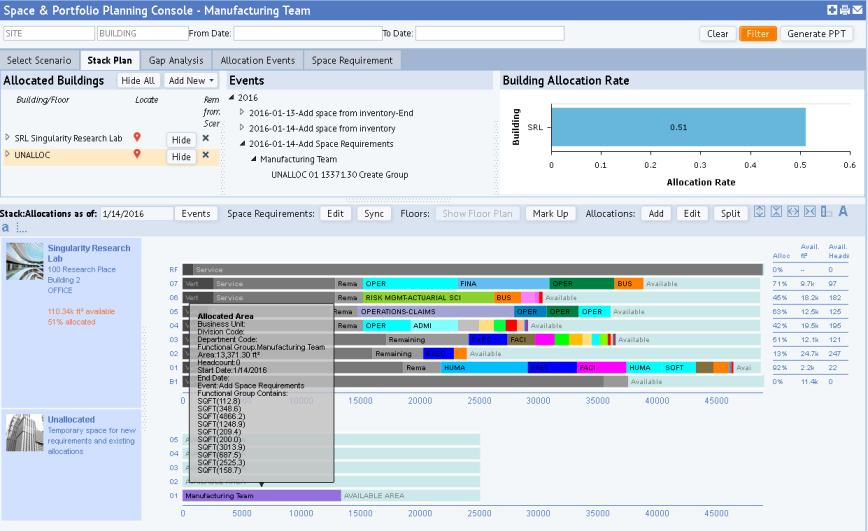
- Review the resulting stack plan and note the following:
- The system adds the Manufacturing Team functional group to the Unallocated building's stack plan so that you can place it. The component departments of this functional group no longer appear in building SRL.
- If you hover over the functional group, you can see the component departments that contribute to it.
- The Events panel shows the event date (2016-01-14) on which the functional group was brought into the scenario and placed in UNALLOC.
Step 4: Work with the Stack Plan and Review Allocation Events
- Drag and drop the non-manufacturing departments from Floor 1 to other floors to relocate them. As you drag the first item, the system will prompt you to enter an allocation event name. Enter "Relocate non-manufacturing" and enter a date later than today's date. For each subsequent stack element that you drag, the system automatically completes the Event Name and Date with these values. When through, you can review this event in the Events pane.
- Drag and drop the “Manufacturing Team” functional group from UNALLOC to SRL-01.
-
Now that you have cleared other departments from SRL-01 and placed the Manufacturing functional group, you can see that the departments of the Manufacturing business unit can easily fit here. By grouping into a functional group all of the Manufacturing departments that were not located on Floor 1, you were able to work with them all at once with one stack element.
- Move to the Allocation Events tab, and in the left pane sort by Event Date.
- In order to clear SRL-01 and make space for the Manufacturing business unit, you moved the existing allocations on SRL-01 to various floors. You can review these changes in the Allocation Events tab.
- For the Add Space Requirements event, note that the event name for moving the Manufacturing Team from UNALLOC to SRL-01 has automatically been modified from "UNALLOC….. Create Group" to “Move from UNALLOC 01 to SRL 01”.
