Space / Occupancy / Client / Request Individual Move (Transactional)
Choosing the Destination Room from a Floor Plan Drawing
If you are running the Request Individual Move task, you can choose to select the destination room (the room to move to) by choosing it from a form, or choosing it from the floor plan drawing.

Procedure
- From the Request Individual Move task/Detailed Request Information tab, choose Show Floor Plan.
- The system presents the Select Assignment from which you can select a floor plan drawing.
- The form presents a filter console, and a drill-down tree for selecting the floor plan.
- Automatically, in the drill-down pane on the left, the system presents only floors that have available rooms. However, if you still have several records to drill through, you may wish to use the filter at the top of the view. The filter further limits the drill-down frames to showing just the data that you indicate in the filter.
- For example, if you have availability in multiple floors and want the drill-down frames to present only floors in the HQ building, set the Building Code to HQ in the filter console.
- In the left panel, drill down to select the floor plan.
- The system displays the floor plan with its room numbers. You can optionally display additional labels by choosing the desired option from the Labels button above the floor plan drawing.
- For example, you may wish to see each room's department displayed in the floor plan drawing so that you can assign an employee to a room owned by the employee's department. Typically, you need to zoom into the drawing in order for this information to display.
- If you don't want to zoom into the drawing to see these labels, you can still access this information by hovering over the room.
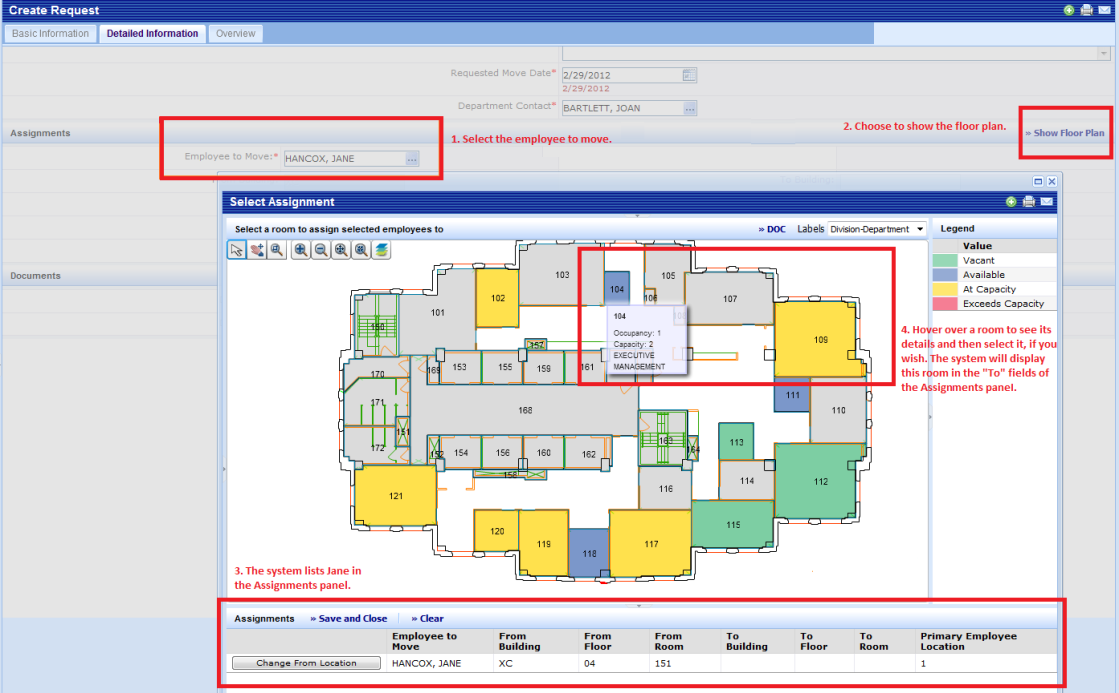
- For example, if you choose Department as the label, you can hover over a room and the system will display the names of department currently assigned to this room, as per the above image.
- In addition to the type of information that you choose in the Labels option, the system displays the Room Capacity and Room Occupancy.
- Examine the floor plan. The system highlights available rooms for this employee, based on criteria described below. All rooms not meeting this criteria are displayed in gray. The legend to the right of the drawing indicates the highlight color for each status. A room is considered to be available to an employee if it:
- has available capacity on the date of the requested move. For information on room capacity, availability, and vacancy, see Occupancy (Concept).
- has a room standard that is appropriate for the employee standard of the person requiring the room. The system uses the rmstd_emstd table and adheres to the to the below rules. These relationships are established with the Background Data/Assign Employee Standards to Room Standard task
- Employees with Employee Standards that are not listed in the rmstd_emstd table can have a room of any room standard
- Rooms with Room Standards that are not listed in the rmstd_emstd table can be requested by any employee standard.
Note: If you have access to the Space Manager process, your drawing will show the status of all rooms on the floor. You will be able to assign employees to over-capacity and at-capacity rooms, as well as rooms that do not match the employee standard of the employee being placed. This approach provides the Space Manager with flexibility in temporarily placing employees until more space becomes available.
- On the floor plan drawing, select the a room for this employee. If you wish, you may first hover over it to see its details. Once you click on it, the system displays a yellow highlight and updates the Assignments form to include this room in the "To" location fields. If you change your mind, simply select another room in the drawing.
- For example, in the above image, if the user selects the room they are hovering over (room 104), in the Assignments panel the system will complete the "To" fields for Jane Hilcox with HQ-19-104.
- If the room has more than one available space, the system prompts you to choose the part of the room that you want to associate with this employee. For example, if the room currently has no occupants, has a capacity of 3, and has Percentage of Space values of 30, 20, and 50, you can choose which percentage you want for this employee.
- When you are satisfied with your assignment, choose the Save and Close button located above the assignment.
- The system moves you to back to the Request Individual Move task / Detailed Information pane. The selected room is listed as the To Location.
- Go back to the Request an Individual Move topic for information about finishing your move request.