Archibus SaaS / Space
Space / Space Inventory
Open Plans with Workstations
Organizations often need to account for the same space in different ways. To negotiate housekeeping contracts or to perform energy analyses, they need to sum the physical area. Yet to allocate space and charge departments for the use of space, they need to assign portions of the same areas, such as workstations, desks, or lab benches, to a department. Other organizations might be interested in a department's number of seats, rather than its area.
To accommodate these situations, you can create an open plan with workstations.
This topic has the following sections:
- Open Plans
- Example 1: An Open Plan Used in Team Space
- Example 2: An Open Plan Used by One Departments
- Example 3: An Open Plan Used by Multiple Departments
- Drawing secondary circulation in open plan areas using AutoCAD REGIONS
- How to select a workstation in the floor plan when there is an overlapping open plan area
Open Plans
You can distinguish physical spaces (such as open plan areas) from logical spaces (such as workstations) by developing an open plan area room along with its component workstation rooms and using the Room Category to classify each space. With this "room within a room" approach, the inventory includes rooms for purposes other than rolling up their areas in space totals.
In the sample HQ project, you will see that the Room Category table offers OPENPLAN, OPENWKSTN, and WORKSTATION room categories for implementing this type of situation. A room category's Calculations Used In field ensures that the areas are not accounted for more than once.
Note: The above diagram labels the area between the rooms as secondary circulation area. The below discussion outlines different ways you can account for secondary circulation area in an open plan with workstations.
Example 1: An Open Plan Used by Team Space
When working with the Team Space features, you might have several workstation areas within an open plan area. If you wish, you can track each workstation as a room. However, tracking the workstation area as one room and noting the occupancy of this area is usually sufficient when working with team space.
The NCO5-03 floor plan in the HQ project has examples of workstations tracked as individual rooms (WORKSTATION room category) and workstations tracked as one room (OPENWKSTN room category).
In the image below:
- The work area located to the left depicts tracking each workstation as its own Room record. The CAD user has polylined each individual workstation and created three Room records for them. In this case, each room will have an Occupancy of 1.
- The work area located on the bottom right depicts a work area with three workstations (three seats) tracked as one room. In this case, there is one Room record whose occupancy is set to 3.

In general, follow these steps to create an open workstation floor plan which can be used for team space:
- Draw your open plan rooms, that is rooms that will house multiple employees but be counted as one room. Assign them a Room Category of OPENWKSTN.
- Note that your open plan rooms will be included in area calculations because the OPENWKSTN Room Category has Used in Calculations set to "All Totals."
- Data number the open plan room polyline so that it becomes an asset symbol and is registered in the database.
- If the rooms will be used exclusively for team space, you can choose to not assign them a division and department; they can get an organizational assignment “indirectly” through the team associations. However, if you wish, you can assign divisions and departments, just like you do for other rooms.
- If you want to track the individual seats for some open plan rooms (such as depicted in the left-most room, above), polyline the workstation areas within the open plan room. This is handy for having the locations available for operations work. Assign these rooms to the WORKSTATION room category.
Example 2: An Open Plan Used by One Department
If all workstations in the open plan are used by one department, then you may want to assign the entire open plan room to the department. You would draw your workstations to have them available as rooms for operations (for example, so that you can assign maintenance work to these workstations), but would exclude the workstations from all area calculations. Secondary circulation area (the area between workstations) would be charged to the department.
In general, follow these steps:
- Draw your open plan room. assign it to a department, and assign it a Room Category of OPENPLAN. Complete the Occupancy field with the number of seats in the room.
- Set your Open Plan room to be included in area calculations by editing the OPENPLAN record in the Room Categories table and setting the Used in Calculations field to "All Totals."
- Draw your workstation rooms within the open plan room so that you have the locations available for operations work. You do not need to assign these rooms to departments. Assign these rooms to the WORKSTATION room category.
- Flag workstation areas to not be included in calculations by editing the WORKSTATION record in the Room Categories table and setting the Used in Calculations field to "No Totals."
- Since the workstations are not used in area calculations, you do not need to track the secondary circulation area; it is included in the overall room plan area.
Example 3: An Open Plan Used by Multiple Departments
If your open plan area is used by more than one department, then you can draw the open plan area as a room so that you have it available for operational tasks, such as housekeeping tasks, but you must exclude the open plan from calculations. You would then draw your workstations as rooms, assign them to departments, and use them to calculate area.
In general, follow these steps:
- Draw your open plan room so that you have it available for operations work. Do not assign it to a department, and assign in a Room Category of OPENPLAN. The Open Plan room does not need a proration assignment since it will not be used in calculations.
- Set your Open Plan room to be excluded from area calculations by editing the OPENPLAN record in the Room Categories table and setting the Used in Calculations field to "No Totals."
- Draw your workstation rooms within the open plan room. Assign these rooms to departments and assign these rooms to the WORKSTATION room category.
- Flag workstation areas to be included in calculations by editing the WORKSTATION record in the Room Categories table and setting the Used in Calculations field to "All Totals."
- For your common area workstations --for example, those housing printers or faxes used by all departments -- set their prorate as you would any common area. Do not assign them to a department.
- You have a few methods available for handling secondary circulation area -- the area between the workstations within the open plan:
- You can choose not to draw it. In this case, it will be included in the floor's remaining area.
- You can outline it in the drawing as a room, include in all calculations, and assign it a department.
- You can outline it in the drawing as a room, include in all calculations, and consider it as common area and prorate it.
Drawing secondary circulation in open plan areas using AutoCAD REGIONS
To outline secondary circulation in open floor plans, you can draw accurate polylines for secondary circulation using AutoCAD REGIONS. This means you do not have to use "lolypop" plines -- polylines that have concavities to subtract the enclosed areas.
Manually-created regions can also be used for other space planning situations, such as chargeback. Just as you can prorate a polylined area, you can prorate a region to all departments in a floor, building, or site. For example, if you are using the BOMA method of cataloging space, you could use regions to capture all circulation areas, and then prorate that space as needed to all departments on a floor. If the circulation needs to be prorated to only two departments in a certain area of a floor then multiple "outer boundaries" would need to be created.
Important. Use the steps documented below when creating the secondary circulation manually. If you create the regions without first copying them and moving them to a prototype layer, there is the potential to accidentally replace your current rm polylines.
Note: For organizations using the Post Secondary Classification Method for space (FICM), manually creating regions for secondary circulation would not be desirable since walls are excluded in this standard.
Tip: For regions that must be manually prorated to just two adjacent departments, or for finer classification of secondary circulation, the CAD specialist can split the region as follows.
1. Copy the region entity to be split.
2. Draw a temporary region over the area that should not be included.
3. Use the SUBTRACT command to subtract that area from the region.
To create regions manually for secondary circulation:
- Copy the outer room boundary of the open plan area to a new layer.
- Copy the enclosed workstation boundary to this same new layer.
- Use the REGION command to convert all polylines to a region.
- Invoke the SUBTRACT command:
- Select the outer room boundary of the open plan area as the "subtract from" region
- Select all the enclosed workstation boundaries as the "items to subtract"
- Copy the resulting region to the RM layer.
- Use Edit Data to number and catalog the region as secondary circulation.
The Smart Client Extension for AutoCAD will:
- Catalog the region with the database with the correct area (that is, the area of the outer room minus the area of the enclosed workstations).
- Publish the outer boundary of the region to the .json enterprise graphics file.
- When assigning highlight colors:
- assign the secondary circulation area a lighter color
- assign the enclosed workstations a darker color
In this way, the workstation highlights will always show, even though the region publishes as just its outer boundary.
Note: Even though the region publishes the outer boundary, the area of this secondary circulation in the database is the correct area.
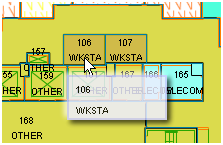
How to select a workstation in the floor plan when there is an overlapping open plan area
With an open plan and workstations as described above, you need to take care when selecting the workstation and the open plan area.
The change in color of the selected area gives you immediate feedback as to which area you have selected. You can also watch the tooltip: when the cursor is directly over the workstation’s labels, a click will select the workstation.
For instance, click with the tooltip as shown below to select the open plan area:

Click with the tooltip as shown below to select the workstation area: