Capital Projects / Projects / Execute / Management Console
Capital Projects / Projects / Manage / Management Console
Project Dashboard
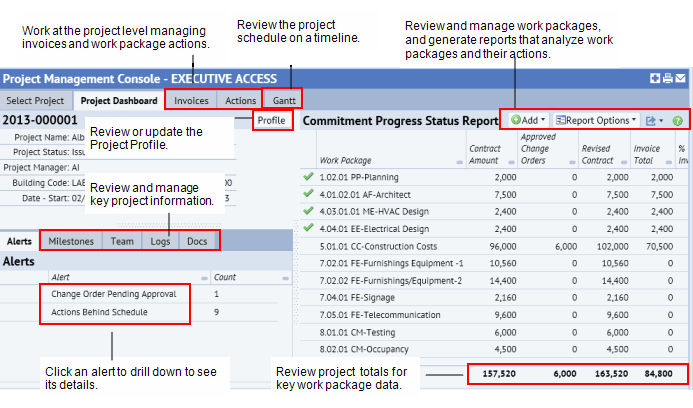
The Project Dashboard summarizes the most important project data in a single dashboard view. From the dashboard, you can review and manage comprehensive information for a project:

Use the Profile button to open the complete Project Profile. The Profile includes detailed data, such as documents, costs, contacts, and the Project Manager for the project. Entering the Project Manager is important because for Manager access certain views are restricted to show only projects for which you are the Project Manager.
You can also update the Project Status from the Profile. For example, you can update the Project Status to Approved - In Design. Or, you can adjust the Date - Target Completion if this date has changed. Having accurate Project Status enables you to review projects by their status in the Project Status report. Also, the Project Analysis report provides the % variance for projects in the Design or Execution phases. These phases are based on Project Status.
The Project Dashboard includes the following tabs at top of the dashboard.:
- Manage invoices: Review all invoices for the project, or filter by Issued or Approved, vendor, or work package. You can add or edit invoices, and approve them if needed, and can export the data shown to XLS or DOCX format. Tracking invoices is key to ensuring that project's stay within their budget or revised contract amount. See Managing Invoices.
- Manage actions. Review all actions by work package for the project, or filter by the dates for which the action item is scheduled, completed, on-hold, or overdue, by work package, or action type. You can add or edit actions, bulk update them, such as by updating the action's status or completion date. Copy baseline estimates from one action to others that you select. Export or import data from MS Project. Add action items for the project. See Adding and Updating Actions from the Management Console.
- Review a Gantt chart for the project. The Gantt chart provides a quick and easy visual representation of how project action items are proceeding, and enables you to find critical dependencies that need to be expedited so that the schedule is not adversely affected. See Estimating Design Schedules.
Alerts help focus your attention on the projects most needing it. From the Project Dashboard, you can review a list of alerts for the project. Clicking an alert brings you to a more detailed list for the items contributing to that alert. Clicking on an item in the list brings you to an edit form from which you can work with a specific item. See Drilling Down to Manage Alerts.
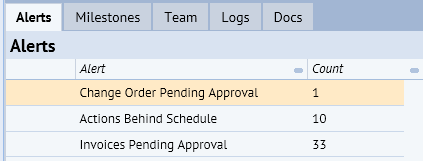
The following alerts are available in the Project Dashboard:
- My Open Tasks: Action Items which have been assigned to you and have not yet been completed. Actions are assigned to a user using the ‘Assigned To’ field in the Edit Action form.
- Work Packages Out for Bid. This alert lists the Work Packages which have been set to status ‘Approved-Out for Bid’. It enables you to monitor how many bids have been collected for a Work Package by looking at the ‘# Bids Submitted’ value. After the bids have been collected, one of the bids will need to be selected and Approved.
- Contracts Pending Signature. After a Work Package bid has been approved, the Contract must be signed. This involves entering final contract details, such as the Contract Amount. Note that the Contract Amount on the Project Dashboard will remain as zero until it is updated when the Contract Status is 'SIGNED.'
- Change Orders Pending Approval: Change Orders are pending approval if they are set to a status of ‘REQUESTED’. This can happen if the Change Order was:
- recorded by an admin or the Project Manager who in turn is waiting for a supervisor to approve the Change Order
- entered by a Vendor using the Contract Process. This Process is designed to be used by outside Vendors who have logged into Web Central. This Alert highlights those Change Orders that a manager needs to review, and then Approve or Reject. Only Approved Change Orders are factored into the calculation of the Revised Contract Amount, as listed on the Project Dashboard.
- Actions Behind Schedule: Lists actions which are not Completed or In Progress, but which should have been started based on their Date to Perform.
- Actions on Hold: An Action Item’s status can be set to On Hold to indicate that progress has been temporarily halted.
- Invoices Pending Approval: Invoices are pending approval if they are have been set to a status of ‘ISSUED’. This can happen if the invoice was
- recorded by an admin or the Project Manager who in turn is waiting for a supervisor to approve the invoice
- entered by a Vendor using the Contract Process.
- High or Urgent Priority Logs: This is a way to alert others to or to remind yourself of issues that are urgent and need attention. Logs are recorded using the Logs tab in the Project Dashboard.
The Alerts section includes a series of tabs that enable you to store key information for your project. The following shows the Milestone, Team, Logs, and Docs tabs next tot he Alerts tab in the Project Dashboard.

Milestones
From the,Milestone Tab, you can add or edit milestones that mark critical junctures in the project's progress. Milestones are project action items, but with a special Action Type of ‘PROJECT – MILESTONE’. Create milestone actions to help you track project progress.
Milestones with a status of Completed or Closed, or with a Percent Complete value of 100% are marked with a green check mark.
Manage team members
From the Team tab. , you can add or edit information for team members. These team members can be company employees, or people outside the company – vendors or other contractors.
Note: When adding a Vendor, Craftsperson or Contact, you can select an existing value in the database or add a new value by clicking Add New.
To add a team member:
- From the Project Dashboard, select the Team tab in the lower left pane.
- From the Team tab, select Add > and then select Employee, Vendor, Craftsperson, or Contact from the list.
The list of available team members of the type selected appears.
- Click ‘Add New ...’.
The appropriate form appears.
- Select the check boxes for the team members you want to add, and click Save Selected.
The team members are shown in the list in the Team tab. They are added to the database as a contact, craftsperson, vendor, or employee. For proposed projects, the team members are also added to your Project Team, so that they can access the project.
Add project logs
From the Logs tab, you can add project logs to record the communications that you have had concerning a project. For example, logs can be used to attach amended or finalized contracts, to record that contracts have been signed and mailed, or to record project status notes. When you add the log, you can attach the document. After you have saved the log, its data becomes read-only except for the Priority setting:
To add a project log and attach a document:
- From the Project Dashboard, select the Logs tab in the lower left pane.
- Click Add, and select a communication type (Notice, Correspondence, or Meeting Notes) from the list that appears. To create a different type of log, select More Options and select from the longer list of Communication Types on the Add Communication Log form.
- Enter the Comm. Log Code. This is the unique identifier for the log.
- In the Summary field, enter the description of the communication.
- Select a priority for the log. Select a High or Urgent Priority setting to have the log appear with a star icon that indicates it is a project Alert.
Note: The only thing you are able to change after saving a log is the priority. If an issue has resolved, you would want to change the priority level to remove a log from the Alerts.
- Click Save.
The Edit Details tab appears.
- On the Edit Details tab, enter additional information, such as the Contact Code, and if this item is associated with an action item, select the Action Item ID. When you click the Select Values button for the Action Item ID list, a selection form shows action items defined for the project.
- To attach a document, click the Check in New Document arrow next to the Document field.
- Optionally, enter a Description. For example, if you are attaching a document, describe what information the document contains.
- When you have added all information and attached the document, click Save on the Edit Details tab. Be sure that all information is entered and any documents are attached before clicking Save, as you can edit only the Priority for a log after you have saved it.
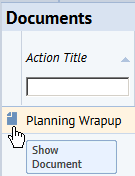
Attached documents can be opened directly from the grid by clicking on the document icon.
Store documents for project actions
From the Docs tab, add or edit any documents or drawings associated with any action for the project. Documents added from this tab are also project action items, but with a special Action Type of ‘PROJECT – DOCUMENT’.
Note: The Docs tab also shows documents included with any type of action. Since both Milestones and Change Orders are types of actions, documents stored with either of these are shown here.
Note: If you create an action to store a document or drawing, it should be used specifically for this purpose. You should not assign any additional values to this action.
To add and view a document:
- From the Project Dashboard, select the Doc tab in the lower let pane.
- Click Add.
The Document Profile form appears.
- Enter an Action Title that clearly identifies the action the document is for.
- Select a work package and project phase from the list.
- Click Save.
The Attach tab appears.
- Click the Check in New Document arrow next to the Document field, and locate the document.
- Click Save on the Attach tab.
- Attached documents can be opened directly from the grid by clicking on the document icon.

To edit document details:
- Click on the record for a document in the grid.
The Edit Document Details form appears.
- You can edit information for the progress, location, costs, or the description for the action item associated with this document.
- Make changes and click Save int he Edit Document Details form.
The Project Dashboard includes the Commitment Status Summary report. This report summarizes the costs and progress of each work package. A green check mark indicates that the work package is completed. A work package that is 100% Invoiced is assumed to be Completed. See Commitment Progress Status Report.